
Category: Longform
You are viewing all posts from this category, beginning with the most recent.
🛜OpenWRT and Common Internet File System (CIFS)
This protocol is based on the widely used samba protocol. CIFS is a network protocol for sharing files, printers, serial ports, and other communications between computers. I gonna use this protocol to connect my NAS device to my OpenWrt-powered box.
Installing the packages
To get everything up and running, we need to install the following package on the linksys device, kmod-cifs_2.4.30-brcm-5_mipsel.ipk. If you wish, you can also install the mount helper package, cifsmount_1.5-2_mipsel.ipk. I decided not to do so.
A quick check
If we want to do a quick check if all is working, follow the following procedure.
root@Hellhound:~# insmod cifs
Using /lib/modules/2.4.30/cifs.o
Make a directory to mount the share on the remote machine.
root@Hellhound:~# mkdir /tmp/mnt
Now we can try to mount the share.
root@Hellhound:~# mount -t cifs //192.168.1.2/share /tmp/mnt -o unc=\\\\192.168.1.2\\share,ip=192.168.1.2,user=admin,pass=geheim ,dom=workgroup
Just double check it is mounted.
root@Hellhound:~# df
//192.168.1.2/share243748864 46485504 197263360 19% /tmp/mnt
Setting up the system
The above mount command is a hell of a command to execute every time you need your NAS device to be connected to your OpenWrt box. So, we are going to make life a little easier for yourself. We will edit the /etc/fstab. If you don’t have a fstab file, make one now. To the fstab file, we add the following line.
//192.168.1.2/share /mnt/bulky cifs unc=\\192.168.1.2\share, ip=192.168.1.2,user=admin,password=geheim,dom=workgroup,rw 0 0
The cifs kernel module does not need to loaded separately. The package also installs the file /etc/modules.d/30-cifs. This will load the module at boot-time. Now we can mount the share with the following command.
root@Hellhound:~# mount /mnt/bulky
Since OpenWrt does not execute the command
mount -a
at boot-time, the configured mount points in fstab are not automagicly mounted at boot-time. To solve this, I added the mount command.
mount /mnt/bulky
to the file /etc/init.d/S95custom-user-startup. 📚📖🎮
🛜OpenWRT and SNMP bandwidth monitor
I would appreciate it if we could monitor the bandwidth of the network devices in our wrt54gs. To do so, we need SNMP enabled on our device and some kind of application to monitor the snmp messages. I choose PRTG to monitor the SNMP messages sent.
Installing the package
We need to install the snmp daemon on OpenWrt. So, we require the following package, snmpd_5.1.2-2_mipsel.ipk. Optionally, you van install the package snmp-utils_5.1.2-2_mipsel.ipk. Since I have my router modded with the MMC/SD card mod, I am going to install the package on this card with the following command.
root@Hellhound:~# ipkg -d opt install snmpd_5.1.2-2_mipsel.ipk
In my case, this will install the package on the mount point /opt. I will refer to this in the paper. Change it to your setup accordingly.
Set up the package
Now we need to set up the snmp package. If you install it in the root of linux, there is no problem. But if you installed op your MMC/SD card you need to take some extra steps. First we have to copy the /opt/etc/default, /opt/etc/init.d and /opt/etc/snmp to the /etc directory. Now we have to copy the file /etc/init.d/snmpd to the file /etc/init.d/S60snmpd. After copying this file, we have to add 2 lines to the script. This is only needed for the ones who have installed the package on the MMC/SD-card. The new file will look like this.
#!/bin/sh

export PATH=/bin:/sbin:/usr/bin:/usr/sbin:/opt/bin:/opt/sbin:
/opt/usr/bin:/opt/usr/sbin
export LD_LIBRARY_PATH=/lib:/usr/lib:/opt/lib:/opt/usr/lib

DEFAULT=/etc/default/snmpd
LIB_D=/var/lib/snmp
LOG_D=/var/log
RUN_D=/var/run
PID_F=$RUN_D/snmpd.pid

[ -f $DEFAULT ] && . $DEFAULT

case $1 in
start)
[ -d $LIB_D ] || mkdir -p $LIB_D
[ -d $LOG_D ] || mkdir -p $LOG_D
[ -d $RUN_D ] || mkdir -p $RUN_D
snmpd $OPTIONS
;;
stop)
[ -f $PID_F ] && kill $(cat $PID_F)
;;
*)
echo "usage: $0 (start|stop)"
exit 1
esac
exit $?
You can also follow the instructions on this page. You will need the script in paragraph 4.3. So, you don’t have to follow the instructions pointed out above here. Just follow the instructions on that page in paragraph 4.3.
What’s next?
You can now reboot your router and the snmpd daemon will start automatically. Now it is time to set up a monitoring tool. I used PRTG, but there are others around. It is out of the scope of this paper to describe the use of PRTG. There is enough material around to help you on that one. 📝🖋️
🛜OpenWRT and Snort
Set up snort on OpenWrt
After installing the MMC/SD card mod, I have enough room to install snort on my wrt54gs. So, this paper will assume that the package will be set up on the MMC/SD card. Which is mounted on /opt. You can read about setting up the MMC/SD card on this page.
Installing the package
To install snort on your wrt54gs install the following package
root@Hellhound:~# ipkg -d opt install snort_2.4.4-1_mipsel.ipk
This will install snort in the directory /opt.
Remote syslog
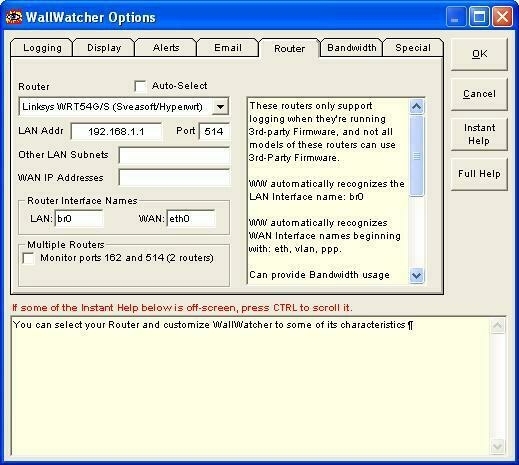
I want snort to log all its messages to a remote syslog server. I already discussed this on the page which discussed using fwbuilder with OpenWrt. Look on this page to set up wallwatcher.
Downloading rules files
We need to get some rule files. These rule files can be downloaded from the snort website. Download the snort 2.4 rule files from this website. These rule files need to be unpacked in the directory /opt/etc/snort/rules/
root@Hellhound:~# tar zxf snortrules-pr-2.4.tar.gz
Setting up snort
Now we have to set up the snort.conf file. In this file, many snort settings are configured. We want to set up snort in a way it will log all messages to our remote syslog, it this case wallwatcher. The first thing we have to do is to set the option HOME_NET
var HOME_NET 192.168.1.0/24
Next, we have to uncomment a line in the snort.conf file.
output alert_syslog: LOG_AUTH LOG_ALERT
We need to change the rules path
var RULE_PATH /opt/etc/snort/rules
At the bottom of the snort.conf there are a lot of rule files included. Make sure you comment all the rule files at first. Just to make sure that we do not flood the memory of the wrt54gs and hang the device when we start snort.
Make the directory snort in the directory /var/log
root@Hellhound:~# mkdir /var/log/snort
Giving snort a test run
To check if snort is running correctly on your device, give the following command on the prompt and open a website in your favorite browser.
root@Hellhound:~# snort -v -i vlan1
This will give you the following output
01/25-22:02:12.344117 195.37.77.141:80 -> 10.0.0.100:2053
TC`1 P TTL:46 TOS:0x0 ID:55048 IpLen:20 DgmLen:40 DF
***A**** Seq: 0xC5D2F3DE Ack: 0xBD63343B Win: 0x5B4 TcpLen: 20
=+=+=+=+=+=+=+=+=+=+=+=+=+=+=+=+=+=+=+=+=+=+=+=+=+=+
End the test run by pressing crtl-C.
Running Snort
Now we know snort runs okay, we set up the rule files. These can be uncommented at the bottom of the /opt/etc/snort/snort.conf file. I would advise you to enable the rule files one by one and keep an eye on your memory usage. After each run of snort check your memory and determine if you can enable another rule. Run snort with the following command.
root@Hellhound:~# snort -c /opt/etc/snort/snort.conf -i vlan1&
Check your memory usage by the following command
root@Hellhound:~# top
If snort is detecting any “bad” traffic, it will be logged to your remote syslog server.
Checking your setup
Snort can be quiet sometimes, how do we check if snort is doing its job?? To check your setup, kill the snort proces that is running at the moment. Make sure you have the LOCAL.RULES enabled in the snort.conf file. Then edit local.rules and add the following line of code.
alert ip any any -> any any (msg:"Got an IP Packet"; classtype:not-suspicious; sid:2000000; rev:1;)
Now start snort with the following command
root@Hellhound:~# snort -c /opt/etc/snort/snort.conf -i vlan1&
And keep a good eye on your remote syslog server…. I will start logging network traffic. 📝🖋️
🛜OpenWRT and Traffic Monitor
A nice way of keeping track of your traffic is vnstat. This beauty is found in the repository of white russian. On the website of the author of vnstat you can find a complete reference of the possibilities of vnstat.
Installing the package
You can get this fine piece of software on your router by installing the following package provided by OpenWrt, vnstat_1.4-1_mipsel.ipk. On the OpenWrt forum a guy called arteqw made a impressive setup to be used with the x-wrt webif^2. I will add his setup in the next paragraphs.
Prepare OpenWrt
After installing the package, we need to create the “database” to collect our data. First, we need to create a directory to hold the database.
mkdir /var/lib/vnstat
Now we create the database in this directory. So first change to this directory before executing the command. We will be creating a database on the WAN device of the router.
vnstat -u -i vlan1
We also want this setup to survive a reboot, so in the /etc/init.d directory we edit the file S95custom-user-startup.
mkdir -p /var/lib/vnstat
vnstat -u -i vlan1
gettraffic.sh
Note: The script gettraffic.sh will be discussed later, for now, we just add this command.
Now we need to get this database to be updated on a regular interval, here cron is helpful. The crontab can be edited by the command crontab -e. In the example below, we update the database every 5 minutes.
*/5 **** vnstat -u -i vlan1
Script gettraffic.sh
The following script must be placed in the directory /usr/sbin and will write the status of the data in the database to a file in the /tmp directory called traffic_stats.inc. This file will be picked up by the web-interface to display the values within the webif^2 interface of OpenWrt.
#!/bin/sh
IFACE_WAN=$(nvram get wan_ifname)
IFACE_LAN=$(nvram get lan_ifname)
IFACE_WLAN=$(nvram get wl0_ifname)

rm /tmp/traffic_stats.inc

echo "<br ><center>" >> /tmp/traffic_stats.inc
vnstat -tr -i $IFACE_WAN | grep -v seconds >> /tmp/traffic_stats.inc
echo "</center><br ><b ><th>Hourly at $IFACE_WAN[WAN]</th></b ><br ><center>" >> /tmp/traffic_stats.inc

vnstat -h -i $IFACE_WAN | grep -v $IFACE_WAN >> /tmp/traffic_stats.inc
echo "</center><br ><b ><th>Daily at $IFACE_WAN[WAN]</th></b ><br ><center>" >> /tmp/traffic_stats.inc

vnstat -d -i $IFACE_WAN | grep -v $IFACE_WAN >> /tmp/traffic_stats.inc
echo "</center><br ><b ><th>Weekly at $IFACE_WAN[WAN]</th></b ><br ><center>" >> /tmp/traffic_stats.inc

vnstat -w -i $IFACE_WAN | grep -v $IFACE_WAN >> /tmp/traffic_stats.inc
echo "</center><br ><b ><th>Monthly at $IFACE_WAN[WAN]</th></b ><br ><center>" >> /tmp/traffic_stats.inc

vnstat -m -i $IFACE_WAN | grep -v $IFACE_WAN >> /tmp/traffic_stats.inc
echo "</center>" >> /tmp/traffic_stats.inc
Last thing we need to do is to add an entry in the crontab (crontab -e). This entry will run the gettraffic.sh every 5 minutes, so that the file /tmp/traffic_stats.inc will be updated.
*/5 * * * * gettraffic.sh
Web interface add-on
Finally, we need to extend the web interface, so we can see the traffic stats in our browser. To do so, we need to place the file traffic.sh in the directory /www/cgi-bin/webif. This file will pick up the file /tmp/traffic_stats.inc.
#!/usr/bin/webif-page
<?
. /usr/lib/webif/webif.sh
header "Status" "Traffic Statistic" "@TR<<Traffic Statistic>>"
?>
<pre><? cat /tmp/traffic_stats.inc ?></pre>
<? footer ?>
<!--
##WEBIF:name:Status:5:Traffic Statistic
-->
Email stats
I wanted to receive the stats of my router hourly by email. So, I looked at a package called mini-sendmail_1.3.5-1_mipsel.ipk which gives the ability to send emails. In the link section at the top I included the manpage for mini-sendmail. So to get the stats by email, I added the following line to the crontab.
0 9-16 * * 1-5 cat /tmp/traffic\_stats.inc | mini\_sendmail -fsend@domain.org -ssmtp.server.org receive@domain.org
This crontab entry will email the contents of /tmp/traffic_stats.inc to the address receive@domain.org. It will be emailed every full hour between 09:00 and 16:00 from Monday to Friday. 📝🖋️
🛜OpenWRT and Dynamic DNS
Having the major dynamic DNS services provide me with a domain name for my internet connection, I configured updatedd on my OpenWrt box. I stopped using ez-ipupdate because this application did not seem to pick up the WAN address of my ADSL router, but picked up the address of my wrt54gs and set that address to be my external address. Which gave problems, of course. Therefore I started to use updatedd which also supports all major dynamic DNS service providers.
Installing the packages
To get updatedd up and running, you need to install the package updatedd_2.5-1_ mipsel.ipk. Since I like to use the provider dyndns.org en no-ip.org I also installed the following packages updatedd-mod-noip_2.5-1_mipsel.ipk and updatedd-mod-dyndns_2.5-1_mipsel.ipk.
Update your IP
Now all the needed packages are installed. Now it’s time to update your IP with the chosen providers, for me, this is no-ip.org and dyndns.org.
updatedd noip username:password nodename.bounceme.net
updatedd dyndns username:password nodename.homeftp.org
Update your IP regularly
Now we want this action to be updated regularly. This means cron will be helpful. To edit cron you can use the command crontab -e. Which uses the VI commands to edit the content. I set up cron in the following way.
0 0 * * * updatedd noip username:password nodename.bounceme.net
0 0 * * * updatedd dyndns username:password nodename.homeftp.org
This will update my dynamic DNS accounts every day at midnight. 📝✏️
✏️ De barbaarse oude man
De teleurstelling had niet groter kunnen zijn voor Davide toen hij op Sinterklaasochtend zijn schoen wilde uithalen. Hij had super zijn best gedaan en voor alles gezorgd om de Sint en zijn schimmel vrolijk te stemmen.
Hij had een van zijn mooiste schoenen gezet, die moeder pas bij de kringloopwinkel had gekocht voor hem. Hij had de mooiste wortel en aardappel gekozen uit de box van de voedselbank. Hij had suikerklontjes bij zijn schoen gelegd. Hij had van vader strikte instructies gekregen om deze niet te ontdoen van de papieren bescherming. Raar want hij wilde Ozosnel niet ziek laten worden. Hij had de hele avond gezongen bij de schoen en was vroeg naar bed gegaan. Ook al omdat het in de avond altijd koud werd in huis.
Op de ochtend dat de goedheiligman was geweest, was Davide naar beneden gesneld. In de hoop mooie cadeaus te vinden bij zijn schoen. Tot zijn ontsteltenis lag er zout op, bij en in zijn schoen. De kleine Davide was ontroostbaar en moeder hoopte dan ook dat de andere kindertjes snel het geheim van Sinterklaas zouden vertellen op school. Ze kon het niet meer aanzien wat een barbaarse man die goedheiligman in dit huis was.
Gelukkig waren er wel gekookte wortelen en aardappelen voor het eten deze avond en had vader zijn gebruikelijke kopje oploskoffie waar hij een ontveld suikerklontje in deed. Deze avond ging Davide ook weer vroeg naar bed, maar nu met zijn hoop op de Kerstman gevestigd. 📝📚☕️
🛜OpenWRT, fwbuilder and wallwatcher
Installing the right packages
To get the fwbuilder generated scripts up and running on a OpenWrt powered device, you need to install a few packages. Those packages are found in de standard repository of white russian. The packages you need to install from that repository are ip_2.6.11-050330-1_mipsel.ipk, iptables-mod-extra_1.3.3-2_mipsel.ipk and iptables-utils_1.3.3-2_mipsel.ipk
Editing /etc/firewall.user
I am using a SquashFS version of OpenWrt. This means that the real filesystem is readonly and that all files are available with symbolic links on a writeable JFFS filesystem. What we now need to do is to delete the symbolic link and copy the real file in place of the symbolic link in the /etc directory.
Now we need to add the following code to the firewall.user file.
insmod ipt_LOG
insmod ipt_limit

if [not -f /usr/sbin/firewallscript.fw ] ; then
{orginal script}
else /usr/sbin/firewallscript.fw
fi
Now you have to place your firewall script in the /usr/sbin directory (or place it at a location of your choice, but you will have to edit the code above to match your location).
Instead of adding the two insmod lines in the firewall.user file, you can also edit the file /etc/modules. You can just edit the file like the example below.
ipt_LOG
ipt_limit
Remote syslog with wallwatcher
Now we have to set up remote syslog, so we can log the output of your firewall script with wallwatcher. Remember to put some rules in fwbuilder on logging, otherwise we will never log a thing. You need to set up OpenWrt to use a remote syslog server. You need to replace the xxx.xxx.xxx.xxx with the ip-address of the system that will be running wallwatcher.
nvram set log_ipaddr=xxx.xxx.xxx.xxx
nvram commit
The only thing you have to do next is to set up wallwatcher router tab
Change Startup order
With the RC5 release of OpenWrt all was working just fine, but when I started to use the RC6 version of OpenWrt I discovered that the firewall script was not executed after a reboot of the router. The problem seemed to be that the /etc/init.d/S35Firewall is executed before /etc/init.d/S40Network. So, When I renamed /etc/init.d/S35Firewall in /etc/init.d/S45Firewall and rebooted the router, the firewall script was executed and all worked just fine. 📝🖋️
📟Fediverse and WordPress
What is it?
ActivityPub is the glue or the oil, if you like, for the Fediverse. It glues all the services together in the Fediverse. It lets mastodon servers communicate with each other, but it also lets Pixelfed talk with mastodon and vice versa. All the social media that is ActivityPub aware can exchange messages with each other.
WordPress
WordPress is by its nature not ActivityPub aware. So, it can’t exchange messages with the Fediverse. But there is a solution. Matthias Pfefferle created a WordPress plugin to connect WordPress to the Fediverse. This enables you to get your WordPress posts across the Fediverse.
What do you need
- Webfinger WordPress Plugin installed on your WordPress instance;
- ActivityPub WordPress Plugin installed on your WordPress instance.
Setup
There is not much needed to get this working. Installed both plugins. The ActivityPub plugin has default settings that could work for you, but fiddle with them if you like. The Webfinger plugin doesn’t need configuration at all. When both plugins are installed, you will see it advises you for 2 more plugins. They are not needed to get ActivityPub working. But will enhance the experience.
Checking the setup
- First check the Site Health under Tools > Site Health. If all is working correctly, you will get no critical errors on this page.
- Go to the Webfinger website and check if you get a JSON response from your ActivityPub plugin by entering the e-mail address at the top. HINT: This is not your regular e-mail address, but the account name and domain name of your WordPress instance. So, if you have an account “Jake” on your WordPress instance at the domain “great.blog.com”, your “e-mail address” will be jake@great.blog.com. You can enter it at the top of the page. As a result, you should get a JSON response.
- Go to your Mastodon account and search for your WordPress account (i.e., jake@great.blog.com) in the search bar of Mastodon.
Dos and Don’ts and Hints
- Don’t install a cache enhancing plugin. It will mess with the ActivityPub or Webfinger Plugin. You will see critical errors after a while in your Site Health menu.
- I found that https://mastodon.social messes with the avatar. It will not come through, even after a few posts on WordPress. I checked a few other mastodon instances (also mastodon.online, which is the other flagship server) they were fine. So, you should be careful with the mastodon server you choose to test this. It could make you think the plugin isn’t working properly.
- Some hosting providers protect the .well-known directory. When this directory is inaccessible for the plugin. It will not work. (This made me host my WordPress instance at home). 📝🖋️