-
Technology
Pretty Good Privacy with keybase.io
Saturday February 11, 20232020 : This post is obsolete since Keybase was acquired by Zoom.
Used PGP back in the 90s just because it was possible. The internet was growing, and my friends and I liked to experiment in those days with all that we found on the internet. PGP was one of those things. We had great fun back then, but never used it again the following decades.
But a few days ago I saw a talk from Mike Godwin about privacy on the internet. He pointed out https://www.keybase.io/ in his talk as a start to set up PGP and ways to communicate with him.
I got curious again about PGP and Keybase.io, and I had no trouble at all to quickly set up an account and a PGP key pair with these guys. They have nice low-level tooling to encrypt and decrypt messages on their website.
What I wanted again was a way to have my email encrypted, like I had back then in the 90s when my friends and I played around with it. I found a great tutorial on the internet from the Electronic Frontier Foundation on how to het PGP setup on a MAC.
It is set up with Thunderbird Mail Client and within this tutorial they let you generate a PGP key pair with GnuPG. Which will do the job, but I wanted to set it up with my Keybase.io key pair. I needed to export my Keybase.io key pair to the GnuPG keychain.
Reading the docs at their site, I found out that I could pull my Keybase.io Key to GnuPG keychain by the following command.
keybase pgp pull-private --allBut this gave me the following error
▶ ERROR .keys doesn't existJust following this workaround to fix it.
Make sure that in the linked device to your keybase.io account, the option “Forbid account changes from the website” is disabled in the advanced settings. By disabling this option, more possibles are enabled on the keybase.io site. One of them is to export your private key.
After you have disabled this option on your device, go to the website of keybase.io and visit your profile page. And find an “edit” link behind the signature of the public key. Select the edit link, and you get the option to export your private key.
Copy the key and save it to your desktop. Use the following command to import the private key to the GnuPG keychain. Where “Private_Key.asc” holds your private key.
gpg2 --allow-secret-key-import --import Private_Key.ascAlso save your public key to your desktop. And import this one with the following command. Where “Public_Key.asc” holds your public key.
gpg2 --import Public_Key.ascThis serie of actions will replace the generation of a PGP key pair with GnuPG and import your keybase.io key pair.
Don’t forget to delete your private key from your desktop.
Make sure it’s cleaned up!
Now finish the thunderbird tutorial from EFF with the keybase.io key pair. And you have a PGP mailclient setup with keybase.io. There is also a nice integration possible with the macOS MAIL.APP with https://gpgtools.org, but this requires a paid license. Whatever suites your needs.
Ok, I hope this helps you.
Find me here on keybase.io and if you like to send me a PGP encrypted email, here is my public key. But this one can also be found on keybase.io.
Oh, and don’t forget to send me your public key or your keybase.io profile page, so I can download your public key if you shared it. If you want a message back, of course ;-).
Use the following command to pull in my public key in your GnuPG keychain. And a follow on keybase.io.
curl https://keybase.io/marc0janssen/pgp_keys.asc | gpg2 --import

keybase follow marc0janssen
Thanks for reading!
-
Technology
Starbit Commander
Saturday February 11, 2023This game is my first coding for The BBC Micro:bit. The goal is to have a nice target to practice and learn microPython on this device. But first I wanted to have a go on the makeCode editor for the Micro:bit.
I made this simple little game. Flying a spaceship through an astroid field. Occasionally, a blinking power-up will appear. This gives the advance to survive an astroid collision. Catching two power-ups will destroy all astroids in the field. Astroids will speed up in time, but slow down if a double power-up is acquired.

To edit this repository in MakeCode.
- Open https://makecode.microbit.org/
- Click Import and select Import URL
- Paste https://github.com/marc0janssen/starbit-commander
- Select import
-
Technology
Simple Simon Says
Saturday February 11, 2023The game Simon in the late 70s was maybe the first “computer” game I played. Well, perhaps it was a real computer. I was just a kid, but the game always stayed with me. In my mind, that is. The game was from a friend, and we played it for ages.
Now with the Micro:bit I wanted to revive this memory and use the Micro:bit as a vehicle to get this to life again. Below is my make code attempt. I used a Micro:bit version2 for this.
This Simon listens to Button A, Button B, Button C (the touch sensitive logo), Button D (= Button A+B).
It was fun to create and a good way to set me off with the possibilities of the Micro:bit…

To edit this repository in MakeCode:
- open https://makecode.microbit.org/
- Click Import and select Import URL
- paste https://github.com/marc0janssen/simple-simon-says
- select import
-
Technology
Micro:bit Fireflies
Saturday February 11, 2023My first attempt to write some (micro)Python code. Fireflies. This leds simulate fireflies in the air…
By the way, I found that display.get_pixel does not return the correct value for the brightness of a LED on a micro:bit. I created this function to correct this behavior in the code (fixPixelBug).
from microbit import * import random # This fucntions fixes the "display.get_pixel" bug. # a full bright led does not return a "9" but a "255". def fixPixelBug(brightness): if brightness == 4: return 3 elif brightness == 8: return 4 elif brightness == 16: return 5 elif brightness == 32: return 6 elif brightness == 64: return 7 elif brightness == 128: return 8 elif brightness == 255: return 9 else: return brightness while True: sleep(50) brightness = random.randint(1, 9) x = random.randint(0, 4) y = random.randint(0, 4) if display.get_pixel(x, y) == 0: display.set_pixel(x, y, brightness) for fireflies in range(0, 5): x = random.randint(0, 4) y = random.randint(0, 4) if fixPixelBug(display.get_pixel(x, y)) > 0: display.set_pixel(x, y, fixPixelBug(display.get_pixel(x, y)) - 1) -
Technology
Starbit Commander II
Saturday February 11, 2023Well, on my quest to learn python, I poked and peeked around at the web of inters. And came across some nice sites about the micro:bits, projects and coding.
One site inspired me to create a python version of Starbit Commander. This site is home to many projects of Derek Graham. Next to Micro:bit bits, he has many other things too on his site.
But why remake of Starbit Commander? Derek has this pleasant example of “Tiny Astroids”, which resembled a lot like Starbit Commander. And he created it in Python… so. Mine Starbit Commander should get a python version too… In this little gem from Derek, he created a really, really pleasant piece of code that animated an explosion on this 5×5 LED display. I loved it. And although I wanted to create Starbit from scratch in OO, I really wanted to adopt this pleasant little tiny explosion. So, I contacted Derek via Twitter, asked if he agreed to me use his explosion-code. We had a short but very nice chat on Twitter, and he agreed for the code to be reuse in Starbit Commander. Thanks, Derek!
Well, I wanted to test and learn more python and also OO in python. So, I decided to try to make Starbit Commander in an OO-style. I have no experience in this, but I think (as far as I can tell) this is an OO-version of the game now. Derek mentioned on micro:bit V1’s coding OO would let you ran into out of memory errors. I haven’t seen them on the microbit V2 with Starbit Commander. (Now I’m worried if I did a proper OO-coding style ;-0)
I differed a bit from the original Starbit code. While de MakeCode version has power-ups to collect, in this python-version I decided to skip that and make the astroid field a bit more challenging by starting slow and easy and ending fast and astroid-crowded. Giving you more and more bonus score along the way you go.
This code can be found here. And watch that explosion… Thanks again, Derek Graham!
-
Technology
Choosing your Python editing weapon
Saturday February 11, 2023Well a few days passed since I got a micro:bit… Started out with MakeCode to play around with it, but the goal was python. For this I switched to mu-editor at first. A great editor… I like the check en tidy function. But I missed the simulator I had in MakeCode. Of course you can (and must) run your code on the physical micro:bit but a simulator is great for testing and trying little pieces of code. But I accepted the fact that mu-editor and python coding didn’t had a simulator.
Then I picked up a “old” tool from the shed on my Macbook, Visual Studio code. I started to use it again to edit shell scripts because brackets announced to stop service this coming summer. Why not pop in python script in there. This editor offered me to install python extensions. And I started exploring the nets of inter what was possible with VScode.
And I came across Device Simulator Express, an extension for VScode. Just the tool I needed to have my micro:bit simulated in VScode. Just open the extensions tab in VScode and look for “Device Simulator Express” and install the beast.
There is one pitfall in installing this extension. After installing the extension en pressing shift-command-p to open de command-pane : enter “device simulator express : New file”. This will install some more dependencies and you might run in the problem that you get a message “Device Simulator Express: Install Extension Dependencies”. Telling you the install failed.
When pressing shift-command-p and giving the command “Device Simulator Express: Install Extension Dependencies” as instructed, you will find that they will never get installed and you end up with a reoccurring error all the time. This seems to have something to do with python 3.9. You can fix this doing the following:
On Python 3.9:
Edit the file “users<user>.vscodeextensionsms-python.devicesimulatorexpress-2020.0.36321outrequirements.txt” and changed the line
Pillow==7.0.0
to
Pillow==8.1.0
Restart VScode and press shift-command-p and give the command “Device Simulator Express: Install Extension Dependencies” again. Now the dependencies get installed nicely.
What I extra installed was a linter. Shift-command-p : Python: Select Linter and select “flake8”. Sometimes you need to restart VS-code to force install-popup for flake8. Now you have error-highting in the editor as you go.
And what I also installed was code formatter for python. Press shift-option-f: install formatter : install autopep8. This little baby formats your code. Cut the extra white-space. Correct the indenting. All kind of stuff.
I stopped using Windows at home for more than 11 years and left everything from Microsoft alone, switching to Apple and got the complete fruitbasket with all it’s products. But VScode has surprised me and it’s gonna stay for python editing……
-
Technology
Getting your Emby library scanned for new content in four ways.
Saturday February 11, 2023Running Emby en Radarr/Sonarr on different servers or in different container can be a pain in the ass to get your content scanned.
But it is much easier than you think if you know what’s going on inside the services. The TL;DR is keep your content path the same in EMBY and in Sonarr/Radarr. If you don’t keep them the same, you run into trouble.
First, I show two options when you can’t keep the paths the same (say you have a linux node running EMBY and a Windows (don’t mention it) node for Sonarr/Radarr. It’s obvious the paths will never be the same, as Linux will give you a PATH like below.
/home/user/video/movies/Your Old Movie (1921)/Your.Old.Movie.1921.Remux-2160p.mkvWhere Windows (sh*t have to mention it again) will give you a path
D:\data\video\movies\Your Old Movie (1921)\Your.Old.Movie.1921.Remux-2160p.mkvThe slashed only (Linux forward slash / and Windows a backslash \ ) already makes this a problem.
Then I will show you two options if you can the PATHs the same. This can be done when:
- You run all your software on one node, therefor the content PATHs in EMBY en Sonarr/Radarr will be the same (Obviously)
- When you run multiple nodes of the SAME OS and run the services (EMBY, Sonarr, Radarr) in DOCKER, and therefore you can keep the PATHs the same inside your docker containers.
- When you run multiple nodes of THE SAME OS (for EMBY, Sonarr and Radarr) and store the content on the same network share (a third node) via Radarr/Sonarr and EMBY will scan the content on that same third node.
Option 1 different paths (you can’t keep the paths the same)
This method triggers a complete library scan. This work fine but is suboptimal. When your library is large, or you frequently trigger the library scan, it will have an impact on EMBY.
curl -X POST "${EMBY_HOST}/Emby/Library/Refresh?api_key=${EMBY_APIKEY}" --data ""Where:
EMBY_HOST = http:/192.168.1.1:0896 or https://www.yourdoamin.com:443

EMBY_APIKEY = XXXXXXYYYYYZZZZZZ
Option 2 different paths (you can’t keep the paths the same)
This method tiggers a scan for a certain library in your collection (EMBY_PARENT_ID). The advance to the pervious option is that you only trigger one collection in the library. The downside is you have to fiddle around with the EMBY_PARENT_ID. These can be obtained from the URL when you open the collection in EMBY.
curl -X POST "${EMBY_URL}/emby/Items/${EMBY_PARENT_ID}/Refresh?Recursive=true&MetadataRefreshMode=Default&ImageRefreshMode=Default&ReplaceAllMetadata=false&ReplaceAllImages=false&api_key=${EMBY_APIKEY}" -H "accept: */*" -d “”Where:
EMBY_HOST = http:/192.168.1.1:0896 or https://www.yourdoamin.com:443

EMBY_APIKEY = XXXXXXYYYYYZZZZZZ

EMBY_PARENT_ID = 12
Option 3 Same paths (you can keep the path in *arr equal to the path in EMBY)
This is the simplest to configure the default trigger in Sonarr/Radarr
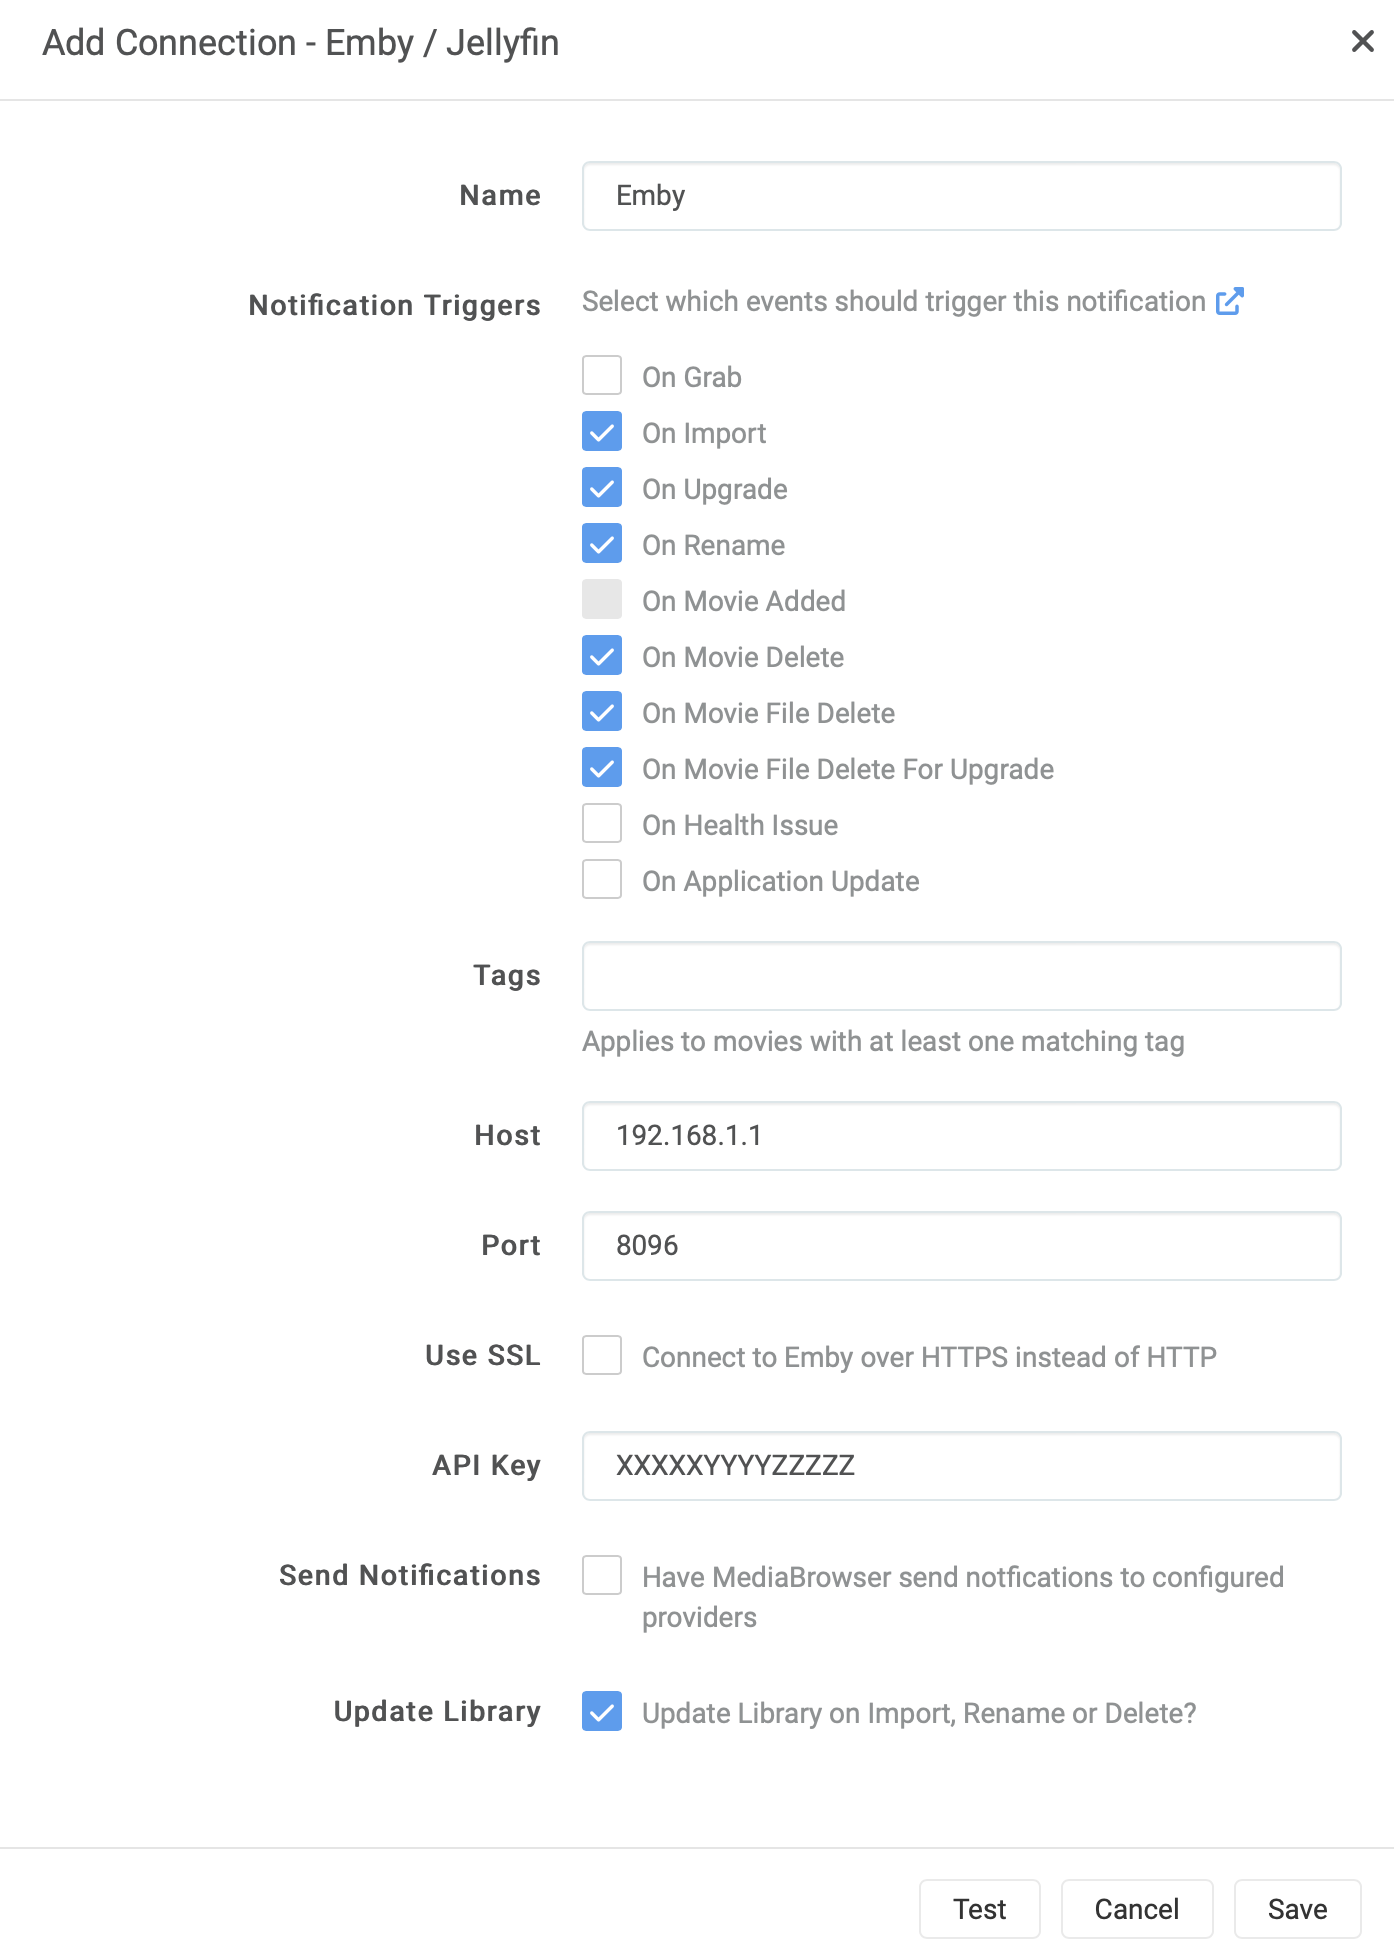
Option 4 Same paths (you can keep the path in *arr equal to the path in EMBY)
This method tiggers a scan for a certain library in your collection. The advance to the pervious option is that you add your own logic to the scan. The other advance is that you can fill-out Path and UpdateType from the environment variables in Linux (or your container)
curl -X POST "${EMBY_URL}/emby/Library/Media/Updated?api_key=${EMBY_APIKEY}" -H "accept: */*" -H "Content-Type: application/json" -d "{\"Updates\":[{\"Path\":\"${Path}\",\"UpdateType\":\"${UpdateType}\"}]}"Where:
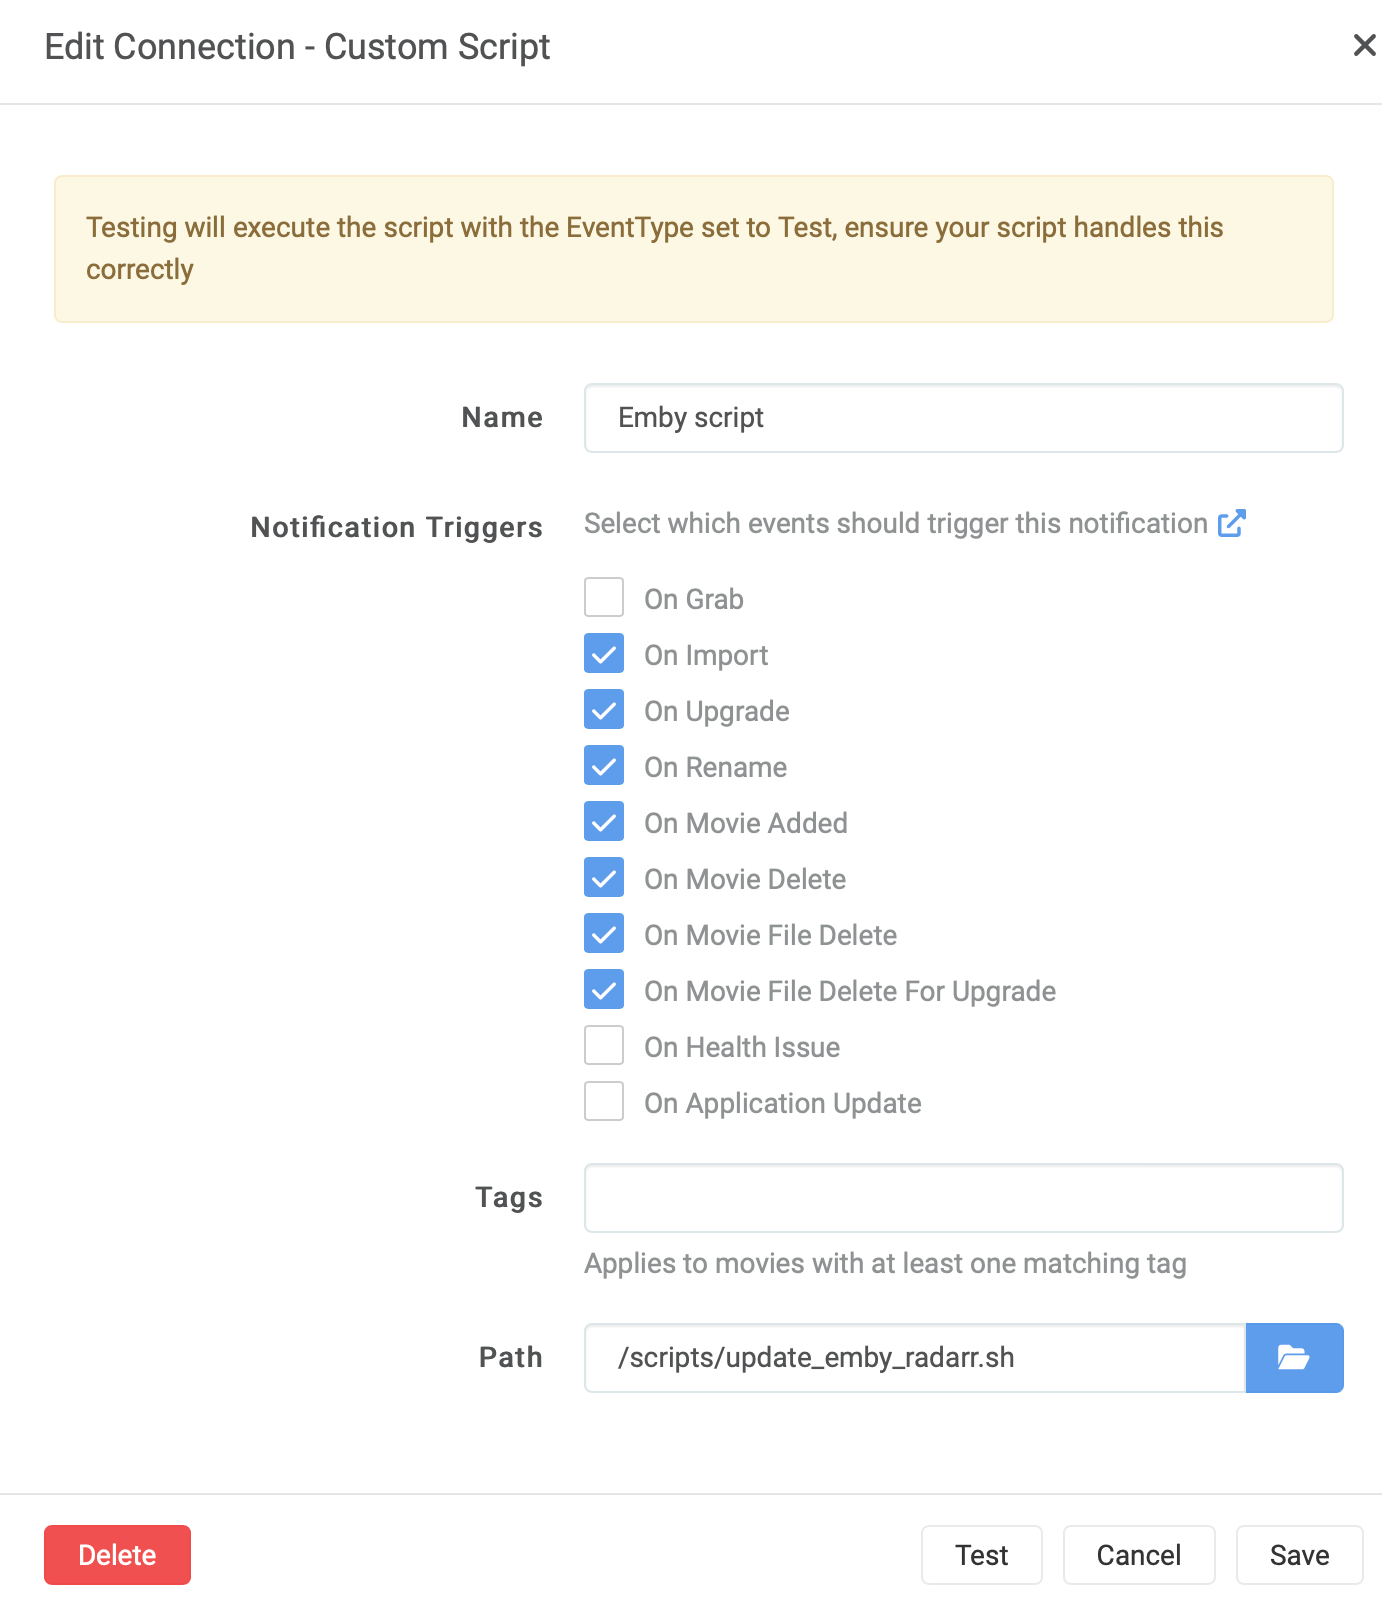
EMBY_HOST = http:/192.168.1.1:0896 or https://www.yourdoamin.com:443

EMBY_APIKEY = XXXXXXYYYYYZZZZZZ

Path = /movies/Old Movie, The (1921)/The.Old.Movie.1921.Bluray-2160p.mkv

UpdateType = [ Created | Modified | Deleted ] (optional)
Here is an example script I use for Radarr and Sonarr. I like separate scripts for Radarr and Sonarr, but you easily merge them and create one script for both Radarr and Sonarr.
Radarr
#!/bin/bash

NOW=$(date +"%d-%m-%Y %H:%M")
LOG_FILE="/logging/radarr/emby_scan.txt"
TMP_FILE="/tmp/tmp_emby_radarr.txt"
DL_FILE="/scripts/dl_radarr.txt"
DEL_FILE="/scripts/del_radarr.txt"
REN_FILE="/scripts/ren_radarr.txt"
EMBY_URL="https://emby.yourdomain.com"
EMBY_RADARR_APIKEY="xxxyyyyyzzz"

if [ "${radarr_eventtype}" != "" ]; then
  if [ "${radarr_eventtype}" == "ApplicationUpdate" ] || [ "${radarr_eventtype}" == "MovieAdded" ] || [ "${radarr_eventtype}" == "Grab" ] || [ "${radarr_eventtype}" == "HealthIssue" ] || [ "${radarr_eventtype}" == "Test" ]; then
    (echo "${NOW} - [Emby Library Scan] Radarr Event Type is ${radarr_eventtype}, exiting."; cat ${LOG_FILE}) > ${TMP_FILE}; mv ${TMP_FILE} ${LOG_FILE}
    exit
  fi

  (echo "${NOW} - [Emby Library Scan] Radarr Event Type is ${radarr_eventtype}, updating Emby Library for ${radarr_movie_title}."; cat ${LOG_FILE}) > ${TMP_FILE}; mv ${TMP_FILE} ${LOG_FILE}

  if [ "$radarr_eventtype" == "Download" ]; then
    echo "${radarr_movie_title} (${radarr_movie_year})" >> ${DL_FILE}
    UpdateType="Created"
    Path="${radarr_movie_path}"
  fi

  if [ "${radarr_eventtype}" == "MovieDelete" ]; then
    echo "${radarr_movie_title} (${radarr_movie_year})" >> ${DEL_FILE}
    UpdateType="Deleted"
    Path="${radarr_movie_path}"
  fi

  if [ "$radarr_eventtype" == "Rename" ]; then
    echo "${radarr_movie_title} (${radarr_movie_year})" >> ${REN_FILE}
    UpdateType="Modified"
    Path="${radarr_movie_path}"
  fi

  curl -X POST "${EMBY_URL}/emby/Library/Media/Updated?api_key=${EMBY_RADARR_APIKEY}" -H "accept: */*" -H "Content-Type: application/json" -d "{\"Updates\":[{\"Path\":\"${Path}\",\"UpdateType\":\"${UpdateType}\"}]}"

else
  (echo "${NOW} - [Emby Library Scan] Radarr Event Type is empty."; cat ${LOG_FILE}) > ${TMP_FILE}; mv ${TMP_FILE} ${LOG_FILE}

fi

# write a status file with date of last run.  Helps troubleshoot that cron task is running.
echo "$(basename $0) last run was at $(date)" > /logging/radarr/_$(basename $0)_lastrun.txt
Sonarr
#!/bin/bash

NOW=$(date +"%d-%m-%Y %H:%M")
LOG_FILE="/logging/sonarr/emby_scan.txt"
TMP_FILE="/tmp/tmp_emby_sonarr.txt"
DL_FILE="/scripts/dl_sonarr.txt"
DEL_FILE="/scripts/del_sonarr.txt"
REN_FILE="/scripts/ren_sonarr.txt"
EMBY_URL="https://emby.yourdomain.com"
EMBY_SONARR_APIKEY="zzzzzyyyyyxxxxx"

if [ "${sonarr_eventtype}" != "" ]; then
  if [ "${sonarr_eventtype}" == "ApplicationUpdate" ] || [ "${sonarr_eventtype}" == "Grab" ] || [ "${sonarr_eventtype}" == "HealthIssue" ] || [ "${sonarr_eventtype}" == "Test" ]; then
    (echo "${NOW} - [Emby Library Scan] Sonarr Event Type is ${sonarr_eventtype}, exiting."; cat ${LOG_FILE}) > ${TMP_FILE}; mv ${TMP_FILE} ${LOG_FILE}
    exit
  fi

  (echo "${NOW} - [Emby Library Scan] Sonarr Event Type is ${sonarr_eventtype}, updating Emby Library for ${sonarr_series_title} - ${sonarr_episodefile_episodetitles}."; cat ${LOG_FILE}) > ${TMP_FILE}; mv ${TMP_FILE} ${LOG_FILE}

  if [ "$sonarr_eventtype" == "Download" ];  then
    echo "${sonarr_series_title} - ${sonarr_episodefile_episodetitles}" >> ${DL_FILE}
    UpdateType="Created"
    Path="${sonarr_episodefile_path}"
  fi

  if [ "$sonarr_eventtype" == "EpisodeFileDelete" ];  then
    echo "${sonarr_series_title} - ${sonarr_episodefile_episodetitles}" >> ${DEL_FILE}
    UpdateType="Deleted"
    Path="${sonarr_episodefile_path}"
  fi

  if [ "$sonarr_eventtype" == "SeriesDelete" ];  then
    echo "${sonarr_series_title}" >> ${DEL_FILE}
    UpdateType="Deleted"
    Path="${sonarr_series_path}"
  fi

  if [ "$sonarr_eventtype" == "Rename" ]; then
    echo "${sonarr_series_title}" >> ${REN_FILE}
    UpdateType="Modified"
    Path="${sonarr_series_path}"
  fi

  curl -X POST "${EMBY_URL}/emby/Library/Media/Updated?api_key=${EMBY_SONARR_APIKEY}" -H "accept: */*" -H "Content-Type: application/json" -d "{\"Updates\":[{\"Path\":\"${Path}\",\"UpdateType\":\"${UpdateType}\"}]}"

else
  (echo "${NOW} - [Emby Library Scan] Sonarr Event Type is empty."; cat ${LOG_FILE}) > ${TMP_FILE}; mv ${TMP_FILE} ${LOG_FILE}

fi

# write a status file with date of last run.  Helps troubleshoot that cron task is running.
echo "$(basename $0) last run was at $(date)" > /logging/sonarr/_$(basename $0)_lastrun.txt
These scripts also maintain lists of the content names, so they can be used in reporting or notification. You can, of course, strip these.
I run these scripts in the Connect section in Radarr/Sonarr.
-
Technology
Setting Up Jellyseerr for Emby
Saturday February 11, 2023Jellyseerr is a free and open source software application for managing requests for your media library. It is a a fork of Overseerr built to bring support for Jellyfin & Emby media servers! Follow this link for more info.
Docker
Docker-compose.yml
version: '3'
services:
    jellyseerr:
       image: fallenbagel/jellyseerr:latest
       container_name: jellyseerr
       environment:
            - TZ=Europe/Amsterdam
            - JELLYFIN_TYPE=emby
       ports:
            - 5055:5055
       volumes:
            - /path/to/dir/config:/app/config
       restart: unless-stopped

docker-compose -p "jellyseerr" -f /path/to/file/docker-compose.yml up -d --remove-orphans
Swag
NGINX - jellyseerr.subdomain.conf
The following code should be included in file at the following location: /path/to/dir/swag/config/nginx/proxy-confs/jellyseerr.subdomain.conf
The trick is to copy the jellyseerr.subdomain.conf.sample file to jellyseerr.subdomain.conf. You can create a new file from scratch, but the Swag startup could complain the file does not have to correct timestamp. This is a warning not a “showstopper”.
## Version 2022/09/08
# make sure that your dns has a cname set for jellyseerr and that your jellyseerr container is named jellyseerr

server {
    listen 80;
    server_name jellyseerr.*;
    return 301 https://$server_name$request_uri;
}

server {
    listen 443 ssl http2;
    server_name jellyseerr.*;
        server_name jellyseerr.yourdomain.com;
        resolver 1.1.1.1 1.0.0.1 valid=300s;
        resolver_timeout 10s;
        gzip on;
        gzip_vary on;
        gzip_min_length 1000;
        gzip_proxied any;
        gzip_types text/plain text/css text/xml application/xml text/javascript application/x-javascript image/svg+xml;
        gzip_disable "MSIE [1-6]\.";

    location / {
            proxy_pass http://192.168.1.1:5055;
            proxy_read_timeout    90;
            proxy_connect_timeout 90;
            proxy_redirect        off;
            proxy_set_header      Host $host;
            proxy_set_header      X-Real-IP $remote_addr;
            proxy_set_header      X-Forwarded-For $proxy_add_x_forwarded_for;
            proxy_set_header      Proxy "";
        }

        proxy_set_header Host $http_host;
        proxy_set_header X-Forwarded-For $remote_addr;
        proxy_set_header X-Forwarded-Proto $scheme;
}
fail2ban - jail.local
Add the configuration below to the file: /path/to/dir/swag/config/fail2ban/jail.local
The path /jellyseerr_log/ should be added to your docker-compose.yml of SWAG.
This config let the intruder try 3 times, if failed within 10 minutes they’re blocked for 1 hour. IP’s from 192.168.1.0/24 are ignored.
[jellyseerr]

enabled		= true
filter		= jellyseerr
port		= http,https
logpath		= /jellyseerr_log/overseerr-*.log
maxretry	= 3
findtime	= 10m
bantime		= 1h
ignoreip	= 192.168.1.0/24
fail2ban - jellyseerr.conf
Add the following config to /path/to/dir/swag/config/fail2ban/filter.d/jellyseerr.conf
# Fail2Ban for jellyseerr # # [Definition] failregex = \[info\]\[Auth\]: Failed login attempt from user with incorrect Jellyfin credentials \{"account":\{"ip":"<HOST>","email":".*","password":"__REDACTED__"\}\} ignoreregex = -
Technology
OpenWRT and Common Internet File System (CIFS)
Saturday February 11, 2023This protocol is based on the widely used samba protocol. CIFS is a network protocol for sharing files, printers, serial ports, and other communications between computers. I gonna use this protocol to connect my NAS device to my OpenWrt-powered box.
Installing the packages
To get everything up and running, we need to install the following package on the linksys device, kmod-cifs_2.4.30-brcm-5_mipsel.ipk. If you wish, you can also install the mount helper package, cifsmount_1.5-2_mipsel.ipk. I decided not to do so.
A quick check
If we want to do a quick check if all is working, follow the following procedure.
root@Hellhound:~# insmod cifs
Using /lib/modules/2.4.30/cifs.o
Make a directory to mount the share on the remote machine.
root@Hellhound:~# mkdir /tmp/mntNow we can try to mount the share.
root@Hellhound:~# mount -t cifs //192.168.1.2/share /tmp/mnt -o unc=\\\\192.168.1.2\\share,ip=192.168.1.2,user=admin,pass=geheim ,dom=workgroupJust double check it is mounted.
root@Hellhound:~# df
//192.168.1.2/share243748864 46485504 197263360 19% /tmp/mnt
Setting up the system
The above mount command is a hell of a command to execute every time you need your NAS device to be connected to your OpenWrt box. So, we are going to make life a little easier for yourself. We will edit the /etc/fstab. If you don’t have a fstab file, make one now. To the fstab file, we add the following line.
//192.168.1.2/share /mnt/bulky cifs unc=\\192.168.1.2\share, ip=192.168.1.2,user=admin,password=geheim,dom=workgroup,rw 0 0The cifs kernel module does not need to loaded separately. The package also installs the file /etc/modules.d/30-cifs. This will load the module at boot-time. Now we can mount the share with the following command.
root@Hellhound:~# mount /mnt/bulkySince OpenWrt does not execute the command
mount -aat boot-time, the configured mount points in fstab are not automagicly mounted at boot-time. To solve this, I added the mount command.
mount /mnt/bulkyto the file /etc/init.d/S95custom-user-startup.
-
Technology
OpenWRT and SNMP bandwidth monitor
Saturday February 11, 2023I would appreciate it if we could monitor the bandwidth of the network devices in our wrt54gs. To do so, we need SNMP enabled on our device and some kind of application to monitor the snmp messages. I choose PRTG to monitor the SNMP messages sent.
Installing the package
We need to install the snmp daemon on OpenWrt. So, we require the following package, snmpd_5.1.2-2_mipsel.ipk. Optionally, you van install the package snmp-utils_5.1.2-2_mipsel.ipk. Since I have my router modded with the MMC/SD card mod, I am going to install the package on this card with the following command.
root@Hellhound:~# ipkg -d opt install snmpd_5.1.2-2_mipsel.ipkIn my case, this will install the package on the mount point /opt. I will refer to this in the paper. Change it to your setup accordingly.
Set up the package
Now we need to set up the snmp package. If you install it in the root of linux, there is no problem. But if you installed op your MMC/SD card you need to take some extra steps. First we have to copy the /opt/etc/default, /opt/etc/init.d and /opt/etc/snmp to the /etc directory. Now we have to copy the file /etc/init.d/snmpd to the file /etc/init.d/S60snmpd. After copying this file, we have to add 2 lines to the script. This is only needed for the ones who have installed the package on the MMC/SD-card. The new file will look like this.
#!/bin/sh

export PATH=/bin:/sbin:/usr/bin:/usr/sbin:/opt/bin:/opt/sbin:
/opt/usr/bin:/opt/usr/sbin
export LD_LIBRARY_PATH=/lib:/usr/lib:/opt/lib:/opt/usr/lib

DEFAULT=/etc/default/snmpd
LIB_D=/var/lib/snmp
LOG_D=/var/log
RUN_D=/var/run
PID_F=$RUN_D/snmpd.pid

[ -f $DEFAULT ] && . $DEFAULT

case $1 in
start)
[ -d $LIB_D ] || mkdir -p $LIB_D
[ -d $LOG_D ] || mkdir -p $LOG_D
[ -d $RUN_D ] || mkdir -p $RUN_D
snmpd $OPTIONS
;;
stop)
[ -f $PID_F ] && kill $(cat $PID_F)
;;
*)
echo "usage: $0 (start|stop)"
exit 1
esac
exit $?
You can also follow the instructions on this page. You will need the script in paragraph 4.3. So, you don’t have to follow the instructions pointed out above here. Just follow the instructions on that page in paragraph 4.3.
What’s next?
You can now reboot your router and the snmpd daemon will start automatically. Now it is time to set up a monitoring tool. I used PRTG, but there are others around. It is out of the scope of this paper to describe the use of PRTG. There is enough material around to help you on that one.
-
Technology
OpenWRT and Snort
Saturday February 11, 2023Set up snort on OpenWrt
After installing the MMC/SD card mod, I have enough room to install snort on my wrt54gs. So, this paper will assume that the package will be set up on the MMC/SD card. Which is mounted on /opt. You can read about setting up the MMC/SD card on this page.
Installing the package
To install snort on your wrt54gs install the following package
root@Hellhound:~# ipkg -d opt install snort_2.4.4-1_mipsel.ipkThis will install snort in the directory /opt.
Remote syslog
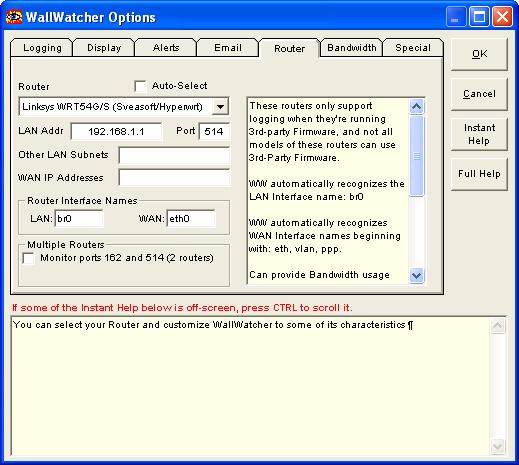
I want snort to log all its messages to a remote syslog server. I already discussed this on the page which discussed using fwbuilder with OpenWrt. Look on this page to set up wallwatcher.
Downloading rules files
We need to get some rule files. These rule files can be downloaded from the snort website. Download the snort 2.4 rule files from this website. These rule files need to be unpacked in the directory /opt/etc/snort/rules/
root@Hellhound:~# tar zxf snortrules-pr-2.4.tar.gzSetting up snort
Now we have to set up the snort.conf file. In this file, many snort settings are configured. We want to set up snort in a way it will log all messages to our remote syslog, it this case wallwatcher. The first thing we have to do is to set the option HOME_NET
var HOME_NET 192.168.1.0/24Next, we have to uncomment a line in the snort.conf file.
output alert_syslog: LOG_AUTH LOG_ALERTWe need to change the rules path
var RULE_PATH /opt/etc/snort/rulesAt the bottom of the snort.conf there are a lot of rule files included. Make sure you comment all the rule files at first. Just to make sure that we do not flood the memory of the wrt54gs and hang the device when we start snort.
Make the directory snort in the directory /var/log
root@Hellhound:~# mkdir /var/log/snortGiving snort a test run
To check if snort is running correctly on your device, give the following command on the prompt and open a website in your favorite browser.
root@Hellhound:~# snort -v -i vlan1This will give you the following output
01/25-22:02:12.344117 195.37.77.141:80 -> 10.0.0.100:2053
TC`1 P TTL:46 TOS:0x0 ID:55048 IpLen:20 DgmLen:40 DF
***A**** Seq: 0xC5D2F3DE Ack: 0xBD63343B Win: 0x5B4 TcpLen: 20
=+=+=+=+=+=+=+=+=+=+=+=+=+=+=+=+=+=+=+=+=+=+=+=+=+=+
End the test run by pressing crtl-C.
Running Snort
Now we know snort runs okay, we set up the rule files. These can be uncommented at the bottom of the /opt/etc/snort/snort.conf file. I would advise you to enable the rule files one by one and keep an eye on your memory usage. After each run of snort check your memory and determine if you can enable another rule. Run snort with the following command.
root@Hellhound:~# snort -c /opt/etc/snort/snort.conf -i vlan1&Check your memory usage by the following command
root@Hellhound:~# topIf snort is detecting any “bad” traffic, it will be logged to your remote syslog server.
Checking your setup
Snort can be quiet sometimes, how do we check if snort is doing its job?? To check your setup, kill the snort proces that is running at the moment. Make sure you have the LOCAL.RULES enabled in the snort.conf file. Then edit local.rules and add the following line of code.
alert ip any any -> any any (msg:"Got an IP Packet"; classtype:not-suspicious; sid:2000000; rev:1;)Now start snort with the following command
root@Hellhound:~# snort -c /opt/etc/snort/snort.conf -i vlan1&And keep a good eye on your remote syslog server…. I will start logging network traffic.
-
Technology
OpenWRT and Traffic Monitor
Saturday February 11, 2023A nice way of keeping track of your traffic is vnstat. This beauty is found in the repository of white russian. On the website of the author of vnstat you can find a complete reference of the possibilities of vnstat.
Installing the package
You can get this fine piece of software on your router by installing the following package provided by OpenWrt, vnstat_1.4-1_mipsel.ipk. On the OpenWrt forum a guy called arteqw made a impressive setup to be used with the x-wrt webif^2. I will add his setup in the next paragraphs.
Prepare OpenWrt
After installing the package, we need to create the “database” to collect our data. First, we need to create a directory to hold the database.
mkdir /var/lib/vnstatNow we create the database in this directory. So first change to this directory before executing the command. We will be creating a database on the WAN device of the router.
vnstat -u -i vlan1We also want this setup to survive a reboot, so in the /etc/init.d directory we edit the file S95custom-user-startup.
mkdir -p /var/lib/vnstat
vnstat -u -i vlan1
gettraffic.sh
Note: The script gettraffic.sh will be discussed later, for now, we just add this command.
Now we need to get this database to be updated on a regular interval, here cron is helpful. The crontab can be edited by the command crontab -e. In the example below, we update the database every 5 minutes.
*/5 **** vnstat -u -i vlan1Script gettraffic.sh
The following script must be placed in the directory /usr/sbin and will write the status of the data in the database to a file in the /tmp directory called traffic_stats.inc. This file will be picked up by the web-interface to display the values within the webif^2 interface of OpenWrt.
#!/bin/sh
IFACE_WAN=$(nvram get wan_ifname)
IFACE_LAN=$(nvram get lan_ifname)
IFACE_WLAN=$(nvram get wl0_ifname)

rm /tmp/traffic_stats.inc

echo "<br ><center>" >> /tmp/traffic_stats.inc
vnstat -tr -i $IFACE_WAN | grep -v seconds >> /tmp/traffic_stats.inc
echo "</center><br ><b ><th>Hourly at $IFACE_WAN[WAN]</th></b ><br ><center>" >> /tmp/traffic_stats.inc

vnstat -h -i $IFACE_WAN | grep -v $IFACE_WAN >> /tmp/traffic_stats.inc
echo "</center><br ><b ><th>Daily at $IFACE_WAN[WAN]</th></b ><br ><center>" >> /tmp/traffic_stats.inc

vnstat -d -i $IFACE_WAN | grep -v $IFACE_WAN >> /tmp/traffic_stats.inc
echo "</center><br ><b ><th>Weekly at $IFACE_WAN[WAN]</th></b ><br ><center>" >> /tmp/traffic_stats.inc

vnstat -w -i $IFACE_WAN | grep -v $IFACE_WAN >> /tmp/traffic_stats.inc
echo "</center><br ><b ><th>Monthly at $IFACE_WAN[WAN]</th></b ><br ><center>" >> /tmp/traffic_stats.inc

vnstat -m -i $IFACE_WAN | grep -v $IFACE_WAN >> /tmp/traffic_stats.inc
echo "</center>" >> /tmp/traffic_stats.inc
Last thing we need to do is to add an entry in the crontab (crontab -e). This entry will run the gettraffic.sh every 5 minutes, so that the file /tmp/traffic_stats.inc will be updated.
*/5 * * * * gettraffic.shWeb interface add-on
Finally, we need to extend the web interface, so we can see the traffic stats in our browser. To do so, we need to place the file traffic.sh in the directory /www/cgi-bin/webif. This file will pick up the file /tmp/traffic_stats.inc.
#!/usr/bin/webif-page
<?
. /usr/lib/webif/webif.sh
header "Status" "Traffic Statistic" "@TR<<Traffic Statistic>>"
?>
<pre><? cat /tmp/traffic_stats.inc ?></pre>
<? footer ?>
<!--
##WEBIF:name:Status:5:Traffic Statistic
-->
Email stats
I wanted to receive the stats of my router hourly by email. So, I looked at a package called mini-sendmail_1.3.5-1_mipsel.ipk which gives the ability to send emails. In the link section at the top I included the manpage for mini-sendmail. So to get the stats by email, I added the following line to the crontab.
0 9-16 * * 1-5 cat /tmp/traffic\_stats.inc | mini\_sendmail -fsend@domain.org -ssmtp.server.org receive@domain.orgThis crontab entry will email the contents of /tmp/traffic_stats.inc to the address receive@domain.org. It will be emailed every full hour between 09:00 and 16:00 from Monday to Friday.
-
Technology
OpenWRT and Dynamic DNS
Saturday February 11, 2023Having the major dynamic DNS services provide me with a domain name for my internet connection, I configured updatedd on my OpenWrt box. I stopped using ez-ipupdate because this application did not seem to pick up the WAN address of my ADSL router, but picked up the address of my wrt54gs and set that address to be my external address. Which gave problems, of course. Therefore I started to use updatedd which also supports all major dynamic DNS service providers.
Installing the packages
To get updatedd up and running, you need to install the package updatedd_2.5-1_ mipsel.ipk. Since I like to use the provider dyndns.org en no-ip.org I also installed the following packages updatedd-mod-noip_2.5-1_mipsel.ipk and updatedd-mod-dyndns_2.5-1_mipsel.ipk.
Update your IP
Now all the needed packages are installed. Now it’s time to update your IP with the chosen providers, for me, this is no-ip.org and dyndns.org.
updatedd noip username:password nodename.bounceme.net
updatedd dyndns username:password nodename.homeftp.org
Update your IP regularly
Now we want this action to be updated regularly. This means cron will be helpful. To edit cron you can use the command crontab -e. Which uses the VI commands to edit the content. I set up cron in the following way.
0 0 * * * updatedd noip username:password nodename.bounceme.net
0 0 * * * updatedd dyndns username:password nodename.homeftp.org
This will update my dynamic DNS accounts every day at midnight.
-
Technology
OpenWRT, fwbuilder and wallwatcher
Saturday February 11, 2023Installing the right packages
To get the fwbuilder generated scripts up and running on a OpenWrt powered device, you need to install a few packages. Those packages are found in de standard repository of white russian. The packages you need to install from that repository are ip_2.6.11-050330-1_mipsel.ipk, iptables-mod-extra_1.3.3-2_mipsel.ipk and iptables-utils_1.3.3-2_mipsel.ipk
Editing /etc/firewall.user
I am using a SquashFS version of OpenWrt. This means that the real filesystem is readonly and that all files are available with symbolic links on a writeable JFFS filesystem. What we now need to do is to delete the symbolic link and copy the real file in place of the symbolic link in the /etc directory.
Now we need to add the following code to the firewall.user file.
insmod ipt_LOG
insmod ipt_limit

if [not -f /usr/sbin/firewallscript.fw ] ; then
{orginal script}
else /usr/sbin/firewallscript.fw
fi
Now you have to place your firewall script in the /usr/sbin directory (or place it at a location of your choice, but you will have to edit the code above to match your location).
Instead of adding the two insmod lines in the firewall.user file, you can also edit the file /etc/modules. You can just edit the file like the example below.
ipt_LOG
ipt_limit
Remote syslog with wallwatcher
Now we have to set up remote syslog, so we can log the output of your firewall script with wallwatcher. Remember to put some rules in fwbuilder on logging, otherwise we will never log a thing. You need to set up OpenWrt to use a remote syslog server. You need to replace the xxx.xxx.xxx.xxx with the ip-address of the system that will be running wallwatcher.
nvram set log_ipaddr=xxx.xxx.xxx.xxx
nvram commit
The only thing you have to do next is to set up wallwatcher router tab
Change Startup order
With the RC5 release of OpenWrt all was working just fine, but when I started to use the RC6 version of OpenWrt I discovered that the firewall script was not executed after a reboot of the router. The problem seemed to be that the /etc/init.d/S35Firewall is executed before /etc/init.d/S40Network. So, When I renamed /etc/init.d/S35Firewall in /etc/init.d/S45Firewall and rebooted the router, the firewall script was executed and all worked just fine.
-
Technology
OpenWRT and MMC/SD card mod Linksys WRT54GSv4
Saturday February 11, 2023Modifying the casing of the router
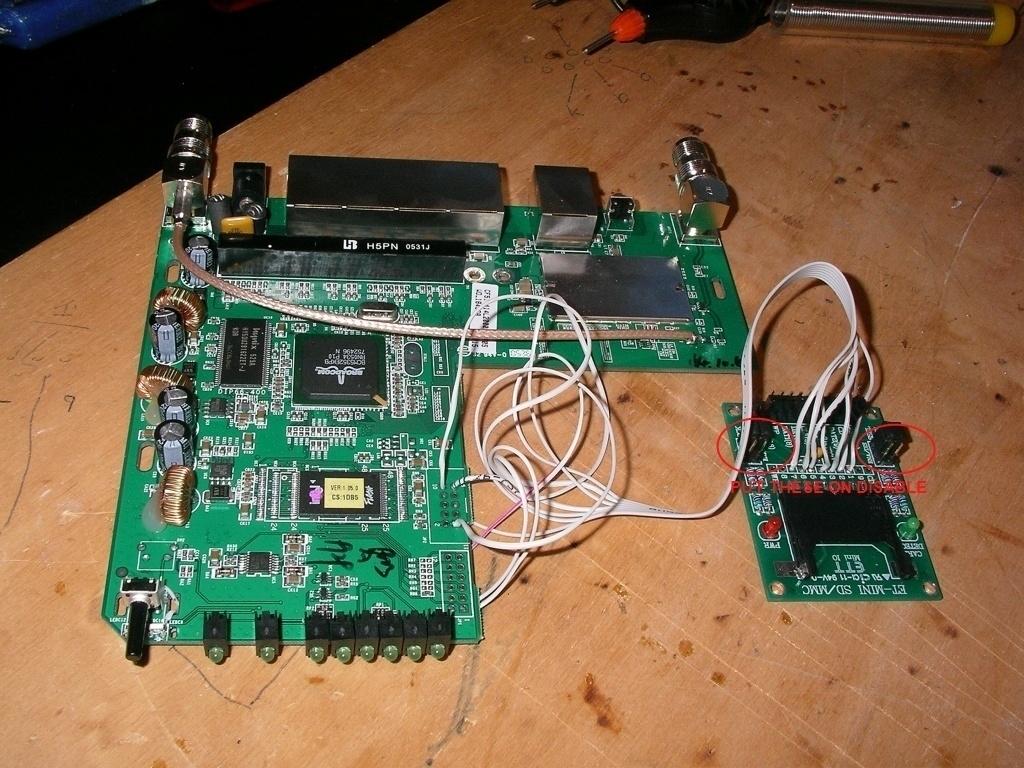
wrt54gs I used the MMC/SD mini board from Futurlec. I added a picture of the modded case. As you can see in the picture, I used the screw holes to mount the miniboard. I decided to make the card being inserted at the side of the case.

Soldering the miniboard to the wrt54gs pcb
I have a wrt54gs version 4, so I made use of the GPIO-pins 2,3,4 and 7. The table below shows the pin-layout of the SD card and the soldering point on the pcb of the wrt54gsV4.

Below, I placed the pictures I took during soldering the MMC/SD-card mod into the wrt54gs. The first two points are the easy ones. These are GPIO4 and GPIO7 located at the bottom-side of the PCB. They are straightforward to solder. So, no sweat here.

These two suckers are the hard ones to solder, but it is do-able. A steady hand and a good soldering-iron will do it!

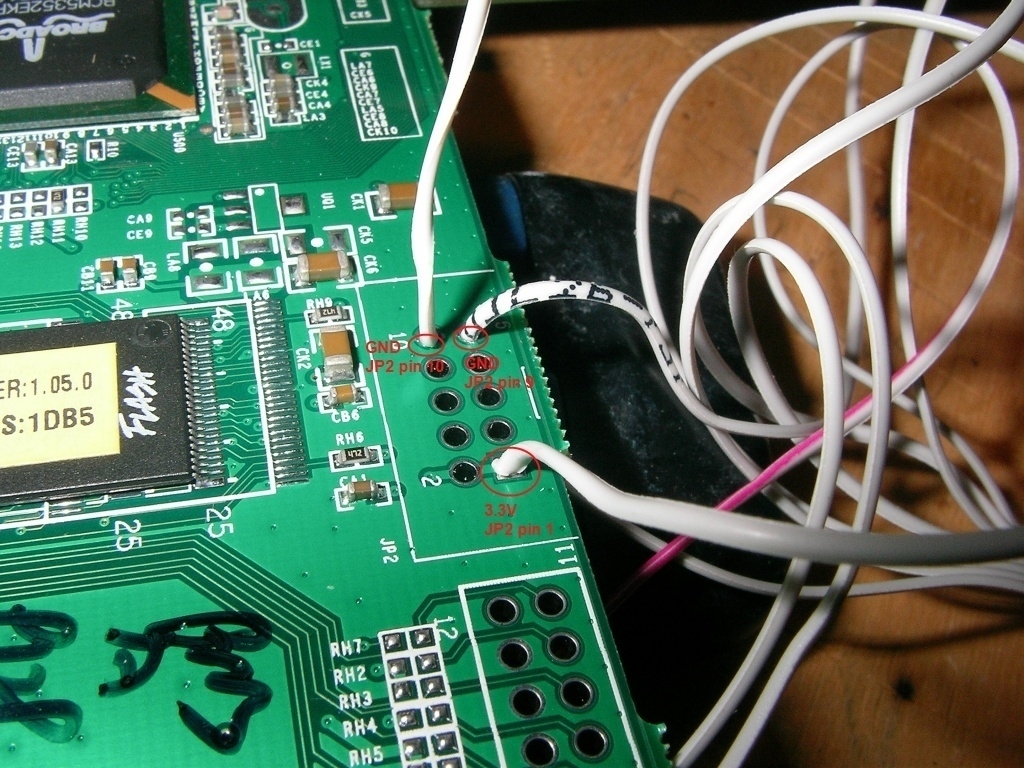
I am NOT sure on this one, but you can also use the following soldering points for GPIO2 and GPIO3. Use this at your own risk, I have not tried it, just tested it out with a multimeter.

These are the easiest soldering points of them all. The 3.3v and the two ground pins.
Here you have a picture of the complete setup with the miniboard of futurlec. Put the jumpers on the miniboard to disable. I also tried the jumpers on enable and they also work, no problem. But the jumpers pull the data-lines in a high state. I don’t know what kind of effect that will have on the chipset of the router.
Testing your modification
After you soldered the MMC/SD mod into the router, you are ready to turn on the router and copy the driver to the correct place. I use the following version of the driver, you can download it here. This driver needs to be placed in the directory.
/lib/modules/2.4.30Now we need to install the kernel modules for vfat filesystem support, so we can mount the MMC/SD card. To do this you need the following package kmod-vfat 2.4.30-brcm-5
Now all the needed software is installed on the router. We can start testing the mod. You have to execute the following command to add vfat support to the kernel
root@Hellhound:~# insmod fat
using /lib/modules/2.4.30/fat.o

root@Hellhound:~# insmod vfat
using /lib/modules/2.4.30/vfat.o
Now we are ready to test the soldering, make sure you have an SD card installed in your socket. Remember that theoretically the driver supports 2GB cards, but what I have found on the web and personally experienced is that a 2GB will not work. The largest card support is 1GB. Now execute the following command on the prompt.
root@Hellhound:~# insmod mmc
Using /lib/modules/2.4.30/mmc.o
To check if the mod is working execute the following command
root@Hellhound:~# dmesg
mmc Hardware init
mmc Card init
mmc Card init *1*
mmc Card init *2*
Size = 14400, hardsectsize = 512, sectors = 28800
Partition check:
mmca:
The orange LED on the router should light up. If you get an error, make sure you have a GPIO2 driver installed, otherwise recheck your soldering.
Now we are ready to mount the MMC/SD card. Execute the following command at the prompt.
root@Hellhound:~# mkdir /tmp/mmc
root@Hellhound:~# mount -tvfat /dev/mmc/disc0/part1 /tmp/mmc
This will mount your MMC/SD card to the mount point /tmp/mmc. To check if the mount was successful, execute the following.
root@Hellhound:~# df
Filesystem           1k-blocks      Used Available Use% Mounted on
/dev/root                 1024      1024         0 100% /rom
none                     7152        32      7120   0% /tmp
/dev/mtdblock/4           2240      2104       136  94% /jffs
/jffs                     1024      1024         0 100% /
/dev/mmc/disc0/part1    241657      1562    227618   1% /tmp/mmc
Now you need to mask the GPIO pins. Remember, the command below is for a GPIO2 mod. It works for version 0.9test.
root@Hellhound:~# echo "0x9c" > /proc/diag/gpiomask
root@Hellhound:~# cat /proc/diag/gpiomask
0x009c
root@Hellhound:~#
The following command should work with older versions of OpenWrt.
root@Hellhound:~# echo 9c > /proc/diag/gpiomask
root@Hellhound:~# cat /proc/diag/gpiomask
156
root@Hellhound:~#
This will make the mod stable. In the beginning I didn’t do a mask of the GPIO pins and that caused my mod to be unstable, and the router would lock up. Now we can test if the router is stable by executing the following command and checking the syslog afterwards (dmesg).
root@Hellhound:~# cd /tmp/mmc
root@Hellhound:~# wget http://www2.zonnet.nl/10mb.bin
Connecting to www2.zonnet.nl[62.58.50.219]:80
10mb.bin        24% |******                  |  2522 KB     00:09 ETA
To dismount/unload the modules
root@Hellhound:~# umount /tmp/mmc
root@Hellhound:~# rmmod mmc
root@Hellhound:~# rmmod vfat
root@Hellhound:~# rmmod fat
Making the setup persistent
After we have made sure the whole mod is working. We can attempt to make the mounting of the MMC/SD card survive a reboot of the router. I decided to have a mount point in the root called /opt. So, I execute the following command.
root@Hellhound:~# mkdir /optBecause we want to install packages on the MMC/SD card, we need to have support for symlinks. This is something vfat does not support. So we need to format the card in EXT2. To do this, we have to install the package e2fsprogs 1.38-1. After installing this package, we can start formatting the card. Make sure it is dismounted.
root@Hellhound:~# mkfs.ext2 /dev/mmc/disc0/part1When the card is formatted, we create a file /etc/fstab with the following code
/dev/mmc/disc0/part1 /opt ext2 defaults 0 0Now instal the package kmod-ext2 2.4.30-brcm-5 to give the kernel EXT2 support. (If you like, you can uninstall the vfat package). To test if the card is mountable , try the following:
root@Hellhound:~# insmod ext2
root@Hellhound:~# mount /opt
To check if the card is writeable, you can check it by coping a file to it or so. Now create the file S20mmc in the directory /etc/init.d with the following code:
#!/bin/sh
echo "0x9c" > /proc/diag/gpiomask
insmod mmc
e2fsck /dev/mmc/disc0/part1
mount /opt
Make the file executable with the following command
root@Hellhound:~# chmod 755 S20mmcNow all you need to do is to reboot your router, and you are ready to go. You don’t need to worry about the insmod EXT2 because in the directory /etc/modules.d there is a script called 30-ext2 that will load the module at boottime.
Flashing power LED
*note: I have not tested this yet. But this mod will cause the power LED to blink when the module is loaded. To fix this comment, the last line in the file /etc/init.d/S99done.
Installing packages on the MMC/SD card
To install the packages on your MMC/SD card, you need to change some environment setting in OpenWrt. There is a nice wiki document about this that can be found here.
What is missing from this wiki document is information about running packages with symlinks. I found out that many packages would not run even when you followed the wiki document mentioned early. The script mentioned in paragraph 4.3 of this document gives you the solution you need to run the programs installed on the external storage. This script will add (and remove) symlinks to the programs on the MMC/SD card from the root. You can either add/remove symlinks per program, or add/remove symlinks for the whole MMC/SD card.
-
Technology
Fediverse and WordPress
Saturday February 11, 2023What is it?
ActivityPub is the glue or the oil, if you like, for the Fediverse. It glues all the services together in the Fediverse. It lets mastodon servers communicate with each other, but it also lets Pixelfed talk with mastodon and vice versa. All the social media that is ActivityPub aware can exchange messages with each other.
WordPress
WordPress is by its nature not ActivityPub aware. So, it can’t exchange messages with the Fediverse. But there is a solution. Matthias Pfefferle created a WordPress plugin to connect WordPress to the Fediverse. This enables you to get your WordPress posts across the Fediverse.
What do you need
- Webfinger WordPress Plugin installed on your WordPress instance;
- ActivityPub WordPress Plugin installed on your WordPress instance.
Setup
There is not much needed to get this working. Installed both plugins. The ActivityPub plugin has default settings that could work for you, but fiddle with them if you like. The Webfinger plugin doesn’t need configuration at all. When both plugins are installed, you will see it advises you for 2 more plugins. They are not needed to get ActivityPub working. But will enhance the experience.
Checking the setup
- First check the Site Health under Tools > Site Health. If all is working correctly, you will get no critical errors on this page.
- Go to the Webfinger website and check if you get a JSON response from your ActivityPub plugin by entering the e-mail address at the top. HINT: This is not your regular e-mail address, but the account name and domain name of your WordPress instance. So, if you have an account “Jake” on your WordPress instance at the domain “great.blog.com”, your “e-mail address” will be jake@great.blog.com. You can enter it at the top of the page. As a result, you should get a JSON response.
- Go to your Mastodon account and search for your WordPress account (i.e., jake@great.blog.com) in the search bar of Mastodon.
Dos and Don’ts and Hints
- Don’t install a cache enhancing plugin. It will mess with the ActivityPub or Webfinger Plugin. You will see critical errors after a while in your Site Health menu.
- I found that [mastodon.social ](mastodon.social “mastodon.social”)messes with the avatar. It will not come through, even after a few posts on WordPress. I checked a few other mastodon instances (also mastodon.online, which is the other flagship server) they were fine. So, you should be careful with the mastodon server you choose to test this. It could make you think the plugin isn’t working properly.
- Some hosting providers protect the .well-known directory. When this directory is inaccessible for the plugin. It will not work. (This made me host my WordPress instance at home).