Technology
OpenWRT and MMC/SD card mod Linksys WRT54GSv4
Modifying the casing of the router
wrt54gs I used the MMC/SD mini board from Futurlec. I added a picture of the modded case. As you can see in the picture, I used the screw holes to mount the miniboard. I decided to make the card being inserted at the side of the case.

Soldering the miniboard to the wrt54gs pcb
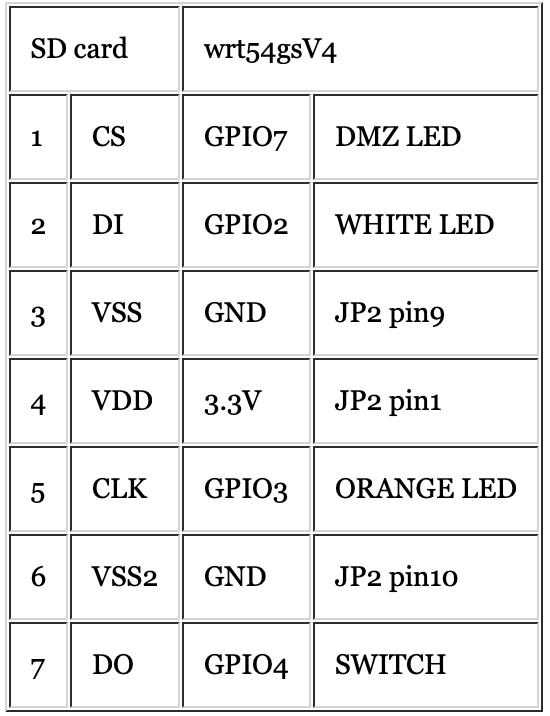
I have a wrt54gs version 4, so I made use of the GPIO-pins 2,3,4 and 7. The table below shows the pin-layout of the SD card and the soldering point on the pcb of the wrt54gsV4.
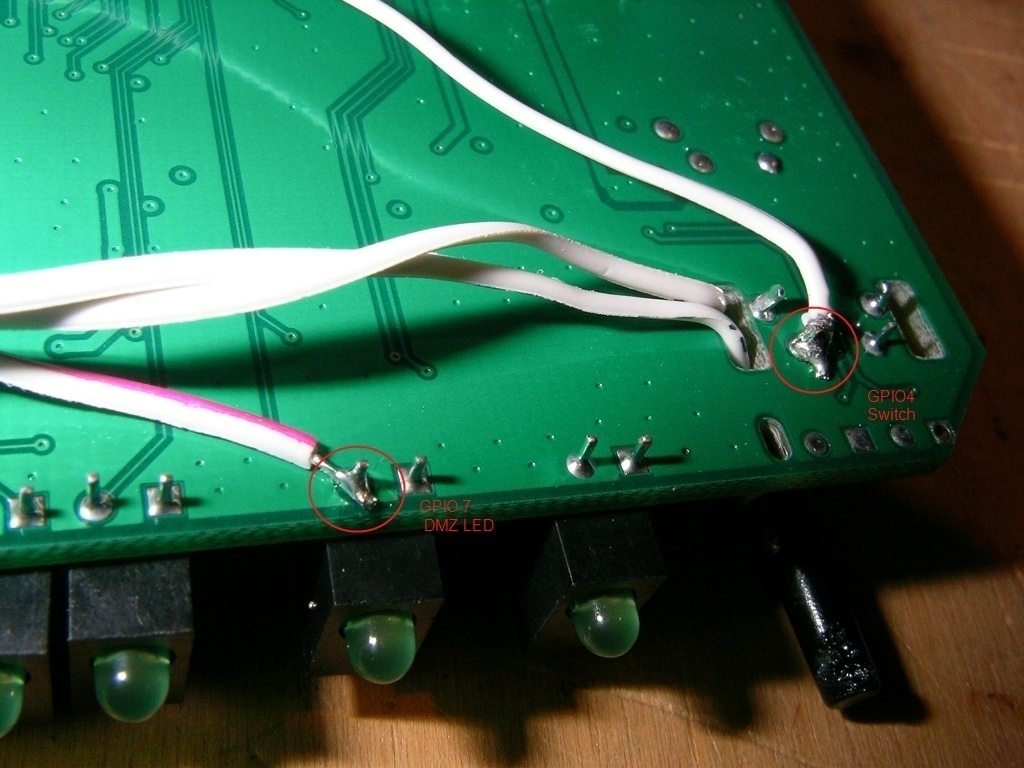
Below, I placed the pictures I took during soldering the MMC/SD-card mod into the wrt54gs. The first two points are the easy ones. These are GPIO4 and GPIO7 located at the bottom-side of the PCB. They are straightforward to solder. So, no sweat here.
These two suckers are the hard ones to solder, but it is do-able. A steady hand and a good soldering-iron will do it!
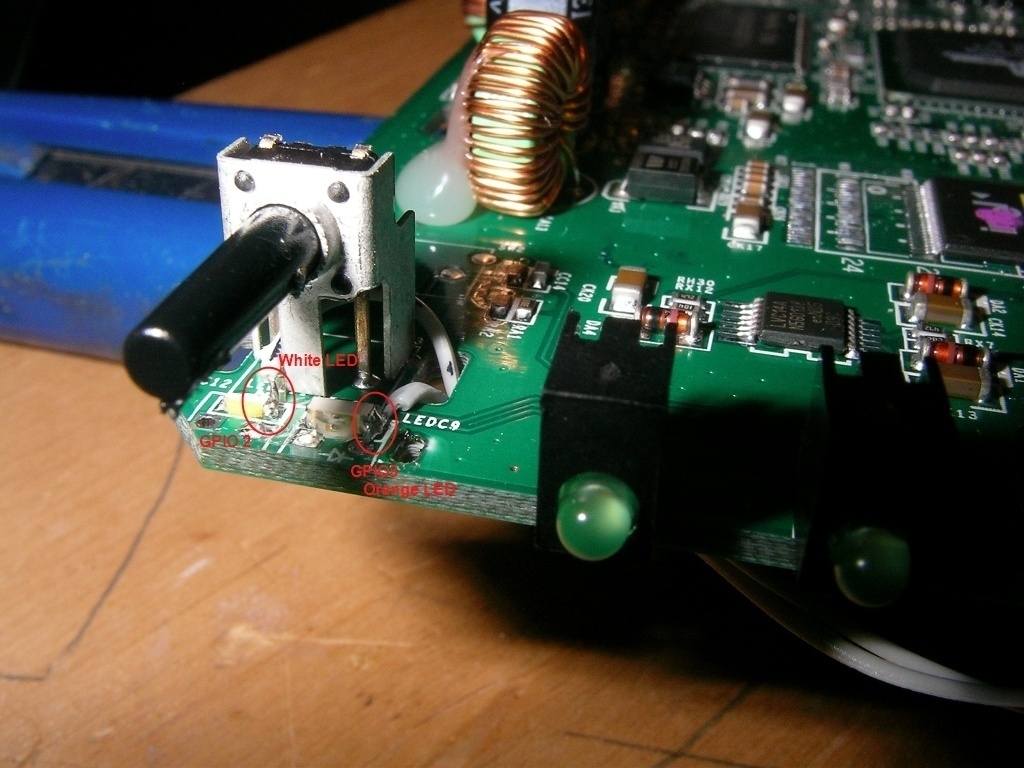
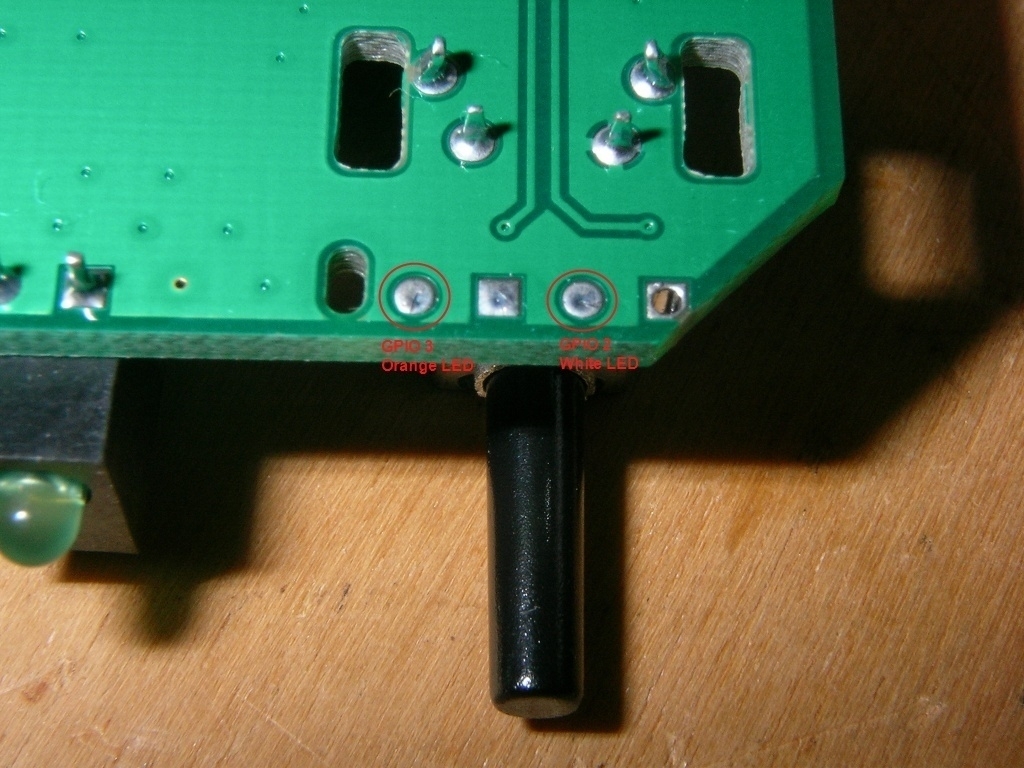
I am NOT sure on this one, but you can also use the following soldering points for GPIO2 and GPIO3. Use this at your own risk, I have not tried it, just tested it out with a multimeter.
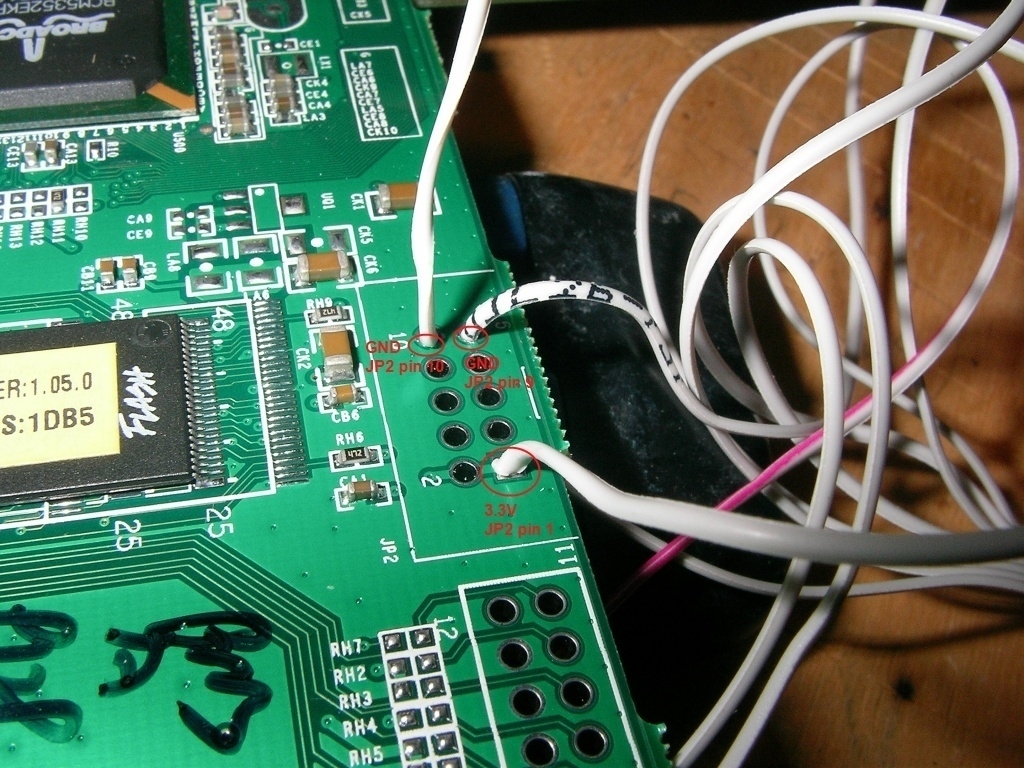
These are the easiest soldering points of them all. The 3.3v and the two ground pins.
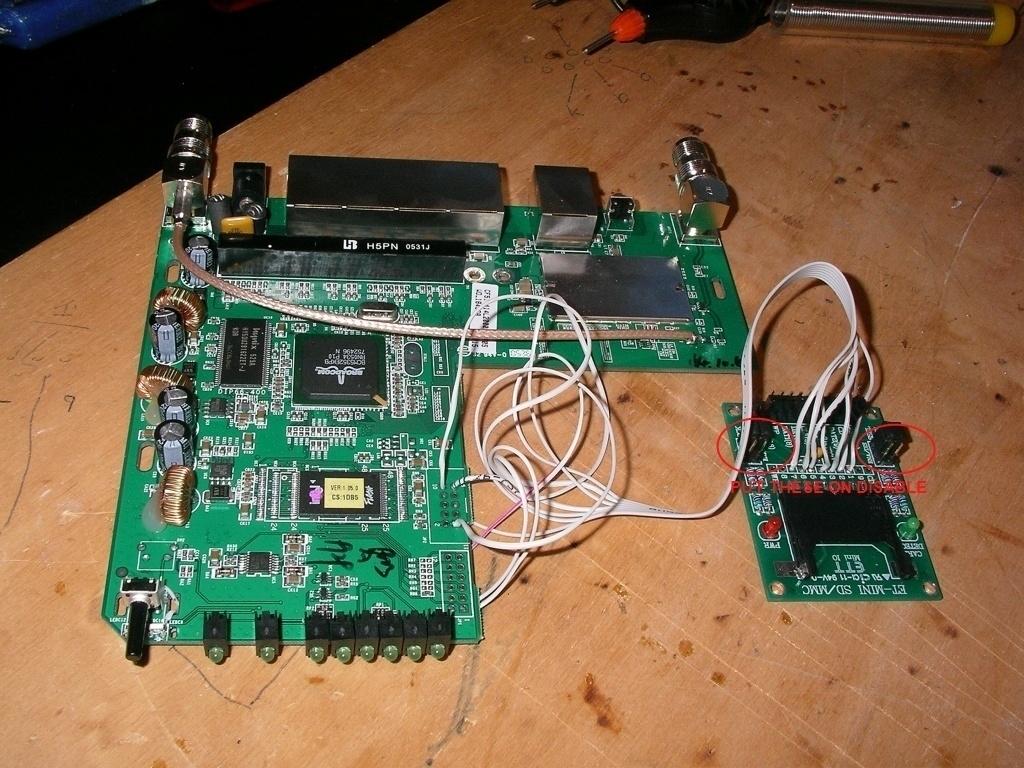
Here you have a picture of the complete setup with the miniboard of futurlec. Put the jumpers on the miniboard to disable. I also tried the jumpers on enable and they also work, no problem. But the jumpers pull the data-lines in a high state. I don’t know what kind of effect that will have on the chipset of the router.
Testing your modification
After you soldered the MMC/SD mod into the router, you are ready to turn on the router and copy the driver to the correct place. I use the following version of the driver, you can download it here. This driver needs to be placed in the directory.
/lib/modules/2.4.30
Now we need to install the kernel modules for vfat filesystem support, so we can mount the MMC/SD card. To do this you need the following package kmod-vfat 2.4.30-brcm-5
Now all the needed software is installed on the router. We can start testing the mod. You have to execute the following command to add vfat support to the kernel
root@Hellhound:~# insmod fat
using /lib/modules/2.4.30/fat.o

root@Hellhound:~# insmod vfat
using /lib/modules/2.4.30/vfat.o
Now we are ready to test the soldering, make sure you have an SD card installed in your socket. Remember that theoretically the driver supports 2GB cards, but what I have found on the web and personally experienced is that a 2GB will not work. The largest card support is 1GB. Now execute the following command on the prompt.
root@Hellhound:~# insmod mmc
Using /lib/modules/2.4.30/mmc.o
To check if the mod is working execute the following command
root@Hellhound:~# dmesg
mmc Hardware init
mmc Card init
mmc Card init *1*
mmc Card init *2*
Size = 14400, hardsectsize = 512, sectors = 28800
Partition check:
mmca:
The orange LED on the router should light up. If you get an error, make sure you have a GPIO2 driver installed, otherwise recheck your soldering.
Now we are ready to mount the MMC/SD card. Execute the following command at the prompt.
root@Hellhound:~# mkdir /tmp/mmc
root@Hellhound:~# mount -tvfat /dev/mmc/disc0/part1 /tmp/mmc
This will mount your MMC/SD card to the mount point /tmp/mmc. To check if the mount was successful, execute the following.
root@Hellhound:~# df
Filesystem           1k-blocks      Used Available Use% Mounted on
/dev/root                 1024      1024         0 100% /rom
none                     7152        32      7120   0% /tmp
/dev/mtdblock/4           2240      2104       136  94% /jffs
/jffs                     1024      1024         0 100% /
/dev/mmc/disc0/part1    241657      1562    227618   1% /tmp/mmc
Now you need to mask the GPIO pins. Remember, the command below is for a GPIO2 mod. It works for version 0.9test.
root@Hellhound:~# echo "0x9c" > /proc/diag/gpiomask
root@Hellhound:~# cat /proc/diag/gpiomask
0x009c
root@Hellhound:~#
The following command should work with older versions of OpenWrt.
root@Hellhound:~# echo 9c > /proc/diag/gpiomask
root@Hellhound:~# cat /proc/diag/gpiomask
156
root@Hellhound:~#
This will make the mod stable. In the beginning I didn’t do a mask of the GPIO pins and that caused my mod to be unstable, and the router would lock up. Now we can test if the router is stable by executing the following command and checking the syslog afterwards (dmesg).
root@Hellhound:~# cd /tmp/mmc
root@Hellhound:~# wget http://www2.zonnet.nl/10mb.bin
Connecting to www2.zonnet.nl[62.58.50.219]:80
10mb.bin        24% |******                  |  2522 KB     00:09 ETA
To dismount/unload the modules
root@Hellhound:~# umount /tmp/mmc
root@Hellhound:~# rmmod mmc
root@Hellhound:~# rmmod vfat
root@Hellhound:~# rmmod fat
Making the setup persistent
After we have made sure the whole mod is working. We can attempt to make the mounting of the MMC/SD card survive a reboot of the router. I decided to have a mount point in the root called /opt. So, I execute the following command.
root@Hellhound:~# mkdir /opt
Because we want to install packages on the MMC/SD card, we need to have support for symlinks. This is something vfat does not support. So we need to format the card in EXT2. To do this, we have to install the package e2fsprogs 1.38-1. After installing this package, we can start formatting the card. Make sure it is dismounted.
root@Hellhound:~# mkfs.ext2 /dev/mmc/disc0/part1
When the card is formatted, we create a file /etc/fstab with the following code
/dev/mmc/disc0/part1 /opt ext2 defaults 0 0
Now instal the package kmod-ext2 2.4.30-brcm-5 to give the kernel EXT2 support. (If you like, you can uninstall the vfat package). To test if the card is mountable , try the following:
root@Hellhound:~# insmod ext2
root@Hellhound:~# mount /opt
To check if the card is writeable, you can check it by coping a file to it or so. Now create the file S20mmc in the directory /etc/init.d with the following code:
#!/bin/sh
echo "0x9c" > /proc/diag/gpiomask
insmod mmc
e2fsck /dev/mmc/disc0/part1
mount /opt
Make the file executable with the following command
root@Hellhound:~# chmod 755 S20mmc
Now all you need to do is to reboot your router, and you are ready to go. You don’t need to worry about the insmod EXT2 because in the directory /etc/modules.d there is a script called 30-ext2 that will load the module at boottime.
Flashing power LED
*note: I have not tested this yet. But this mod will cause the power LED to blink when the module is loaded. To fix this comment, the last line in the file /etc/init.d/S99done.
Installing packages on the MMC/SD card
To install the packages on your MMC/SD card, you need to change some environment setting in OpenWrt. There is a nice wiki document about this that can be found here.
What is missing from this wiki document is information about running packages with symlinks. I found out that many packages would not run even when you followed the wiki document mentioned early. The script mentioned in paragraph 4.3 of this document gives you the solution you need to run the programs installed on the external storage. This script will add (and remove) symlinks to the programs on the MMC/SD card from the root. You can either add/remove symlinks per program, or add/remove symlinks for the whole MMC/SD card.
Saturday February 11, 2023