
Category: Technology
You are viewing all posts from this category, beginning with the most recent.
📟 Escaping USA Tech, Bye Bye Dropbox, Hello! Jottacloud
I recently got more concerned about what is happening in the US since a certain president He-Who-Must-Not-Be-Named and what this does in the world and my personal life. I was already on a streak, cutting loose from BIG-TECH social media like META’s “suite” and Google. This was also for privacy concerns.
I got concern about having all my data, partly client side encrypted but partly not, stored in the USA with Dropbox. I really liked Dropbox because it has a great adoption rate in other apps and products. But I did not like it that all my data was in the US. And with the recent presidency of He-Who-Must-Not-Be-Named, I got more concerned about my data with Dropbox.
Finding a European alternative with the same level of integration in software and services as Dropbox is a challenging task. Not that these services are inferior, but integrating them can sometimes be difficult. My goal was to achieve incremental backups of my shared folders on a Synology NAS and have the sync folder from my cloud storage synchronised with the Synology NAS.
This would be typically done with Hyperbackup for incremental backups and Cloud Sync for your sync folder. Most of the services listed there are either US-based, expensive, no up to the job, etc. A least for me.
After looking around and comparing European-based cloud providers, I got my eye on Jottacloud. This is a Norwegian cloud provider which is fast, in Europe of course, nice supporting clients for iOS and macOS (Yes, also US BIG-TECH, but I love Apple, there is nothing that compares with Apple Products. And I think Apple is doing a better job on privacy), has a great deal on “unlimited” storage space. The only downside Jottacloud has, they don’t (like Dropbox) have zero-knowledge encryption. If they had it, would enhance privacy a lot… But since they are in Europe with strict privacy laws, I took that as a step forward compared to the US-based Dropbox. Plus, the unlimited storage deal at JottaCloud is the same price as the 2 TB deal I had at Dropbox. Just a hint: if you look around on the internet you can find Jottacloud deals. I got a deal with 15% off for the first year.
Jottacloud also runs on 100% renewable energy, if you care for such a thing (I do).
Jottacloud is not one of the default services supported by Synology in their backup suite and other software. This is a shame, but there is a way to still create nice incremental backups of your shared folders to Jottacloud directly from your Synology.
This is achieved using a brilliant free application called Restic. Restic is a free, open-source backup tool offering secure, efficient, and flexible data protection. It supports multiple storage backends, including cloud services, and features encryption, deduplication, and compression. Restic is user-friendly and suitable for various operating systems, making it ideal for both personal and professional backup needs.
To access Jottacloud with Restic, I used Rclone. Rclone is a versatile command-line tool for managing cloud storage, offering features such as file syncing, encryption, and compression. It supports over 70 cloud services, including Jottacloud, Google Drive, and Amazon S3, and is ideal for automating backups and data transfers across various platforms with ease and reliability.
Rclone and Restic are not natively available on your Synology. There are scripts and methods to install them via the NAS shell. However, I am a fan of Docker. Since I own a Synology that supports Docker, which Synology refers to as “Container Manager” in their DSM, I implemented Restic and Rclone using Docker.
Docker is a containerisation platform that enables efficient deployment and management of applications. It allows developers to package software into portable containers, ensuring consistent performance across environments. Docker streamlines development, testing, and deployment processes, enhancing flexibility and scalability for a wide range of applications and services.
If your Synology does not support Docker, you can still achieve what is described below by using a Raspberry Pi. You can in install your favourite OS (mine is Ubuntu on the PI) and install Docker within Ubuntu on this beautiful device. If you have done so, you can connect your shared folders using NFS to the Ubuntu installation you can use the method that is described below.
Okay, how is this done? Five years ago, I came a cross of a nice five-year-old (at that time) project on GitHub. This already made a docker container including Restic and Rclone. At the time It was not recently maintained (older Restic version, not build with the latest package) I decided to fork this project and update and enhance it. My GitHub repository can be found here. The pre-build docker images for ARM and AMD can be found here.
I recently added an option to set up a sync with your sync-folder, supported by your cloud provider. I will explain that later. First, we set up the container in Docker.
Below you find a template docker-compose.yml file. This uses the stable build for the image. If you like the development tree, use the marc0janssen/restic-backup-helper:develop as an image reference.
version: '3'

services:
  restic-remote:
    container_name: restic-remote
    image: marc0janssen/restic-backup-helper:latest
    healthcheck:
      test: ["CMD", "restic", "-r", "rclone:jottacloud:backups", "cat", "config"]
      interval: 15m
      timeout: 10s
      start_period: 1m
      start_interval: 10s
    restart: always
    hostname: supernode
    cap_add:
      - DAC_READ_SEARCH
      - SYS_ADMIN
    devices:
      - /dev/fuse
    environment:
      - RESTIC_PASSWORD=YOUR_PASSWORD_HERE
      - RESTIC_TAG=YOUR_TAGS_HERE
      - RESTIC_FORGET_ARGS=--prune --keep-hourly 24 --keep-daily 7 --keep-weekly 5 --keep-monthly 12 --keep-yearly 10
      - RESTIC_REPOSITORY=rclone:jottacloud:backups
      - RESTIC_JOB_ARGS=--exclude-file /config/exclude_files.txt
      - RESTIC_CACHE_DIR=/tmp/cache_dir
      - TMPDIR=/tmp/restic/
      - BACKUP_CRON=0 1,13 * * *
      - BACKUP_ROOT_DIR=/data
      - MAILX_RCPT=your_mail@here.tld
      - MAILX_ON_ERROR=OFF
      - CHECK_CRON=37 1 1 * *
      - RCLONE_CONFIG=/config/rclone.conf
      - SYNC_JOB_FILE=/config/sync_jobs.txt
      - SYNC_JOB_ARGS=--exclude-from exclude_sync.txt
      - SYNC_CRON=*/10 * * * *
      - TZ=Europe/Amsterdam
    volumes:
      - /etc/localtime:/etc/localtime:ro
      - /path/to/your/hooks:/hooks
      - /path/to/your/log:/var/log
      - /path/to/your/restore:/restore
      - /path/to/your/config/:/config
      - /path/to/your/config/msmtprc:/etc/msmtprc
      - /path/to/data:/data
      - /path/to/your/tmp/:/tmp/restic/
      - /path/to/your/cache_dir/:/tmp/cache_dir/
Set up the following tree for your installation:
./
├── config
│   ├── exclude_files.txt
│   ├── exclude_sync.txt
│   ├── include_files.txt
│   ├── msmtprc
│   ├── rclone.conf
│   └── sync_jobs.txt
├── hooks
├── log
│   ├── backup-error-last.log
│   ├── backup-last.log
│   ├── check-error-last.log
│   ├── check-last.log
│   └── cron.log
└── scripts
    └── docker-compose.yml
-
config
exclude_files.txt- files/folders to exclude from your Restic backupsexclude_sync.txt- files/folders to exclude from your Rclone bisyncinclude_files.txt- files/folders to include from your Restic backupsmsmtprc- configuration file for the msmtp-clientrclone.conf- configuration file for your rclone clientsync_jobs.txt- configuration file with sync jobs for rclone
-
hooks
pre-backup.sh- script started before backuppost-backup.sh- script started after backuppre-check.sh- script started before checking the repositorypost-check.sh- script started after checking the repositorypre-sync.sh- script started before sync of sync folderpost-sync.sh- script started after sync of sync folder
-
log
backup-error-last.log- Most recent backup error logbackup-last.log- Most recent backup logcheck-error-last.log- Most recent repository check error logcheck-last.log- Most recent repository check logcron.log- Active cron logsync-error-last.log- Most recent sync error logsync-last.log- Most recent sync log
-
scripts
docker-compose.yml- Container Configuration file
The first thing to do is to create a rclone config file. I, personally, do this within Ubuntu on a Raspberry Pi, where I installed rclone. Run the follow command and follow its instructions:
$ rclone config
To choose the following option, n) New remote. Enter a name for your new remote. Since I use Jottacloud, I entered Jottacloud. A list of cloud providers is shown. Jottacloud is number 25. Enter this number on the CLI. The next question is if you have an advanced configuration, for me, this answer is the default no. After this, you have to select an authentication type. Choose 1 Standard authentication. Now you have to generate a Personal login token. This can be generated here. Paste this token in the CLI and press enter. The next question is if you use a non-standard device or mountpoint. For a backup is n) No (default) but if you want to use the sync option of this image I advise you to select y) Yes and pick the Sync mount point. For now, select n) No (default). Confirm your config. Your new created rclone.conf can be found in:
~/.config/rclone/rclone.conf
Copy this file to the /config/ directory of the tree shown above.
Remember to set RESTIC_REPOSITORY and healthcheck: in the docker-compose.yml to the path of your repository. For me, this would be:
rclone:jottacloud:backups
NOTE: If you plan to back up multiple nodes with their containers. And you decide to have a rclone and Restic package on your client desktop or laptop. And also connect to the repository, ALWAYS have a new separate rclone.conf file. Your token will get invalid if you connect with multiple nodes to use the same token.
NOTE: Also make sure the rclone.conf file is writable for the restic-helper-container, since Rclone will update the expiration date for the token. If it fails to do so, your token will get invalid.
If the token gets invalid, you can update your token with:
$ rclone config reconnect jottacloud:
Where jottacloud: is the name of your remote.
The next stop is to create a configuration file for the mail option in the container. This file should look like the following example.
account default
from _mail_from@here.tld_
host _smtp_host.here.tld_
port 587
tls on
auth on
user _login@here.tld_
password _Pa55w0rd_h3r3_
Next stop is to create a configuration file for the files you would rather not back up from your source. A basic file for a Synology would be something like the following example. Of course, you can add your exclusions to the file exclude_files.txt.
*@eaDir*
.DS_Store
**/#recycle
Setting the BACKUP_ROOT_DIR environment variable in the docker-compose.yml file to a shared directory of your Synology would only back up that directory, ex.: BACKUP_ROOT_DIR=/volume1/data. That is probably not what you want. You most likely want to back up more shared directories. If you choose BACKUP_ROOT_DIR=/volume1 to do so, I would back up ALL the stuff in /volume1 and that is also not what we want.
To come around this, you leave BACKUP_ROOT_DIR= empty and set up include_files.txt. This file holds the files and directories you would like to back up.
/volume1/content
/volume1/docker
/volume1/documents
/volume1/homes
/volume1/homevideo
/volume1/inbox
/volume1/logging
/volume1/photo
/volume1/programming
/volume1/software
Edit your docker-compose.yml with the following line.
- RESTIC_JOB_ARGS=--exclude-file /config/exclude_files.txt --files-from /config/include_files.txt
We still need to create a repository in the cloud, Jottacloud that is. Here we need to use Restic on the linux CLI. I do this again from an Ubuntu installation on a Raspberry Pi. The command you have to execute is:
$ restic -r rclone:jottacloud:backups init
- rclone - This is the protocol we like to use
- jottacloud - This is the remote you created with rclone
- backups - This is a target that will be created in the Jottacloud Archive section.
Now set up the rest of the docker-compose.yml file and start your container. The following command will get you started to start the container.
$ docker-compose -p "restic-backup-helper" -f /path/to/your/docker-compose.yml up -d --remove-orphans
Of course, if you use Portainer. You can create a stack and past the content of the docker-compose.yml in the editor and start your container like so.
Portainer is an open-source container management platform offering a user-friendly graphical interface for managing Docker and Kubernetes environments. It simplifies deployment, monitoring, and maintenance of containerised applications, providing a unified dashboard for multiple environments and supporting various container technologies like Docker Swarm and Azure ACI.
If you set up the container correctly, you would see something like this.
🌟 *************************************************
🌟 ***           Restic Backup Helper            ***
🌟 *************************************************
🚀 Starting container Restic Backup Helper 'kish' on: 2025-03-25 19:03:16...
📦 Release: 1.6.52-0.17.3-dev
🔍 Checking repository status...
ℹ️ Repository check status: 0
✅ Restic repository 'rclone:jottacloud:backups' attached and accessible.
⏰ Setting up backup cron job with expression: 30 17 * * 6
⏰ Setting up sync cron job with expression: */5 * * * *
✅ Container started successfully.
In this example, the backup will be executed every Saturday at 17:30. The repository can be found on rclone:jottacloud:backups. This will back it up to the archive part of Jottacloud.
If there is a successful backup, you will see output like this.
ℹ️ Pre-backup script not found...
🔄 Starting Backup at 2025-03-25 17:30:00
📦 Performing backup of /volume1/inbox...
✅ Backup Successful
🏁 Finished backup at 2025-03-25 17:30:38 after 0m 38s
ℹ️ Post-backup script not found...
So your backup is nice and running. In the example above, there a second CRON with runs every 5 minutes. This is the sync folder the connects to the Jottacloud synchronisation part of the cloud.
The setting this up runs rclone config again, runs through the same steps as shown above but if the question comes for a non-standard device or mountpoint. Choose YES and choose the option Sync. This gives Rclone access to the synchronisation part of Jottacloud. The advantage is that whatever you sync from your Synology to Jottacloud, the Jottacloud software will pick this up and sync this to your other devices. If you have the Jottacloud software installed.
Don’t forget to pick a new TOKEN, and after you generate that new config file (with two remotes) copy it to /config/ of your container. Also pick a new name for that remote like jottasync.
Set up the following environment variables in the docker-compose.yml file.
      - SYNC_JOB_FILE=/config/sync_jobs.txt
      - SYNC_JOB_ARGS=--exclude-from exclude_sync.txt
      - SYNC_CRON=*/10 * * * *
The sync_jobs.txt should contain something like this.
# SYNC JOBS
# SOURCE;DESTINATION

/volume1/inbox;jottasync:/inbox
/volume1/photo;jottasync:/photo
/volume1/documents;jottasync:/documents
It is the source and destination of the data you like to sync.
The exclude_sync.txt should contain the files and directories you don’t like to sync.
# Exclude system directories
@eaDir/**
\#recycle/**

# Exclude macOS system files
.DS_Store
And set your SYNC_CRONwith the desired interval of your sync.
If all is well set up, you will see output for the first run only like the following example.
🔀 Performing sync of /volume1/inbox <-> jottasync:/inbox...
❌ Sync Failed with Status 2
🚨 Starting recovery procedure...
🔄 Step 1: Updating from /volume1/inbox to jottasync:/inbox
🔄 Step 2: Updating from jottasync:/inbox to /volume1/inbox
🔄 Step 3: Performing full resync between /volume1/inbox and jottasync:/inbox
✅ Recovery Successful - All steps completed
📊 Recovery Exitcode Summary: Source→Dest=0, Dest→Source=0, Resync=0
🏁 Finished sync at 2025-03-25 15:55:39 after 0m 39s
🔀 Performing sync of /volume1/photo <-> jottasync:/photo...
❌ Sync Failed with Status 2
🚨 Starting recovery procedure...
🔄 Step 1: Updating from /volume1/photo to jottasync:/photo
🔄 Step 2: Updating from jottasync:/photo to /volume1/photo
🔄 Step 3: Performing full resync between /volume1/photo and jottasync:/photo
✅ Recovery Successful - All steps completed
📊 Recovery Exitcode Summary: Source→Dest=0, Dest→Source=0, Resync=0
🏁 Finished sync at 2025-03-25 15:55:39 after 0m 39s
🔀 Performing sync of /volume1/documents <-> jottasync:/documents...
❌ Sync Failed with Status 2
🚨 Starting recovery procedure...
🔄 Step 1: Updating from /volume1/documents to jottasync:/documents
🔄 Step 2: Updating from jottasync:/documents to /volume1/documents
🔄 Step 3: Performing full resync between /volume1/documents and jottasync:/documents
✅ Recovery Successful - All steps completed
📊 Recovery Exitcode Summary: Source→Dest=0, Dest→Source=0, Resync=0
🏁 Finished sync at 2025-03-25 15:55:39 after 0m 39s
The first sync will “fail” because the caches are not yet up to date. The script will handle this correctly for the second run of your sync. Like you see below.
ℹ️ Pre-sync script not found...
🔀 Performing sync of /volume1/inbox <-> jottasync:/inbox...
✅ Sync Successful
🏁 Finished sync at 2025-03-25 19:30:11 after 0m 11s
🔀 Performing sync of /volume1/photo <-> jottasync:/photo...
✅ Sync Successful
🏁 Finished sync at 2025-03-25 19:30:24 after 0m 24s
🔀 Performing sync of /volume1/documents <-> jottasync:/documents...
✅ Sync Successful
🏁 Finished sync at 2025-03-25 19:30:33 after 0m 33s
ℹ️ Post-sync script not found...
Note: The default for Rclone bisync if that is 50% more difference between the source and the destination is found, Rclone will fail and exit. The script syncing your data will then try to copy all data back from the source to the destination and from destination to source. This will look like all syncs did not work, but actually, it is a safety measure. If you don’t want this, add --force to your SYNC_JOB_ARGS.
Here are some examples to use Restic inside the container from the host.
This command will list all snapshots with Restic from a container restic-remote.
$ sudo docker exec -ti restic-remote restic snapshots
This command generates the following output.
ID        Time                 Host        Tags        Paths            Size
-----------------------------------------------------------------------------------
9547a8f4  2025-03-21 16:33:45  eridu       eridu       /home/pi/docker  324.319 MiB
693fc4e7  2025-03-21 23:59:09  eridu       eridu       /home/pi/docker  324.366 MiB
a2db8a02  2025-03-22 18:00:00  eridu       eridu       /home/pi/docker  324.823 MiB
b3076cd0  2025-03-22 19:00:00  eridu       eridu       /home/pi/docker  324.476 MiB
187efc43  2025-03-22 20:00:00  eridu       eridu       /home/pi/docker  324.477 MiB
e50c1751  2025-03-22 21:00:00  eridu       eridu       /home/pi/docker  324.482 MiB
If you want to list the content of a snapshot, you use the following command.
$ sudo docker exec -ti restic-remote restic ls e50c1751 --long | grep mp3
This command will list all files in the snapshot e50c1751. The grep command will only show you all lines with mp3 in its path.
Restoring files from a snapshot is done with the following command.
$ sudo docker exec -ti restic-remote restic restore e50c1751 --target /data --include /mnt/data/
This command will restore from snapshot e50c1751 to target /data, but only the files from the path /mnt/data/
For all the information you need on Restic, check this website.
🛜Setting up Wireguard on Your Ubiquiti Edge Router
I aimed to create a VPN router using my Ubiquiti Edge Router ER-12 and utilise the configuration files from NordVPN. Initially, I attempted this with OpenVPN configuration files, which worked flawlessly, but unfortunately, OpenVPN resulted in poor throughput. (I have written another blog post about setting this up with OpenVPN if you need it, but I recommend using WireGuard instead.)
NordVPN’s implementation of WireGuard is known as NordLynx. However, NordVPN does not make these profiles easily accessible like Mullvad VPN does. On the NordVPN website, only OpenVPN configurations are readily available for download.
To obtain the NordLynx configuration files, I discovered two methods online.
- One approach is to use the method described by Daniel Rosenberg. You can find more details in his article on using WireGuard with NordVPN on an EdgeRouter here.
- The other method I found is a more practical solution from “MyShittyCode”, which provides a straightforward script to extract WireGuard configurations. You can read about it here.
I initially used the Daniel Rosenberg method in a Linux VM on my MacBook, which worked, but after discovering the second option from MyShittyCode, I found their script to be quite useful and decided to modify it slightly, as you can see below.
The primary step in the MyShittyCode method involves setting up NordVPN to generate an ACCESS TOKEN for use in the script. This is relatively straightforward; simply follow the steps outlined in the original blog post.
What You Need to Set in the Script
To use the script, you need to configure the following variables:
# --- Configuration Variables ---
ACCESS_TOKEN="**YOUR TOKEN HERE!!**"
TOTAL_CONFIGS=1
DNS_SERVER="103.86.96.100"
COUNTRY_NAME="Netherlands"
- ACCESS_TOKEN: This can be obtained by following the steps in the original post.
- TOTAL_CONFIGS: You can set this to any number of configurations you wish to generate.
- DNS_SERVER: You can use any DNS server, but to avoid DNS leak complaints from NordVPN, use 103.86.96.100 or 103.86.99.100.
- COUNTRY_NAME: Set this to any country where NordVPN has endpoints; you might prefer to use your current location.
	#!/usr/bin/env bash

	# NordVPN WireGuard Configuration Generator
	# Checks prerequisites and generates WireGuard configuration files.

	# --- Configuration Variables ---
	ACCESS_TOKEN="<<YOUR TOKEN HERE!!>>"
	TOTAL_CONFIGS=1
	DNS_SERVER="103.86.96.100"
	COUNTRY_NAME="Netherlands"

	# --- Functions for Prerequisite Checks ---
	check_command() {
	  if ! command -v "$1" >/dev/null 2>&1; then
	    echo "❌ ERROR: Required command '$1' is not installed."
	    MISSING_DEPENDENCIES=true
	  else
	    echo "✅ '$1' is installed."
	  fi
	}

	check_internet_connection() {
	  if ! curl -s --head https://api.nordvpn.com >/dev/null; then
	    echo "❌ ERROR: Unable to connect to NordVPN API. Please check your internet connection."
	    exit 1
	  else
	    echo "✅ Internet connection is working."
	  fi
	}

	check_access_token() {
	  RESPONSE=$(curl -s -u token:"$ACCESS_TOKEN" "https://api.nordvpn.com/v1/users/services/credentials")
	  if [[ $(echo "$RESPONSE" | jq -r '.nordlynx_private_key') == "null" ]]; then
	    echo "❌ ERROR: Invalid or expired ACCESS_TOKEN."
	    exit 1
	  else
	    echo "✅ ACCESS_TOKEN is valid."
	  fi
	}

	# --- Perform Prerequisite Checks ---
	echo "🔍 Checking prerequisites..."
	MISSING_DEPENDENCIES=false

	check_command curl
	check_command jq

	if [ "$MISSING_DEPENDENCIES" = true ]; then
	  echo "🚨 Please install the missing dependencies before running this script again."
	  exit 1
	fi

	check_internet_connection
	check_access_token

	echo "🚀 All prerequisites satisfied. Proceeding..."

	# --- Fetch Country ID ---
	COUNTRY_ID=$(curl -s "https://api.nordvpn.com/v1/servers/countries" | \
	jq -r ".[] | select(.name==\"$COUNTRY_NAME\") | .id")

	if [ -z "$COUNTRY_ID" ]; then
	  echo "❌ ERROR: Country '$COUNTRY_NAME' not found or invalid."
	  exit 1
	fi

	# --- Fetch Private Key ---
	PRIVATE_KEY=$(curl -s -u token:"$ACCESS_TOKEN" \
	"https://api.nordvpn.com/v1/users/services/credentials" | jq -r '.nordlynx_private_key')

	# --- Fetch Recommended Servers and Generate Configurations ---
	SERVER_RECOMMENDATIONS_URL="https://api.nordvpn.com/v1/servers/recommendations?&filters\[country_id\]=$COUNTRY_ID&filters\[servers_technologies\]\[identifier\]=wireguard_udp&limit=$TOTAL_CONFIGS"

	curl -s "$SERVER_RECOMMENDATIONS_URL" | jq -r --arg private_key "$PRIVATE_KEY" --arg dns "$DNS_SERVER" '
	.[] |
	{
	  filename: (.locations[0].country.name + " - " + .locations[0].country.city.name + " - " + .hostname + ".conf"),
	  ip: .station,
	  publicKey: (.technologies[] | select(.identifier=="wireguard_udp") | .metadata[] | select(.name=="public_key").value)
	} |
	{
	  filename: .filename,
	  config: [
	    "# " + .filename,
	    "",
	    "[Interface]",
	    "PrivateKey = \($private_key)",
	    "Address = 10.5.0.2/32",
	    "DNS = \($dns)",
	    "",
	    "[Peer]",
	    "PublicKey = " + .publicKey,
	    "AllowedIPs = 0.0.0.0/0, ::/0",
	    "Endpoint = " + .ip + ":51820"
	  ] | join("\n")
	} |
	"echo \"" + .config + "\" > \"" + .filename + "\""
	' | sh

	echo "🎉 WireGuard configuration file(s) successfully generated!"
Running the Script
When you run the script, you should see a smooth output like this:
✅ 'curl' is installed.
✅ 'jq' is installed.
✅ Internet connection is working.
✅ ACCESS_TOKEN is valid.
🚀 All prerequisites satisfied. Proceeding...
🎉 WireGuard configuration file(s) successfully generated!
You will find one or more configuration files generated, depending on your settings, similar to this:
-rw-rw-r-- 1 admin admin 290 Mar 19 20:58 'Netherlands - Amsterdam - nl729.nordvpn.com.conf'
The content of the file will resemble the following:
# Netherlands - Amsterdam - nl729.nordvpn.com.conf

[Interface]
PrivateKey = ** YOUR_PRIVATE_KEY_HERE **
Address = 10.5.0.2/32
DNS = 103.86.96.100

[Peer]
PublicKey = ** YOUR_PUBLIC_KEY_HERE **
AllowedIPs = 0.0.0.0/0, ::/0
Endpoint = 213.232.87.204:51820
Installing Wireguard package on your Edgerouter
The EdgeRouter does not come with WireGuard pre-installed. You will need to install it manually. There is a helpful individual on GitHub who maintains the WireGuard packages for EdgeOS. You can find the current release here.
For my router, the ER-12, the correct package can be found here. Now, open an SSH session to your Edge router and enter the following commands:
curl -OL https://github.com/WireGuard/wireguard-vyatta-ubnt/releases/download/1.0.20211208-1/e300-v2-v1.0.20220627-v1.0.20210914.deb

sudo dpkg -i e300-v2-v1.0.20220627-v1.0.20210914.deb
- The
curlcommand will download the required package onto the router. Ensure you download the correct one; in my case, it ise300-v2-v1.0.20220627-v1.0.20210914.deb. - The
dpkgcommand will install the package on the router.
After Obtaining the Configuration Files and package installation
Once you have obtained the configuration files and installed the package, you are ready to proceed with the next step: setting up your Edge Router with a VPN connection.
Setting up your Edge Router with a VPN connection
The script below is an EdgeOS script designed to set up your VPN tunnel for your home LAN. In the example below, it is assumed that you have VLANs and that VLAN30 is the network for all clients that need to be routed through the WireGuard tunnel wg0.
Assumptions:
- VLAN30 is configured with the IP range 192.168.30.0/24.
- You wish to exclude nodes 192.168.30.50, 192.168.30.51, and 192.168.30.52 from the tunnel (for example, these might be RING.COM devices that experience issues with VPNs).
- You need to exclude nodes 104.17.127.1 (Ring oath1) and 104.17.128.1 (Ring oath2) for clients that use the wg0 tunnel. This is necessary for clients that require access to RING.COM apps, as RING.COM does not support VPNs.
- You want to exclude subnets within RFC1918 in the wg0 VPN tunnel.
- You aim to exclude email services from Apple and Google, as they often have issues with VPNs.
Note: Ensure you set your Private Key and Public Key in the script below, which can be found in the configuration file named “Netherlands - Amsterdam - nl729.nordvpn.com.conf”.
Note: Set the correct IP address below, found in the same configuration file. In this example, the IP address is 213.232.87.204
configure

# Wireguard configuration
set interfaces wireguard wg0 address 10.5.0.2/32
set interfaces wireguard wg0 description 'NordVPN Wireguard'
set interfaces wireguard wg0 listen-port 37728
set interfaces wireguard wg0 mtu 1420
set interfaces wireguard wg0 peer YOUR_PUBLIC_KEY_HERE allowed-ips 0.0.0.0/0
set interfaces wireguard wg0 peer YOUR_PUBLIC_KEY_HERE description nl729.nordvpn.com.conf
set interfaces wireguard wg0 peer YOUR_PUBLIC_KEY_HERE endpoint 213.232.87.204:51820
set interfaces wireguard wg0 peer YOUR_PUBLIC_KEY_HERE persistent-keepalive 25
set interfaces wireguard wg0 private-key YOUR_PRIVATE_KEY_HERE
set interfaces wireguard wg0 route-allowed-ips false
commit


# NAT-rule for traffic from 192.168.30.0/24 to VPN-tunnel
set service nat rule 5020 description 'masquerade for wg0/NordVPN'
set service nat rule 5020 log disable
set service nat rule 5020 outbound-interface wg0
set service nat rule 5020 protocol all
set service nat rule 5020 type masquerade
commit

# Allow incoming WireGuard protocol traffic on the WAN
set firewall name WAN_LOCAL rule 15 action accept
set firewall name WAN_LOCAL rule 15 description 'Allow incoming WireGuard'
set firewall name WAN_LOCAL rule 15 destination port 37728
set firewall name WAN_LOCAL rule 15 protocol udp
commit

# Static route for traffic from 192.168.30.0/24 via de VPN-tunnel
set protocols static table 1 description 'Route out via wg0/NordVPN'
set protocols static table 1 interface-route 0.0.0.0/0 next-hop-interface wg0
set protocols static table 1 route 0.0.0.0/0 blackhole distance 255
commit

# Hosts in 192.168.30.0/24 we don't want through wg0/NordVPN
set firewall group address-group Vlan30_Hosts_NordVPN_EXCLUDE description 'Hosts in VLAN30 we dont want through wg0/NordVPN'
set firewall group address-group Vlan30_Hosts_NordVPN_EXCLUDE address 192.168.30.50	# host50
set firewall group address-group Vlan30_Hosts_NordVPN_EXCLUDE address 192.168.30.51 # host51
set firewall group address-group Vlan30_Hosts_NordVPN_EXCLUDE address 192.168.30.52 # host52
commit

# Sites on the Internet we dont want through wg0/NordVPN
set firewall group address-group Internet_Hosts_NordVPN_EXCLUDE description 'Sites on the Internet we dont want through wg0/NordVPN'
set firewall group address-group Internet_Hosts_NordVPN_EXCLUDE address 104.17.127.1 # Ring oath1
set firewall group address-group Internet_Hosts_NordVPN_EXCLUDE address 104.17.128.1 # Ring oath2
commit

# None routable subnets
set firewall group address-group RFC1918 description 'Allow None routable subnets'
set firewall group address-group RFC1918 address 192.168.0.0/16
set firewall group address-group RFC1918 address 172.16.0.0/12
set firewall group address-group RFC1918 address 10.0.0.0/8
commit

# Mail ports (spoiler: Apple Mail and Google Mail don't like VPN's)
set firewall group port-group Mail_ports description 'Mail poorten'
set firewall group port-group Mail_ports port 993
set firewall group port-group Mail_ports port 587
set firewall group port-group Mail_ports port 465
set firewall group port-group Mail_ports port 2525
commit

# traffic from 192.168.30.0/24 to RFC1918 not via wg0
set firewall modify SOURCE_ROUTE rule 10 description 'traffic from 192.168.30.0/24 to RFC1918 not via wg0'
set firewall modify SOURCE_ROUTE rule 10 source address 192.168.30.0/24
set firewall modify SOURCE_ROUTE rule 10 destination group address-group RFC1918
set firewall modify SOURCE_ROUTE rule 10 action accept

# traffic from excluded hosts to 0.0.0.0/0 not via wg0
set firewall modify SOURCE_ROUTE rule 20 description 'traffic from excluded hosts to 0.0.0.0/0 not via wg0'
set firewall modify SOURCE_ROUTE rule 20 source group address-group Vlan30_Hosts_NordVPN_EXCLUDE
set firewall modify SOURCE_ROUTE rule 20 destination address 0.0.0.0/0
set firewall modify SOURCE_ROUTE rule 20 action accept

# traffic for excluded sites on Internet not via wg0
set firewall modify SOURCE_ROUTE rule 21 description 'traffic for excuded sites on Internet not via wg0'
set firewall modify SOURCE_ROUTE rule 21 destination group address-group Internet_Hosts_NordVPN_EXCLUDE
set firewall modify SOURCE_ROUTE rule 21 action accept

# traffic from MAIL ports to 0.0.0.0/0 not via wg0
set firewall modify SOURCE_ROUTE rule 30 description 'traffic from MAIL ports to 0.0.0.0/0 not via wg0'
set firewall modify SOURCE_ROUTE rule 30 destination group port-group Mail_ports
set firewall modify SOURCE_ROUTE rule 30 action accept

# Firewall rule traffic from 192.168.30.0/24 through wg0
set firewall modify SOURCE_ROUTE rule 100 description 'traffic from 192.168.30.0/24 through wg0'
set firewall modify SOURCE_ROUTE rule 100 source address 192.168.30.0/24
set firewall modify SOURCE_ROUTE rule 100 modify table 1

# Apply firewall-modification to VLAN30
set interfaces switch switch0 vif 30 firewall in modify SOURCE_ROUTE

commit
save
exit
The interface specified in the script can be configured to any interface you need. In this example, it is VLAN30 on switch0, but you can easily use eth2 or any other interface that suits your requirements.
# Apply firewall-modification to eth2
set interfaces ethernet eth2 firewall in modify SOURCE_ROUTE
Or If you want it to be applied to your complete switch0
# Apply firewall-modification to switch0
set interfaces switch switch0 firewall in modify SOURCE_ROUTE
Disabling a VPN
To disable a VPN, use the following commands:
configure

delete interfaces switch switch0 vif 30 firewall in modify SOURCE_ROUTE

commit
save
exit
Re-enabling a VPN
To re-enable a VPN after disabling it, use the following commands:
configure

set interfaces switch switch0 vif 30 firewall in modify SOURCE_ROUTE

commit
save
exit
📝
🛜Set up QOS with EdgeOS (Ubiquiti)
Setting up QOS on a Ubiquiti router with EdgeOS is not very complicated and pretty straightforward. In this post I try to set forth the way to set this up. I will show two ways.
- A configuration with groups, which is slower but better manageable
- A configuration without groups, which is faster giving a higher throughput
Configuration with groups
This configuration with a group is nice if you want to easily add or remove nodes from QOS. You can do this by logging in to the webGUI of your Ubiquiti router and just conveniently add or remove a IP. In the script below that group is called “QOS_High_Prio_Nodes”. A default IP is added “192.168.130.1”.
The downside of this script is that because we are marking the traffic, the router gets pretty busy and so the throughput of the traffic goes significantly down.
-
Create an address group for high-priority nodes.
This group (QOS_High_Prio_Nodes) can be easily managed from the webGui. -
Mark traffic via a firewall rule
This marking makes it possible to use a group, as using a group directly is not possible. The downside is that the throughput is significantly lower than not marking the traffic. -
Define a traffic shaper policy for download traffic
Here you set the true bandwidth of your broadband connection with your ISP. -
Class 10: High priority for traffic to QOS_High_Prio_Nodes
-
Class 20: Lower priority for traffic from VLAN200 (192.168.200.0/24)
-
Class 30: Lower priority for traffic from VLAN120 (192.168.120.0/24)
In this example there are 3 classes set. All with their own bandwidth-quota and priority. -
Default Class: Other traffic receives default treatment.
All other traffic is shaped at the lowest priority.Make sure the sum of all the bandwidth does not excite 100%
-
Apply the policy to both interfaces.
Since I own a Ubiquiti Edgerouter ER-12 the default WAN port is eth9. Of course if your WAN is on a different port, adjust accordingly.
Script 1
configure

# 1. Create an address group for all high priority nodes
set firewall group address-group QOS_High_Prio_Nodes address 192.168.130.1
set firewall group address-group QOS_High_Prio_Nodes description "Address group for nodes with high priority"

# 2. Mark traffic via a firewall rule
set firewall modify MARK_QOS_High_Prio_Nodes rule 10 action modify
set firewall modify MARK_QOS_High_Prio_Nodes rule 10 modify mark 10
set firewall modify MARK_QOS_High_Prio_Nodes rule 10 source group address-group QOS_High_Prio_Nodes
set firewall modify MARK_QOS_High_Prio_Nodes rule 10 description "Mark traffic for QOS_High_Prio_Nodes"

# 3. Define a traffic shaper policy for download traffic
set traffic-policy shaper DOWNLOAD_POLICY bandwidth 910mbit
set traffic-policy shaper DOWNLOAD_POLICY description "QoS policy for download traffic, total bandwidth 910 Mbps"

# 4. Class 10: High priority for VLAN30 traffic (192.168.130.1/32)
set traffic-policy shaper DOWNLOAD_POLICY class 10 bandwidth 5%
set traffic-policy shaper DOWNLOAD_POLICY class 10 ceiling 100%
set traffic-policy shaper DOWNLOAD_POLICY class 10 priority 7
set traffic-policy shaper DOWNLOAD_POLICY class 10 queue-type fair-queue
set traffic-policy shaper DOWNLOAD_POLICY class 10 match VLAN30_QOS_HIGH_PRIORITY mark 10
set traffic-policy shaper DOWNLOAD_POLICY class 10 description "High priority (50% guaranteed) for PRIO nodes"

# 5. Class 20: Lower priority for VLAN20 traffic (192.168.20.0/24)
# If VLAN20 does not exist in your network, remove this class.
set traffic-policy shaper DOWNLOAD_POLICY class 20 bandwidth 20%
set traffic-policy shaper DOWNLOAD_POLICY class 20 ceiling 100%
set traffic-policy shaper DOWNLOAD_POLICY class 20 priority 4
set traffic-policy shaper DOWNLOAD_POLICY class 20 queue-type fair-queue
set traffic-policy shaper DOWNLOAD_POLICY class 20 match VLAN20_PRIORITY ip source address 192.168.120.0/24
set traffic-policy shaper DOWNLOAD_POLICY class 20 description "Lower priority (20% guaranteed) for VLAN20 traffic"

# 6. Class 30: Lower priority for VLAN178 traffic (192.168.178.0/24)
set traffic-policy shaper DOWNLOAD_POLICY class 30 bandwidth 65%
set traffic-policy shaper DOWNLOAD_POLICY class 30 ceiling 100%
set traffic-policy shaper DOWNLOAD_POLICY class 30 priority 3
set traffic-policy shaper DOWNLOAD_POLICY class 30 queue-type fair-queue
set traffic-policy shaper DOWNLOAD_POLICY class 30 match VLAN178_PRIORITY ip source address 192.168.200.0/24
set traffic-policy shaper DOWNLOAD_POLICY class 30 description "Lower priority (20% guaranteed) for VLAN178 traffic"

# 7. Default class: Other traffic gets standard treatment
set traffic-policy shaper DOWNLOAD_POLICY default bandwidth 10%
set traffic-policy shaper DOWNLOAD_POLICY default ceiling 100%
set traffic-policy shaper DOWNLOAD_POLICY default priority 1
set traffic-policy shaper DOWNLOAD_POLICY default queue-type fair-queue

# 8. Apply the policy to both interfaces:
# - eth9: Outbound traffic to the internet
set interfaces ethernet eth9 traffic-policy out DOWNLOAD_POLICY
set interfaces ethernet eth9 description "WAN interface with QoS policy applied to outbound traffic"

commit
save
exit
Configuration without groups, but a higher throughput
This configuration lacks groups, which would have given it the ability to be more manageable. More manageable in the way that you could add and remove modes (IP’s) to and from an address-group in the webGUI of your Ubiquiti router. This would have been very convenient. But more on that later.
The great benefit of dropping the convenience of the traffic marking is that you get the max possible throughput of the router.
-
Define a traffic shaping policy for download traffic
Here you set the true bandwidth of your broadband connection with your ISP. -
Class 10: High priority for VLAN30 traffic (192.168.130.1/32)
This now your node this the highest priority for QOS -
Class 20: Lower priority for VLAN120 traffic (192.168.120.0/24)
-
Class 30: Lower priority for VLAN140 traffic (192.168.140.0/24)
-
Default class: Other traffic gets standard treatment
All other traffic is shaped at the lowest priority.Make sure the sum of all the bandwidth does not excite 100%
-
Apply the policy to both interface eth9
Since I own a Ubiquiti Edgerouter ER-12 the default WAN port is eth9. Of course if your WAN is on a different port, adjust accordingly.
Script 2
configure

# 1. Define a traffic shaping policy for download traffic
set traffic-policy shaper DOWNLOAD_POLICY bandwidth 910mbit
set traffic-policy shaper DOWNLOAD_POLICY description "QoS policy for download traffic, total bandwidth 910 Mbps"

# 2. Class 10: High priority for (192.168.130.1/32)
set traffic-policy shaper DOWNLOAD_POLICY class 10 bandwidth 5%
set traffic-policy shaper DOWNLOAD_POLICY class 10 ceiling 100%
set traffic-policy shaper DOWNLOAD_POLICY class 10 priority 7
set traffic-policy shaper DOWNLOAD_POLICY class 10 queue-type fair-queue
set traffic-policy shaper DOWNLOAD_POLICY class 10 match VLAN30_QOS_HIGH_PRIORITY ip source address 192.168.130.1/32
set traffic-policy shaper DOWNLOAD_POLICY class 10 description "High priority (5% guaranteed) for TV"

# 3. Class 20: Lower priority for VLAN120 traffic (192.168.120.0/24)
# If VLAN120 does not exist in your network, remove this class.
set traffic-policy shaper DOWNLOAD_POLICY class 20 bandwidth 20%
set traffic-policy shaper DOWNLOAD_POLICY class 20 ceiling 100%
set traffic-policy shaper DOWNLOAD_POLICY class 20 priority 4
set traffic-policy shaper DOWNLOAD_POLICY class 20 queue-type fair-queue
set traffic-policy shaper DOWNLOAD_POLICY class 20 match VLAN20_PRIORITY ip source address 192.168.120.0/24
set traffic-policy shaper DOWNLOAD_POLICY class 20 description "Lower priority (20% guaranteed) for VLAN120 traffic"

# 4.Class 30: Lower priority for VLAN140 traffic (192.168.140.0/24)
# If VLAN140 does not exist in your network, remove this class.
set traffic-policy shaper DOWNLOAD_POLICY class 30 bandwidth 65%
set traffic-policy shaper DOWNLOAD_POLICY class 30 ceiling 100%
set traffic-policy shaper DOWNLOAD_POLICY class 30 priority 3
set traffic-policy shaper DOWNLOAD_POLICY class 30 queue-type fair-queue
set traffic-policy shaper DOWNLOAD_POLICY class 30 match VLAN178_PRIORITY ip source address 192.168.140.0/24
set traffic-policy shaper DOWNLOAD_POLICY class 30 description "Lower priority (65% guaranteed) for VLAN140 traffic"

# 5. Default class: Other traffic gets standard treatment
set traffic-policy shaper DOWNLOAD_POLICY default bandwidth 10%
set traffic-policy shaper DOWNLOAD_POLICY default ceiling 100%
set traffic-policy shaper DOWNLOAD_POLICY default priority 1
set traffic-policy shaper DOWNLOAD_POLICY default queue-type fair-queue

# 6. Apply the policy to both interfaces:
# - eth9: outbound internet-facing interface
set interfaces ethernet eth9 traffic-policy out DOWNLOAD_POLICY
set interfaces ethernet eth9 description "WAN interface with QoS policy applied to outbound traffic"

commit
save
exit
📝🎮📺
📺Getting your Emby library scanned for new content in four ways.
Running Emby en Radarr/Sonarr on different servers or in different container can be a pain in the ass to get your content scanned.
But it is much easier than you think if you know what’s going on inside the services. The TL;DR is keep your content path the same in EMBY and in Sonarr/Radarr. If you don’t keep them the same, you run into trouble.
First, I show two options when you can’t keep the paths the same (say you have a linux node running EMBY and a Windows (don’t mention it) node for Sonarr/Radarr. It’s obvious the paths will never be the same, as Linux will give you a PATH like below.
/home/user/video/movies/Your Old Movie (1921)/Your.Old.Movie.1921.Remux-2160p.mkv
Where Windows (sh*t have to mention it again) will give you a path
D:\data\video\movies\Your Old Movie (1921)\Your.Old.Movie.1921.Remux-2160p.mkv
The slashed only (Linux forward slash / and Windows a backslash \ ) already makes this a problem.
Then I will show you two options if you can the PATHs the same. This can be done when:
- You run all your software on one node, therefor the content PATHs in EMBY en Sonarr/Radarr will be the same (Obviously)
- When you run multiple nodes of the SAME OS and run the services (EMBY, Sonarr, Radarr) in DOCKER, and therefore you can keep the PATHs the same inside your docker containers.
- When you run multiple nodes of THE SAME OS (for EMBY, Sonarr and Radarr) and store the content on the same network share (a third node) via Radarr/Sonarr and EMBY will scan the content on that same third node.
Option 1 different paths (you can’t keep the paths the same)
This method triggers a complete library scan. This work fine but is suboptimal. When your library is large, or you frequently trigger the library scan, it will have an impact on EMBY.
curl -X POST "${EMBY_HOST}/Emby/Library/Refresh?api_key=${EMBY_APIKEY}" --data ""
Where:
EMBY_HOST = http:/192.168.1.1:0896 or https://www.yourdoamin.com:443

EMBY_APIKEY = XXXXXXYYYYYZZZZZZ
Option 2 different paths (you can’t keep the paths the same)
This method tiggers a scan for a certain library in your collection (EMBY_PARENT_ID). The advance to the pervious option is that you only trigger one collection in the library. The downside is you have to fiddle around with the EMBY_PARENT_ID. These can be obtained from the URL when you open the collection in EMBY.
curl -X POST "${EMBY_URL}/emby/Items/${EMBY_PARENT_ID}/Refresh?Recursive=true&MetadataRefreshMode=Default&ImageRefreshMode=Default&ReplaceAllMetadata=false&ReplaceAllImages=false&api_key=${EMBY_APIKEY}" -H "accept: */*" -d “”
Where:
EMBY_HOST = http:/192.168.1.1:0896 or https://www.yourdoamin.com:443

EMBY_APIKEY = XXXXXXYYYYYZZZZZZ

EMBY_PARENT_ID = 12
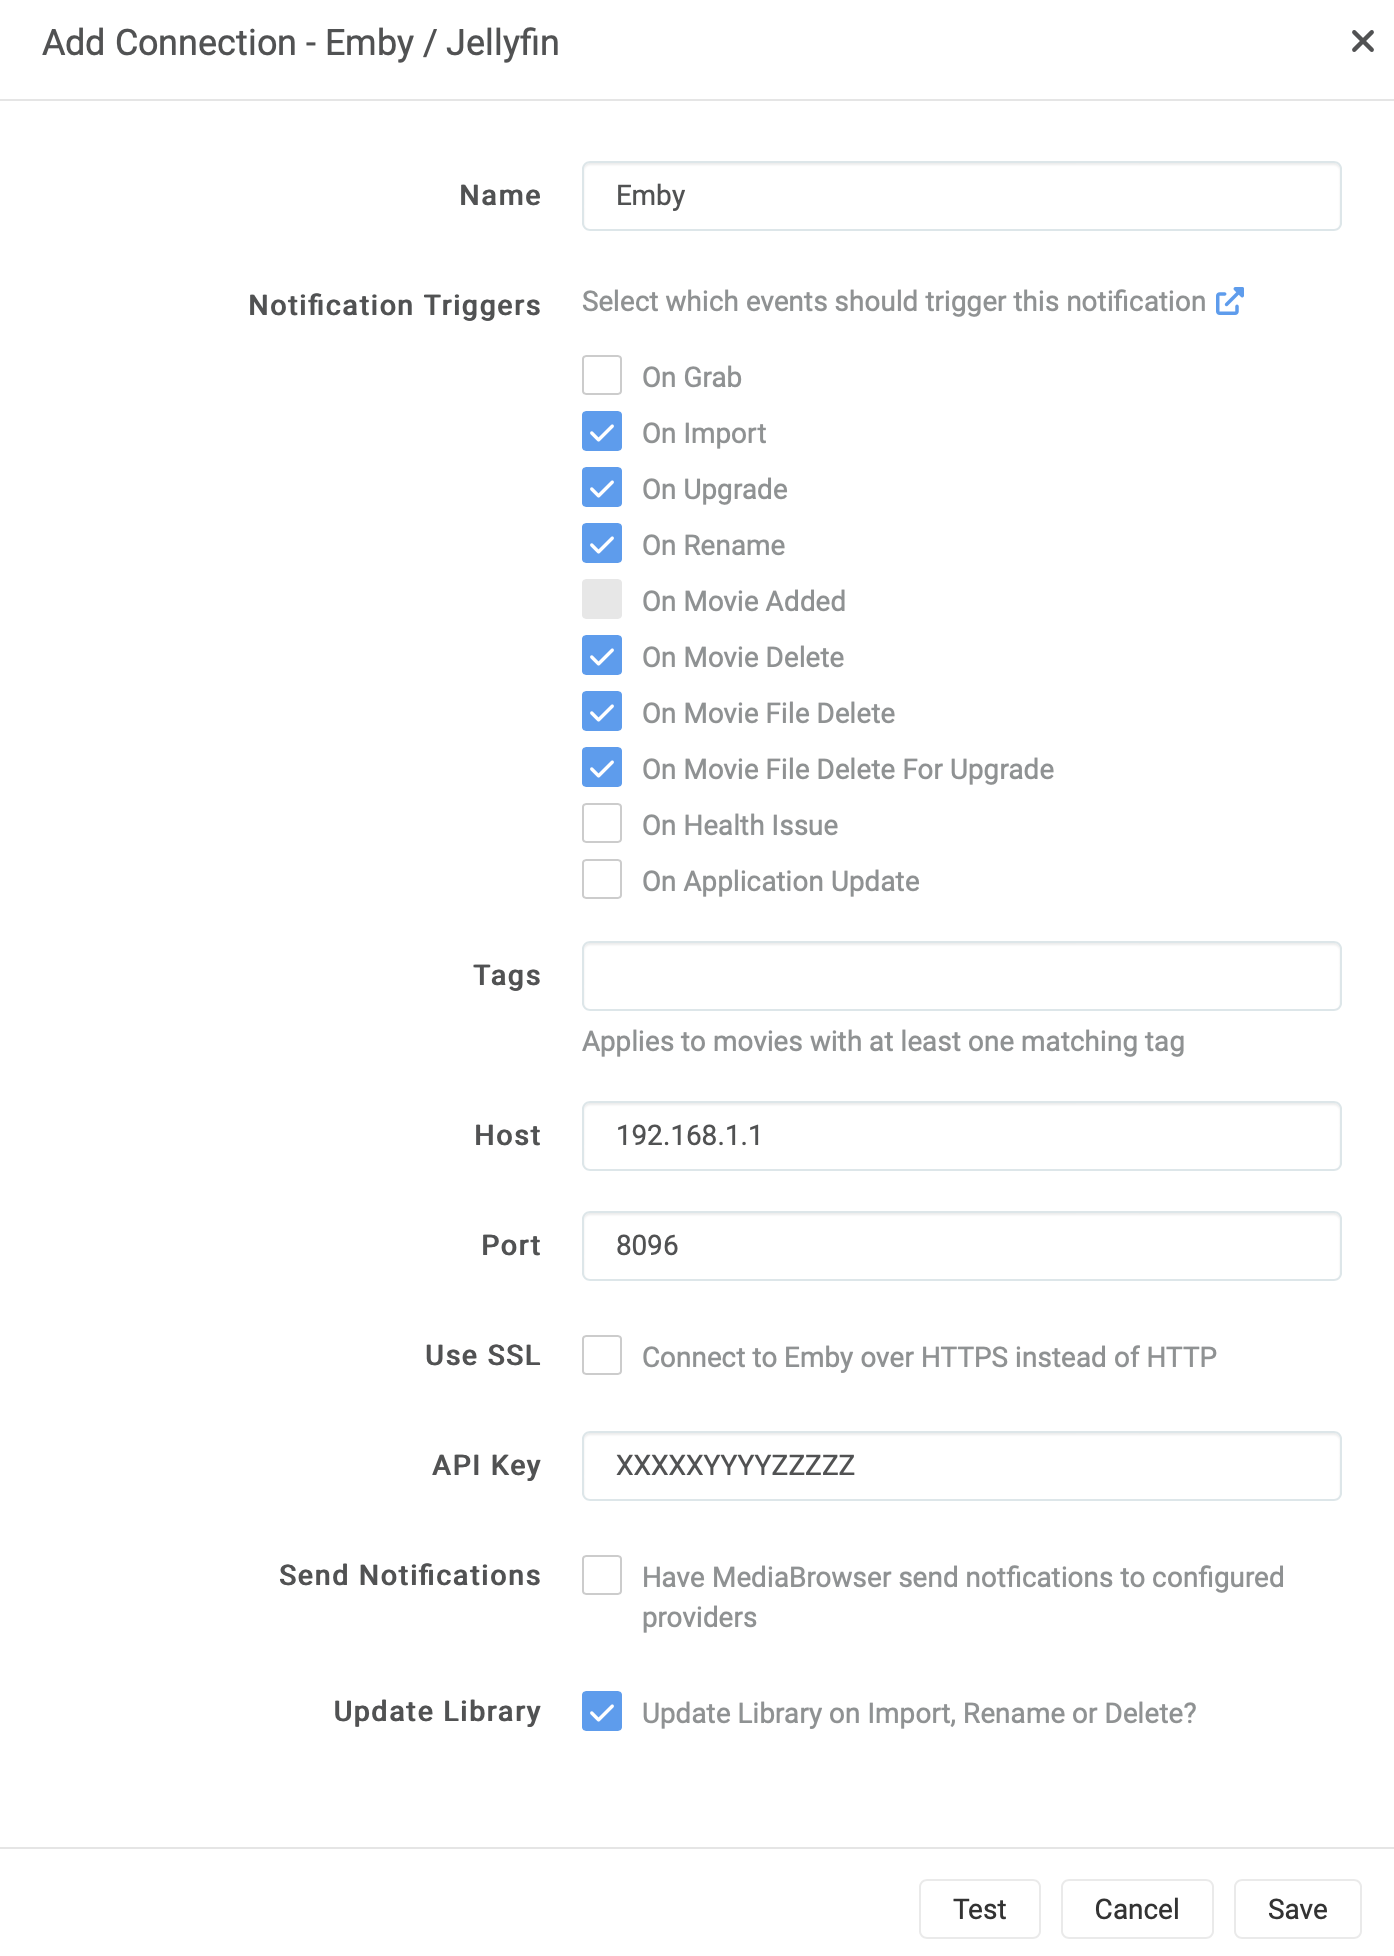
Option 3 Same paths (you can keep the path in *arr equal to the path in EMBY)
This is the simplest to configure the default trigger in Sonarr/Radarr
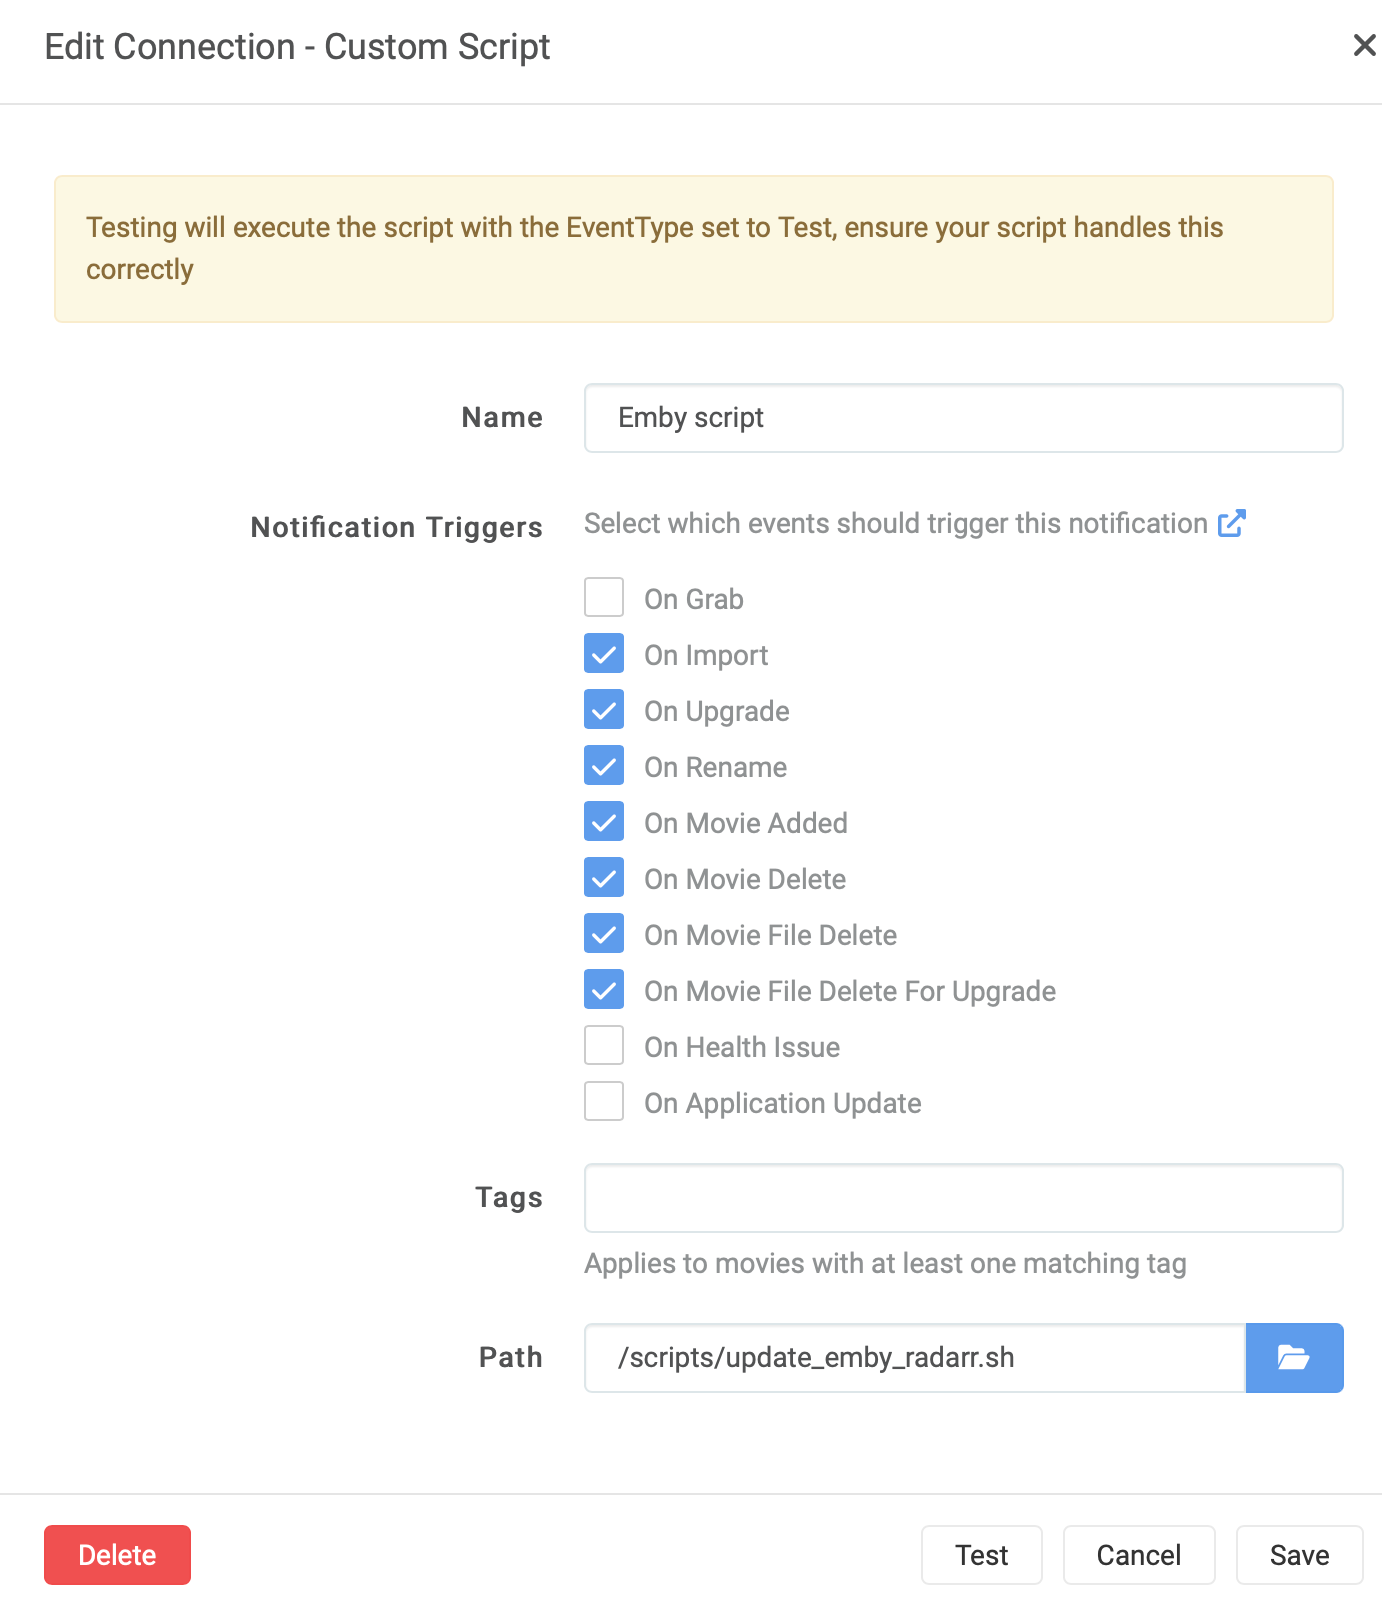
Option 4 Same paths (you can keep the path in *arr equal to the path in EMBY)
This method tiggers a scan for a certain library in your collection. The advance to the pervious option is that you add your own logic to the scan. The other advance is that you can fill-out Path and UpdateType from the environment variables in Linux (or your container)
curl -X POST "${EMBY_URL}/emby/Library/Media/Updated?api_key=${EMBY_APIKEY}" -H "accept: */*" -H "Content-Type: application/json" -d "{\"Updates\":[{\"Path\":\"${Path}\",\"UpdateType\":\"${UpdateType}\"}]}"
Where:
EMBY_HOST = http:/192.168.1.1:0896 or https://www.yourdoamin.com:443

EMBY_APIKEY = XXXXXXYYYYYZZZZZZ

Path = /movies/Old Movie, The (1921)/The.Old.Movie.1921.Bluray-2160p.mkv

UpdateType = [ Created | Modified | Deleted ] (optional)
Here is an example script I use for Radarr and Sonarr. I like separate scripts for Radarr and Sonarr, but you easily merge them and create one script for both Radarr and Sonarr.
Radarr
#!/bin/bash

NOW=$(date +"%d-%m-%Y %H:%M")
LOG_FILE="/logging/radarr/emby_scan.txt"
TMP_FILE="/tmp/tmp_emby_radarr.txt"
DL_FILE="/scripts/dl_radarr.txt"
DEL_FILE="/scripts/del_radarr.txt"
REN_FILE="/scripts/ren_radarr.txt"
EMBY_URL="https://emby.yourdomain.com"
EMBY_RADARR_APIKEY="xxxyyyyyzzz"

if [ "${radarr_eventtype}" != "" ]; then
  if [ "${radarr_eventtype}" == "ApplicationUpdate" ] || [ "${radarr_eventtype}" == "MovieAdded" ] || [ "${radarr_eventtype}" == "Grab" ] || [ "${radarr_eventtype}" == "HealthIssue" ] || [ "${radarr_eventtype}" == "Test" ]; then
    (echo "${NOW} - [Emby Library Scan] Radarr Event Type is ${radarr_eventtype}, exiting."; cat ${LOG_FILE}) > ${TMP_FILE}; mv ${TMP_FILE} ${LOG_FILE}
    exit
  fi

  (echo "${NOW} - [Emby Library Scan] Radarr Event Type is ${radarr_eventtype}, updating Emby Library for ${radarr_movie_title}."; cat ${LOG_FILE}) > ${TMP_FILE}; mv ${TMP_FILE} ${LOG_FILE}

  if [ "$radarr_eventtype" == "Download" ]; then
    echo "${radarr_movie_title} (${radarr_movie_year})" >> ${DL_FILE}
    UpdateType="Created"
    Path="${radarr_movie_path}"
  fi

  if [ "${radarr_eventtype}" == "MovieDelete" ]; then
    echo "${radarr_movie_title} (${radarr_movie_year})" >> ${DEL_FILE}
    UpdateType="Deleted"
    Path="${radarr_movie_path}"
  fi

  if [ "$radarr_eventtype" == "Rename" ]; then
    echo "${radarr_movie_title} (${radarr_movie_year})" >> ${REN_FILE}
    UpdateType="Modified"
    Path="${radarr_movie_path}"
  fi

  curl -X POST "${EMBY_URL}/emby/Library/Media/Updated?api_key=${EMBY_RADARR_APIKEY}" -H "accept: */*" -H "Content-Type: application/json" -d "{\"Updates\":[{\"Path\":\"${Path}\",\"UpdateType\":\"${UpdateType}\"}]}"

else
  (echo "${NOW} - [Emby Library Scan] Radarr Event Type is empty."; cat ${LOG_FILE}) > ${TMP_FILE}; mv ${TMP_FILE} ${LOG_FILE}

fi

# write a status file with date of last run.  Helps troubleshoot that cron task is running.
echo "$(basename $0) last run was at $(date)" > /logging/radarr/_$(basename $0)_lastrun.txt
Sonarr
#!/bin/bash

NOW=$(date +"%d-%m-%Y %H:%M")
LOG_FILE="/logging/sonarr/emby_scan.txt"
TMP_FILE="/tmp/tmp_emby_sonarr.txt"
DL_FILE="/scripts/dl_sonarr.txt"
DEL_FILE="/scripts/del_sonarr.txt"
REN_FILE="/scripts/ren_sonarr.txt"
EMBY_URL="https://emby.yourdomain.com"
EMBY_SONARR_APIKEY="zzzzzyyyyyxxxxx"

if [ "${sonarr_eventtype}" != "" ]; then
  if [ "${sonarr_eventtype}" == "ApplicationUpdate" ] || [ "${sonarr_eventtype}" == "Grab" ] || [ "${sonarr_eventtype}" == "HealthIssue" ] || [ "${sonarr_eventtype}" == "Test" ]; then
    (echo "${NOW} - [Emby Library Scan] Sonarr Event Type is ${sonarr_eventtype}, exiting."; cat ${LOG_FILE}) > ${TMP_FILE}; mv ${TMP_FILE} ${LOG_FILE}
    exit
  fi

  (echo "${NOW} - [Emby Library Scan] Sonarr Event Type is ${sonarr_eventtype}, updating Emby Library for ${sonarr_series_title} - ${sonarr_episodefile_episodetitles}."; cat ${LOG_FILE}) > ${TMP_FILE}; mv ${TMP_FILE} ${LOG_FILE}

  if [ "$sonarr_eventtype" == "Download" ];  then
    echo "${sonarr_series_title} - ${sonarr_episodefile_episodetitles}" >> ${DL_FILE}
    UpdateType="Created"
    Path="${sonarr_episodefile_path}"
  fi

  if [ "$sonarr_eventtype" == "EpisodeFileDelete" ];  then
    echo "${sonarr_series_title} - ${sonarr_episodefile_episodetitles}" >> ${DEL_FILE}
    UpdateType="Deleted"
    Path="${sonarr_episodefile_path}"
  fi

  if [ "$sonarr_eventtype" == "SeriesDelete" ];  then
    echo "${sonarr_series_title}" >> ${DEL_FILE}
    UpdateType="Deleted"
    Path="${sonarr_series_path}"
  fi

  if [ "$sonarr_eventtype" == "Rename" ]; then
    echo "${sonarr_series_title}" >> ${REN_FILE}
    UpdateType="Modified"
    Path="${sonarr_series_path}"
  fi

  curl -X POST "${EMBY_URL}/emby/Library/Media/Updated?api_key=${EMBY_SONARR_APIKEY}" -H "accept: */*" -H "Content-Type: application/json" -d "{\"Updates\":[{\"Path\":\"${Path}\",\"UpdateType\":\"${UpdateType}\"}]}"

else
  (echo "${NOW} - [Emby Library Scan] Sonarr Event Type is empty."; cat ${LOG_FILE}) > ${TMP_FILE}; mv ${TMP_FILE} ${LOG_FILE}

fi

# write a status file with date of last run.  Helps troubleshoot that cron task is running.
echo "$(basename $0) last run was at $(date)" > /logging/sonarr/_$(basename $0)_lastrun.txt
These scripts also maintain lists of the content names, so they can be used in reporting or notification. You can, of course, strip these.
I run these scripts in the Connect section in Radarr/Sonarr.
📺🎥📽️
👨🏽💻Choosing your Python editing weapon
Well a few days passed since I got a micro:bit… Started out with MakeCode to play around with it, but the goal was python. For this I switched to mu-editor at first. A great editor… I like the check en tidy function. But I missed the simulator I had in MakeCode. Of course you can (and must) run your code on the physical micro:bit but a simulator is great for testing and trying little pieces of code. But I accepted the fact that mu-editor and python coding didn’t had a simulator.
Then I picked up a “old” tool from the shed on my Macbook, Visual Studio code. I started to use it again to edit shell scripts because brackets announced to stop service this coming summer. Why not pop in python script in there. This editor offered me to install python extensions. And I started exploring the nets of inter what was possible with VScode.
And I came across Device Simulator Express, an extension for VScode. Just the tool I needed to have my micro:bit simulated in VScode. Just open the extensions tab in VScode and look for “Device Simulator Express” and install the beast.
There is one pitfall in installing this extension. After installing the extension en pressing shift-command-p to open de command-pane : enter “device simulator express : New file”. This will install some more dependencies and you might run in the problem that you get a message “Device Simulator Express: Install Extension Dependencies”. Telling you the install failed.
When pressing shift-command-p and giving the command “Device Simulator Express: Install Extension Dependencies” as instructed, you will find that they will never get installed and you end up with a reoccurring error all the time. This seems to have something to do with python 3.9. You can fix this doing the following:
On Python 3.9:
Edit the file “users<user>.vscodeextensionsms-python.devicesimulatorexpress-2020.0.36321outrequirements.txt” and changed the line
Pillow==7.0.0
to
Pillow==8.1.0
Restart VScode and press shift-command-p and give the command “Device Simulator Express: Install Extension Dependencies” again. Now the dependencies get installed nicely.
What I extra installed was a linter. Shift-command-x : this opens the extensions. Enter “flake8” in the search field. Sometimes you need to restart VS-code to force install-popup for flake8. Now you have error-highting in the editor as you go.
And what I also installed was code formatter for python. Shift-command-x : this opens the extensions. Enter “autopep8” in the search field. Press shift-option-f: to start the formatter when your cursor is on a line that needs formatting. This little baby formats your code. Cut the extra white-space. Correct the indenting. All kind of stuff.
I stopped using Windows at home for more than 11 years and left everything from Microsoft alone, switching to Apple and got the complete fruitbasket with all it’s products. But VScode has surprised me and it’s gonna stay for python editing……
📝🖋️
👨🏽💻Starbit Commander II
Well, on my quest to learn python, I poked and peeked around at the web of inters. And came across some nice sites about the micro:bits, projects and coding.
One site inspired me to create a python version of Starbit Commander. This site is home to many projects of Derek Graham. Next to Micro:bit bits, he has many other things too on his site.
But why remake of Starbit Commander? Derek has this pleasant example of “Tiny Astroids”, which resembled a lot like Starbit Commander. And he created it in Python… so. Mine Starbit Commander should get a python version too… In this little gem from Derek, he created a really, really pleasant piece of code that animated an explosion on this 5×5 LED display. I loved it. And although I wanted to create Starbit from scratch in OO, I really wanted to adopt this pleasant little tiny explosion. So, I contacted Derek via Twitter, asked if he agreed to me use his explosion-code. We had a short but very nice chat on Twitter, and he agreed for the code to be reuse in Starbit Commander. Thanks, Derek!
Well, I wanted to test and learn more python and also OO in python. So, I decided to try to make Starbit Commander in an OO-style. I have no experience in this, but I think (as far as I can tell) this is an OO-version of the game now. Derek mentioned on micro:bit V1’s coding OO would let you ran into out of memory errors. I haven’t seen them on the microbit V2 with Starbit Commander. (Now I’m worried if I did a proper OO-coding style ;-0)
I differed a bit from the original Starbit code. While de MakeCode version has power-ups to collect, in this python-version I decided to skip that and make the astroid field a bit more challenging by starting slow and easy and ending fast and astroid-crowded. Giving you more and more bonus score along the way you go.
This code can be found here. And watch that explosion… Thanks again, Derek Graham!
👨🏽💻Micro:bit Fireflies
My first attempt to write some (micro)Python code. Fireflies. This leds simulate fireflies in the air…
By the way, I found that display.get_pixel does not return the correct value for the brightness of a LED on a micro:bit. I created this function to correct this behavior in the code (fixPixelBug).
from microbit import *
import random

# This fucntions fixes the "display.get_pixel" bug.
# a full bright led does not return a "9" but a "255".
def fixPixelBug(brightness):
    if brightness == 4:
        return 3
    elif brightness == 8:
        return 4
    elif brightness == 16:
        return 5
    elif brightness == 32:
        return 6
    elif brightness == 64:
        return 7
    elif brightness == 128:
        return 8
    elif brightness == 255:
        return 9
    else:
        return brightness


while True:
    sleep(50)

    brightness = random.randint(1, 9)
    x = random.randint(0, 4)
    y = random.randint(0, 4)
    if display.get_pixel(x, y) == 0:
        display.set_pixel(x, y, brightness)

    for fireflies in range(0, 5):
        x = random.randint(0, 4)
        y = random.randint(0, 4)

        if fixPixelBug(display.get_pixel(x, y)) > 0:
            display.set_pixel(x, y, fixPixelBug(display.get_pixel(x, y)) - 1)
Code here 📝✏️
📟How do you find the RSS Feed of a website (if it exists)
Summary
This article describes various methods to find RSS feeds on websites. For WordPress, you append /feed to the URL to find the RSS feed, while for Tumblr and Medium, /rss and /feed/ are added respectively. For a Blogger site, the string at the end of the URL is longer, feeds/posts/default. YouTube channel pages also act as RSS feeds. Additionally, you can extract the RSS feed from the page source by searching for ‘Application/rss’ or ‘Atom’ in the source code. Safari users can use an app that adds a ready-to-use RSS button to their browser. Lastly, ‘educated guessing’ is a technique where you add /feed/ or /rss/ to the domain in the hope that one of them leads you to the correct feed.
Comments
Method 2 is the most practical in practice.
Content
Method 1 – Investigating the CMS Used
- To access a WordPress RSS feed, simply append /feed to the site’s URL. So, if the WordPress site’s URL is, for example, example.com, to find the RSS feed, you would add /feed to obtain example.com/feed. When used in an RSS reader, this URL would allow you to view the site’s content in feed form.
- In the case of sites hosted on Tumblr, the method is slightly different but still very straightforward. You need to add /rss to the end of the Tumblr site’s URL. So, if the Tumblr address is example.tumblr.com, the RSS feed can be found at example.tumblr.com/rss.
- For blogs hosted on Blogger, you need to add a slightly longer string to the end of the URL: feeds/posts/default. So, for a Blogger site at the address example.blogspot.com, the RSS feed can be found at example.blogspot.com/feeds/posts/default.
- If you want to find an RSS feed for a publication hosted on Medium, you have to add /feed/ before the publication’s name in the URL. If the publication’s address on Medium is medium.com/example-site, the URL for the RSS feed would change to medium.com/feed/example-site to view it in your RSS reader.
- YouTube channel pages also have a built-in functionality to act as RSS feeds. As such, you simply need to copy the channel’s URL and paste it into your RSS reader. Additionally, if you are already subscribed to various channels on YouTube, you can find an OPML file with all your subscriptions here, which you can then import into your RSS reader for easy access to all subscribed channels.
Method 2 – Extract RSS Feed from Page Source
To find the RSS or Atom feeds of a specific website, start by opening the website in your browser. Then, right-click anywhere on the page—it doesn’t matter where, as long as it’s not a link or image.
In the context menu that appears, choose the option “View Page Source” or something similar; the exact text may vary depending on the browser you are using. This will show you the page source, which is the underlying HTML and CSS skeleton that determines how the page looks and functions.
Once in the page source, use your browser’s search function (often accessible via Ctrl + F or Command + F on a Mac) to search for the term “Application/rss”. This is the most common way websites indicate their RSS feeds.
If you don’t get any results searching for “Application/rss,” try searching for “Atom”. Atom is an alternative feed standard that some sites may use instead of or in addition to RSS.
If you find any of these terms in the page source, follow the corresponding URL to access the feed.
Method 3 – Browser Extensions
If you use Safari, there is a user-friendly solution you can apply to receive RSS feeds, which is the RSS Button for the Safari app. This feature is designed with simplicity and ease of use in mind. It adds an RSS button to your Safari browser, allowing you quick and easy access to RSS feeds of websites you visit. The only caution is that this convenient button requires a small fee of $0.99. While this is a minimal cost, some users may object to paying for such functionality.
Method 4 – The Principle of Educated Guessing
This is an interesting method, particularly intended for cases where you want to find the RSS feed for a particular website, but it is not clearly indicated on the site itself. In such circumstances, “Educated Guessing” is helpful.
As an illustrative example, let’s take example.com/. Suppose you would like to find the RSS feed for this website, but you cannot find it in the usual sections of the website (such as the footer or sidebar). In such a situation, you can resort to educated guessing. This means trying out some obvious URL paths in the hope that one of them leads you to the correct feed.
Start by appending ‘/feed/’ after the domain. So, in our example, you would try navigating to example.com/feed/. If this doesn’t work, you can try another popular URL structure, such as ‘/rss/’. This means navigating to example.com/rss/.
This is, of course, not an exact science, and there is no guarantee that any of these guesses will lead you to the desired RSS feed. However, in practice, you will find that many websites follow these general URL structures for their feeds, making this a valuable technique to try. It is undoubtedly a quick and simple method to attempt to find the RSS feed if you are unable to locate it directly on the website.
📝✏️
🛜Blocking (or Allowing) whole Countries or a Provider or a Network with your Ubiquiti Edgerouter
I recently picked up a nice second hand Ubiquiti Edgerouter X from Marktplaats, which is the Dutch Craigslist. I wanted to play with a firewall in my network. This quickly became a complete rebuild of the network with multiple Vlans in my house. Which was enjoyable because exploring and learning is always a good thing.
This learning also counts for the firewall in the Edgerouter (which runs EdgeOS). I had some experience with firewalls in a very far past with a product called Checkpoint Firewall-1. I am unsure if it still exists. The company Checkpoint still does, though.
Playing around with the firewall wasn’t very hard. Of course, you need to learn the interface and the possibilities of the Firewall. I checked three videos on YouTube to get a head start. This video jumpstarted the head start for me.
As I progressed and got all the firewall rules in place as I wanted them, I really wanted to block off certain countries to be able to reach my webserver, which is behind a nginx reverse-proxy. The Ubiquiti doesn’t have preloaded sets of country networks. And I would rather not add all the networks used by a country manually. This is a daunting task. If I check for my country for example, there are 5999 networks (date:2024-01-18). This is impossible. So this must be done smarter.
Adding a complete country to a network-group in EdgeOS
For this solution, we lean heavily on te website http://www.ipdeny.com/ with the following script I wrote.
I saved this script on the Edgerouter in my $HOME directory with the following name: create_networkgroup_countrycode.sh
#!/bin/sh

# Name: create_networkgroup_asn.sh
# Coder: Marco Janssen (mastodon [@marc0janssen@mastodon.online](https://micro.blog/marc0janssen@mastodon.online))
# date: 2024-01-17 21:30:00
# update: 2024-01-31 21:39:00

if [ $# -eq 0 ]; then
	echo "No parameters provided. Provide a countrycode. Example nl or de"
else
	countrycode="$1"
	NOW=$(date +"%Y%m%d")

	echo "*** Downloading networkaddress blocks for countrycode $countrycode"
	curl "http://www.ipdeny.com/ipblocks/data/countries/$countrycode.zone" -o "./$countrycode.zone" -s

	echo "*** Writing networkgroup script"
	echo "delete firewall group network-group $countrycode.zone" > "./networkgroup-$countrycode.$NOW.sh"
	echo "set firewall group network-group $countrycode.zone description \"All networks $countrycode\" on $NOW" >> "./networkgroup-$countrycode.$NOW.sh"
	sed -e "s/^/set firewall group network-group $countrycode.zone network /" "./$countrycode.zone" >> "./networkgroup-$countrycode.$NOW.sh"
	cp "./networkgroup-$countrycode.$NOW.sh" nwgs.sh

	echo "*** Archiving zone-list"
	mv "$countrycode.zone" "$countrycode.zone.$NOW"

	echo
	echo "Now execute the following commands on the prompt of your Edgerouter"
	echo
	echo "configure"
	echo ". ./nwgs.sh"
	echo "commit"
	echo "save"
	echo "exit"
fi
What will this script do?
- It will check if you give it a parameter with a single country code. For example, nl or dk or de.
- Then it will try to download the network address blocks for the country-code and save it in a file. For The Netherlands (if you give it country-code nl) it will create a file called “nl.zone”.
- Then it will try to write a script for you which creates a network group in the Edgerouter. The file will be called “networkgroup-nl.<date>.sh (if you give it country-code nl).
- The script which is generated in step 3 will be copied to a shorter name “nwgs.sh” for your convenience. You can archive the longer one in step 3 and use the shorter one in this step.
- The zone list used in step 3 will also be archiving for you in a format “nl.zone.<date>” (if you give it country-code nl).
- Finally, you get further instructions to use the script and create the network-group.
Running the script
-
Get this script on your Edgerouter (ssh, scp, sftp) and place it in a directory of your likings. I place it in my $HOME on the router.
-
Name the script “create_networkgroup_countrycode.sh”
-
Make sure the script is executable:
chmod +x ./create_networkgroup_countrycode.sh -
Run the script (in this example for The Netherlands, i.e., nl):
./create_networkgroup_countrycode.sh nl -
Execute the following commands after the script has run.
configure . ./nwgs.sh commit save exit
A note of warning
For The Netherlands alone it will add 5999 networks to your Edgerouter. (Date: 2024-01-18). To run the generated network group script with the above command . ./nwgs.sh will take you some 18 minutes on the router. The following step commit will take you another 9 minutes on the router. If you now open your Edgerouter GUI, you will see the steps created a network-group called “nl.zone” of 5999 items. To open this group in the GUI takes a long(er) time. A reboot of the router takes 25 minutes with 5999 networks, don’t think your router is bricked…. It just needs loads of time to boot with this kind of lists.
What is next?
Now you have your network-group called “nl.zone” (for this example) in the Edgerouter. You can use it like any other resource in a firewall rule. You can now allow this network-group through your firewall and block all others that are not in this group (so allow only this country to your webserver or whatever). Or you can block this network-group from your webserver and allow all other countries. It’s up to you.
Adding a complete provider to a network-group in EdgeOS
Maybe for you, it is not necessary to allow or block complete countries. I started using the following method, to only allow certain providers in my country to reach my webserver. Why? First, I only share this content with family members so not all networks are needed to achieve this. Second I did not like the long boot times of the Edgerouter with a complete country list. It was not necessary for me to allow a complete country to my server, I just wanted my family members. Why didn’t you just allow their home IP address of their ISP, you would say? Well, they are dynamic, and I would rather not revise the rules often. So I allow their complete provider.
For this solution, I used to following URL’s, but maybe you have beter ones on the internet.
https://www.nirsoft.net/countryip/nl_owner.html
- Nirsoft gives a nice overview of all the providers with the IP-addressblocks.
- ASNTOOL helps to get all the networks in an Autonomous System.
- TEXTCLEAR helps to clean up the list you get from ASNTOOL.
- NETWORKSDB is an example of a website to find your ASN.
ASN stands for Autonomous System Number in networks. It is a unique identifier that is globally available and allows an autonomous system (AS) to exchange routing information with other ASes. An AS is a large network or group of networks that operates under a single routing policy. Each AS is assigned a unique ASN, which is a number used to differentiate and identify the AS in the global routing system. ASNs are essential for network operators to control routing within their networks and facilitate the exchange of routing information.
Save the following script in the $HOME of your Edgerouter (or any directory of your likings). And give it the name “create_networkgroup_asn.sh”.
#!/bin/bash

# Name: create_networkgroup_asn.sh
# Coder: Marco Janssen (mastodon [@marc0janssen@mastodon.online](https://micro.blog/marc0janssen@mastodon.online))
# date: 2024-01-17 21:30:00
# update: 2024-01-31 20:50:00

print_usage() {
  echo "No parameters provided. Provide an ASN with IP blocks. Example: AS1136."
}

create_networkgroup_script() {
  local asn
  local temp_filename
  local output_filename
  local archive_filename
  local networkgroup_script_filename

  asn="$1"
  temp_filename=".temp.txt"
  output_filename="$asn.txt"
  archive_filename="$asn.$NOW.txt"
  networkgroup_script_filename="networkgroup-$asn.$NOW.sh"

  echo "*** Writing new $asn output"
  whois -h whois.radb.net -- "-i origin $asn" | grep -Eo "([0-9.]+){4}/[0-9]+" | uniq -s 0 > "$temp_filename"

  echo "*** Getting owner of $asn"
  local owner
  owner=$(whois -h whois.radb.net -- "-i origin $asn" | grep "^descr:" | awk '{print $2}' | sort | uniq -c | sort -nr | head -1 | awk '{ print $NF }')
  echo "--- Owner of $asn: $owner"

  echo "*** Checking for changes in $asn"
  if [[ -f "$output_filename" && $(diff "$output_filename" "$temp_filename") == "" ]]; then
    echo "--- No Changes in $asn"

    echo "*** Cleaning temporary output"
    rm "$temp_filename"

  else
    echo "*** Writing networkgroup script for $asn"
    cat <<EOF >"$networkgroup_script_filename"
delete firewall group network-group $asn
set firewall group network-group $asn description "All networks $asn by $owner on $NOW"
$(sed -e "s/^/set firewall group network-group $asn network /" "$temp_filename")
EOF

    cp "$networkgroup_script_filename" nwgs.sh

    echo "*** Archiving $asn output"
    cp "$temp_filename" "$archive_filename"
    mv "$temp_filename" "$output_filename"

    echo
    echo "Now execute the following commands on the prompt of your Edgerouter"
    echo
    echo "configure"
    echo ". ./nwgs.sh"
    echo "commit"
    echo "save"
    echo "exit"
  fi
}

main() {
  if [[ $# -eq 0 ]]; then
    print_usage
  else

    NOW=$(date +"%Y%m%d")
    ASN="$1"

    readonly NOW
    readonly ASN

    create_networkgroup_script "$ASN"
  fi
}

main "$@"
What will this script do?
- It will check if you give it a parameter with the name your ASN. For example, AS1136.
- Write a textfile with all the networks in the AS
- Try to get the owner of an AS
- Then it will try to write a script for you which creates a network group in the Edgerouter. The file will be called “networkgroup-AS1136.<date>.sh (if you give it ASN AS1136).
- The script which is generated in step 4 will be copying to a shorter name “nwgs.sh” for your convenience. You can archive the longer one in step 4 and use the shorter one in this step.
- Finally, you get further instructions to use the script and create the net-workgroup.
Running the script
-
Find the ASN you like to use for your network group. This can be done, for example, with the following site to find your ASN: https://networksdb.io/
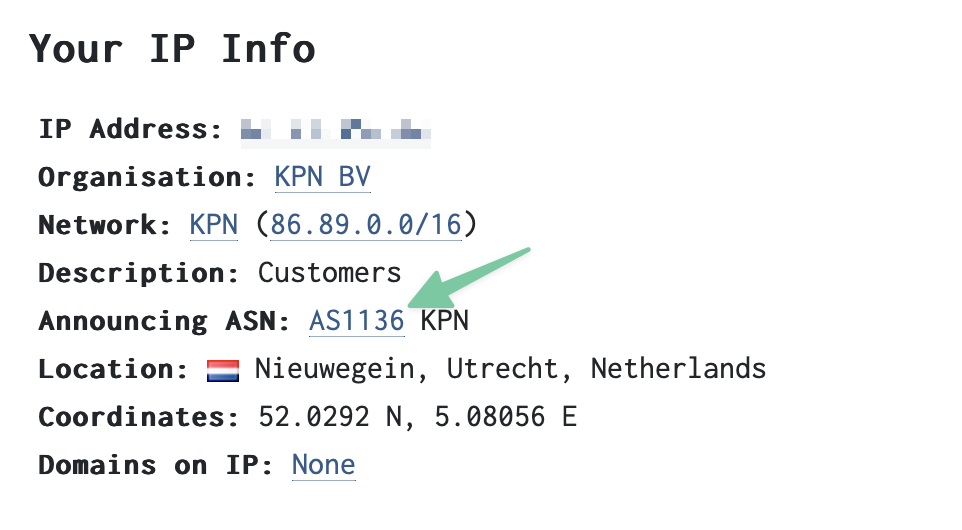
Another way to get and ASN for your desired provider is to look up their IPblocks. I do this with a site from Nirsoft, https://www.nirsoft.net/countryip/nl.html. Here with the IPblocks for The Netherlands. If you want to have the ASN for a provider called “Alma International B.V.” for example, you just take the first available IP-address in their block “2.16.0.1”.
-
Get the above script on your Edgerouter (ssh, scp, sftp) and place it in a directory of your likings. I place it in my $HOME on the router.
-
Name the script “create_networkgroup_asn.sh”
-
Make sure the script is executable:
chmod +x ./create_networkgroup_asn.sh -
Run the script (in this example for Alma International B.V., i.e., AS20940):
./create_networkgroup_asn.sh AS20940 -
Execute the following commands after the script has run.
configure . ./nwgs.sh commit save exit
A note
These network-groups are considerably smaller, I don’t really notice any extra boottime of the router.
What is next?
Now you have your network-group called “AS20940” (for this example) in the Edgerouter. You can use like it like any other resource in a firewall rule. You can now allow this network-group through your firewall and block all others that are not in this group (so allow only this provider to your webserver or whatever). Or you can block this network-group from your webserver and allow all other providers. It’s up to you.
📝
📟Pretty Good Privacy with keybase.io
2020 : This post is obsolete since Keybase was acquired by Zoom.
Used PGP back in the 90s just because it was possible. The internet was growing, and my friends and I liked to experiment in those days with all that we found on the internet. PGP was one of those things. We had great fun back then, but never used it again the following decades.
But a few days ago I saw a talk from Mike Godwin about privacy on the internet. He pointed out https://www.keybase.io/ in his talk as a start to set up PGP and ways to communicate with him.
I got curious again about PGP and Keybase.io, and I had no trouble at all to quickly set up an account and a PGP key pair with these guys. They have nice low-level tooling to encrypt and decrypt messages on their website.
What I wanted again was a way to have my email encrypted, like I had back then in the 90s when my friends and I played around with it. I found a great tutorial on the internet from the Electronic Frontier Foundation on how to het PGP setup on a MAC.
It is set up with Thunderbird Mail Client and within this tutorial they let you generate a PGP key pair with GnuPG. Which will do the job, but I wanted to set it up with my Keybase.io key pair. I needed to export my Keybase.io key pair to the GnuPG keychain.
Reading the docs at their site, I found out that I could pull my Keybase.io Key to GnuPG keychain by the following command.
keybase pgp pull-private --all
But this gave me the following error
▶ ERROR .keys doesn't exist
Just following this workaround to fix it.
Make sure that in the linked device to your keybase.io account, the option “Forbid account changes from the website” is disabled in the advanced settings. By disabling this option, more possibles are enabled on the keybase.io site. One of them is to export your private key.
After you have disabled this option on your device, go to the website of keybase.io and visit your profile page. And find an “edit” link behind the signature of the public key. Select the edit link, and you get the option to export your private key.
Copy the key and save it to your desktop. Use the following command to import the private key to the GnuPG keychain. Where “Private_Key.asc” holds your private key.
gpg2 --allow-secret-key-import --import Private_Key.asc
Also save your public key to your desktop. And import this one with the following command. Where “Public_Key.asc” holds your public key.
gpg2 --import Public_Key.asc
This serie of actions will replace the generation of a PGP key pair with GnuPG and import your keybase.io key pair.
Don’t forget to delete your private key from your desktop.
Make sure it’s cleaned up!
Now finish the thunderbird tutorial from EFF with the keybase.io key pair. And you have a PGP mailclient setup with keybase.io. There is also a nice integration possible with the macOS MAIL.APP with https://gpgtools.org, but this requires a paid license. Whatever suites your needs.
Ok, I hope this helps you.
Find me here on keybase.io and if you like to send me a PGP encrypted email, here is my public key. But this one can also be found on keybase.io.
Oh, and don’t forget to send me your public key or your keybase.io profile page, so I can download your public key if you shared it. If you want a message back, of course ;-).
Use the following command to pull in my public key in your GnuPG keychain. And a follow on keybase.io.
curl https://keybase.io/marc0janssen/pgp_keys.asc | gpg2 --import

keybase follow marc0janssen
Thanks for reading! 📝🖋️
👨🏽💻Starbit Commander
This game is my first coding for The BBC Micro:bit. The goal is to have a nice target to practice and learn microPython on this device. But first I wanted to have a go on the makeCode editor for the Micro:bit.
I made this simple little game. Flying a spaceship through an astroid field. Occasionally, a blinking power-up will appear. This gives the advance to survive an astroid collision. Catching two power-ups will destroy all astroids in the field. Astroids will speed up in time, but slow down if a double power-up is acquired.

To edit this repository in MakeCode.
- Open https://makecode.microbit.org/
- Click Import and select Import URL
- Paste https://github.com/marc0janssen/starbit-commander
- Select import
🎮🖖🏻🚀
👨🏽💻Simple Simon Says
The game Simon in the late 70s was maybe the first “computer” game I played. Well, perhaps it was a real computer. I was just a kid, but the game always stayed with me. In my mind, that is. The game was from a friend, and we played it for ages.
Now with the Micro:bit I wanted to revive this memory and use the Micro:bit as a vehicle to get this to life again. Below is my make code attempt. I used a Micro:bit version2 for this.
This Simon listens to Button A, Button B, Button C (the touch sensitive logo), Button D (= Button A+B).
It was fun to create and a good way to set me off with the possibilities of the Micro:bit…

To edit this repository in MakeCode:
- open https://makecode.microbit.org/
- Click Import and select Import URL
- paste https://github.com/marc0janssen/simple-simon-says
- select import 🎮📝🖌️
📺Setting Up Jellyseerr for Emby
Jellyseerr is a free and open source software application for managing requests for your media library. It is a a fork of Overseerr built to bring support for Jellyfin & Emby media servers! Follow this link for more info.
Docker
Docker-compose.yml
version: '3'
services:
    jellyseerr:
       image: fallenbagel/jellyseerr:latest
       container_name: jellyseerr
       environment:
            - TZ=Europe/Amsterdam
            - JELLYFIN_TYPE=emby
       ports:
            - 5055:5055
       volumes:
            - /path/to/dir/config:/app/config
       restart: unless-stopped

docker-compose -p "jellyseerr" -f /path/to/file/docker-compose.yml up -d --remove-orphans
Swag
NGINX - jellyseerr.subdomain.conf
The following code should be included in file at the following location: /path/to/dir/swag/config/nginx/proxy-confs/jellyseerr.subdomain.conf
The trick is to copy the jellyseerr.subdomain.conf.sample file to jellyseerr.subdomain.conf. You can create a new file from scratch, but the Swag startup could complain the file does not have to correct timestamp. This is a warning not a “showstopper”.
## Version 2022/09/08
# make sure that your dns has a cname set for jellyseerr and that your jellyseerr container is named jellyseerr

server {
    listen 80;
    server_name jellyseerr.*;
    return 301 https://$server_name$request_uri;
}

server {
    listen 443 ssl http2;
    server_name jellyseerr.*;
        server_name jellyseerr.yourdomain.com;
        resolver 1.1.1.1 1.0.0.1 valid=300s;
        resolver_timeout 10s;
        gzip on;
        gzip_vary on;
        gzip_min_length 1000;
        gzip_proxied any;
        gzip_types text/plain text/css text/xml application/xml text/javascript application/x-javascript image/svg+xml;
        gzip_disable "MSIE [1-6]\.";

    location / {
            proxy_pass http://192.168.1.1:5055;
            proxy_read_timeout    90;
            proxy_connect_timeout 90;
            proxy_redirect        off;
            proxy_set_header      Host $host;
            proxy_set_header      X-Real-IP $remote_addr;
            proxy_set_header      X-Forwarded-For $proxy_add_x_forwarded_for;
            proxy_set_header      Proxy "";
        }

        proxy_set_header Host $http_host;
        proxy_set_header X-Forwarded-For $remote_addr;
        proxy_set_header X-Forwarded-Proto $scheme;
}
fail2ban - jail.local
Add the configuration below to the file: /path/to/dir/swag/config/fail2ban/jail.local
The path /jellyseerr_log/ should be added to your docker-compose.yml of SWAG.
This config let the intruder try 3 times, if failed within 10 minutes they’re blocked for 1 hour. IP’s from 192.168.1.0/24 are ignored.
[jellyseerr]

enabled		= true
filter		= jellyseerr
port		= http,https
logpath		= /jellyseerr_log/overseerr-*.log
maxretry	= 3
findtime	= 10m
bantime		= 1h
ignoreip	= 192.168.1.0/24
fail2ban - jellyseerr.conf
Add the following config to /path/to/dir/swag/config/fail2ban/filter.d/jellyseerr.conf
# Fail2Ban for jellyseerr
#
#


[Definition]

failregex = \[info\]\[Auth\]: Failed login attempt from user with incorrect Jellyfin credentials \{"account":\{"ip":"<HOST>","email":".*","password":"__REDACTED__"\}\}
ignoreregex =
📺🎮
🛜OpenWRT and Common Internet File System (CIFS)
This protocol is based on the widely used samba protocol. CIFS is a network protocol for sharing files, printers, serial ports, and other communications between computers. I gonna use this protocol to connect my NAS device to my OpenWrt-powered box.
Installing the packages
To get everything up and running, we need to install the following package on the linksys device, kmod-cifs_2.4.30-brcm-5_mipsel.ipk. If you wish, you can also install the mount helper package, cifsmount_1.5-2_mipsel.ipk. I decided not to do so.
A quick check
If we want to do a quick check if all is working, follow the following procedure.
root@Hellhound:~# insmod cifs
Using /lib/modules/2.4.30/cifs.o
Make a directory to mount the share on the remote machine.
root@Hellhound:~# mkdir /tmp/mnt
Now we can try to mount the share.
root@Hellhound:~# mount -t cifs //192.168.1.2/share /tmp/mnt -o unc=\\\\192.168.1.2\\share,ip=192.168.1.2,user=admin,pass=geheim ,dom=workgroup
Just double check it is mounted.
root@Hellhound:~# df
//192.168.1.2/share243748864 46485504 197263360 19% /tmp/mnt
Setting up the system
The above mount command is a hell of a command to execute every time you need your NAS device to be connected to your OpenWrt box. So, we are going to make life a little easier for yourself. We will edit the /etc/fstab. If you don’t have a fstab file, make one now. To the fstab file, we add the following line.
//192.168.1.2/share /mnt/bulky cifs unc=\\192.168.1.2\share, ip=192.168.1.2,user=admin,password=geheim,dom=workgroup,rw 0 0
The cifs kernel module does not need to loaded separately. The package also installs the file /etc/modules.d/30-cifs. This will load the module at boot-time. Now we can mount the share with the following command.
root@Hellhound:~# mount /mnt/bulky
Since OpenWrt does not execute the command
mount -a
at boot-time, the configured mount points in fstab are not automagicly mounted at boot-time. To solve this, I added the mount command.
mount /mnt/bulky
to the file /etc/init.d/S95custom-user-startup. 📚📖🎮
🛜OpenWRT and SNMP bandwidth monitor
I would appreciate it if we could monitor the bandwidth of the network devices in our wrt54gs. To do so, we need SNMP enabled on our device and some kind of application to monitor the snmp messages. I choose PRTG to monitor the SNMP messages sent.
Installing the package
We need to install the snmp daemon on OpenWrt. So, we require the following package, snmpd_5.1.2-2_mipsel.ipk. Optionally, you van install the package snmp-utils_5.1.2-2_mipsel.ipk. Since I have my router modded with the MMC/SD card mod, I am going to install the package on this card with the following command.
root@Hellhound:~# ipkg -d opt install snmpd_5.1.2-2_mipsel.ipk
In my case, this will install the package on the mount point /opt. I will refer to this in the paper. Change it to your setup accordingly.
Set up the package
Now we need to set up the snmp package. If you install it in the root of linux, there is no problem. But if you installed op your MMC/SD card you need to take some extra steps. First we have to copy the /opt/etc/default, /opt/etc/init.d and /opt/etc/snmp to the /etc directory. Now we have to copy the file /etc/init.d/snmpd to the file /etc/init.d/S60snmpd. After copying this file, we have to add 2 lines to the script. This is only needed for the ones who have installed the package on the MMC/SD-card. The new file will look like this.
#!/bin/sh

export PATH=/bin:/sbin:/usr/bin:/usr/sbin:/opt/bin:/opt/sbin:
/opt/usr/bin:/opt/usr/sbin
export LD_LIBRARY_PATH=/lib:/usr/lib:/opt/lib:/opt/usr/lib

DEFAULT=/etc/default/snmpd
LIB_D=/var/lib/snmp
LOG_D=/var/log
RUN_D=/var/run
PID_F=$RUN_D/snmpd.pid

[ -f $DEFAULT ] && . $DEFAULT

case $1 in
start)
[ -d $LIB_D ] || mkdir -p $LIB_D
[ -d $LOG_D ] || mkdir -p $LOG_D
[ -d $RUN_D ] || mkdir -p $RUN_D
snmpd $OPTIONS
;;
stop)
[ -f $PID_F ] && kill $(cat $PID_F)
;;
*)
echo "usage: $0 (start|stop)"
exit 1
esac
exit $?
You can also follow the instructions on this page. You will need the script in paragraph 4.3. So, you don’t have to follow the instructions pointed out above here. Just follow the instructions on that page in paragraph 4.3.
What’s next?
You can now reboot your router and the snmpd daemon will start automatically. Now it is time to set up a monitoring tool. I used PRTG, but there are others around. It is out of the scope of this paper to describe the use of PRTG. There is enough material around to help you on that one. 📝🖋️
🛜OpenWRT and Snort
Set up snort on OpenWrt
After installing the MMC/SD card mod, I have enough room to install snort on my wrt54gs. So, this paper will assume that the package will be set up on the MMC/SD card. Which is mounted on /opt. You can read about setting up the MMC/SD card on this page.
Installing the package
To install snort on your wrt54gs install the following package
root@Hellhound:~# ipkg -d opt install snort_2.4.4-1_mipsel.ipk
This will install snort in the directory /opt.
Remote syslog
I want snort to log all its messages to a remote syslog server. I already discussed this on the page which discussed using fwbuilder with OpenWrt. Look on this page to set up wallwatcher.
Downloading rules files
We need to get some rule files. These rule files can be downloaded from the snort website. Download the snort 2.4 rule files from this website. These rule files need to be unpacked in the directory /opt/etc/snort/rules/
root@Hellhound:~# tar zxf snortrules-pr-2.4.tar.gz
Setting up snort
Now we have to set up the snort.conf file. In this file, many snort settings are configured. We want to set up snort in a way it will log all messages to our remote syslog, it this case wallwatcher. The first thing we have to do is to set the option HOME_NET
var HOME_NET 192.168.1.0/24
Next, we have to uncomment a line in the snort.conf file.
output alert_syslog: LOG_AUTH LOG_ALERT
We need to change the rules path
var RULE_PATH /opt/etc/snort/rules
At the bottom of the snort.conf there are a lot of rule files included. Make sure you comment all the rule files at first. Just to make sure that we do not flood the memory of the wrt54gs and hang the device when we start snort.
Make the directory snort in the directory /var/log
root@Hellhound:~# mkdir /var/log/snort
Giving snort a test run
To check if snort is running correctly on your device, give the following command on the prompt and open a website in your favorite browser.
root@Hellhound:~# snort -v -i vlan1
This will give you the following output
01/25-22:02:12.344117 195.37.77.141:80 -> 10.0.0.100:2053
TC`1 P TTL:46 TOS:0x0 ID:55048 IpLen:20 DgmLen:40 DF
***A**** Seq: 0xC5D2F3DE Ack: 0xBD63343B Win: 0x5B4 TcpLen: 20
=+=+=+=+=+=+=+=+=+=+=+=+=+=+=+=+=+=+=+=+=+=+=+=+=+=+
End the test run by pressing crtl-C.
Running Snort
Now we know snort runs okay, we set up the rule files. These can be uncommented at the bottom of the /opt/etc/snort/snort.conf file. I would advise you to enable the rule files one by one and keep an eye on your memory usage. After each run of snort check your memory and determine if you can enable another rule. Run snort with the following command.
root@Hellhound:~# snort -c /opt/etc/snort/snort.conf -i vlan1&
Check your memory usage by the following command
root@Hellhound:~# top
If snort is detecting any “bad” traffic, it will be logged to your remote syslog server.
Checking your setup
Snort can be quiet sometimes, how do we check if snort is doing its job?? To check your setup, kill the snort proces that is running at the moment. Make sure you have the LOCAL.RULES enabled in the snort.conf file. Then edit local.rules and add the following line of code.
alert ip any any -> any any (msg:"Got an IP Packet"; classtype:not-suspicious; sid:2000000; rev:1;)
Now start snort with the following command
root@Hellhound:~# snort -c /opt/etc/snort/snort.conf -i vlan1&
And keep a good eye on your remote syslog server…. I will start logging network traffic. 📝🖋️
🛜OpenWRT and Traffic Monitor
A nice way of keeping track of your traffic is vnstat. This beauty is found in the repository of white russian. On the website of the author of vnstat you can find a complete reference of the possibilities of vnstat.
Installing the package
You can get this fine piece of software on your router by installing the following package provided by OpenWrt, vnstat_1.4-1_mipsel.ipk. On the OpenWrt forum a guy called arteqw made a impressive setup to be used with the x-wrt webif^2. I will add his setup in the next paragraphs.
Prepare OpenWrt
After installing the package, we need to create the “database” to collect our data. First, we need to create a directory to hold the database.
mkdir /var/lib/vnstat
Now we create the database in this directory. So first change to this directory before executing the command. We will be creating a database on the WAN device of the router.
vnstat -u -i vlan1
We also want this setup to survive a reboot, so in the /etc/init.d directory we edit the file S95custom-user-startup.
mkdir -p /var/lib/vnstat
vnstat -u -i vlan1
gettraffic.sh
Note: The script gettraffic.sh will be discussed later, for now, we just add this command.
Now we need to get this database to be updated on a regular interval, here cron is helpful. The crontab can be edited by the command crontab -e. In the example below, we update the database every 5 minutes.
*/5 **** vnstat -u -i vlan1
Script gettraffic.sh
The following script must be placed in the directory /usr/sbin and will write the status of the data in the database to a file in the /tmp directory called traffic_stats.inc. This file will be picked up by the web-interface to display the values within the webif^2 interface of OpenWrt.
#!/bin/sh
IFACE_WAN=$(nvram get wan_ifname)
IFACE_LAN=$(nvram get lan_ifname)
IFACE_WLAN=$(nvram get wl0_ifname)

rm /tmp/traffic_stats.inc

echo "<br ><center>" >> /tmp/traffic_stats.inc
vnstat -tr -i $IFACE_WAN | grep -v seconds >> /tmp/traffic_stats.inc
echo "</center><br ><b ><th>Hourly at $IFACE_WAN[WAN]</th></b ><br ><center>" >> /tmp/traffic_stats.inc

vnstat -h -i $IFACE_WAN | grep -v $IFACE_WAN >> /tmp/traffic_stats.inc
echo "</center><br ><b ><th>Daily at $IFACE_WAN[WAN]</th></b ><br ><center>" >> /tmp/traffic_stats.inc

vnstat -d -i $IFACE_WAN | grep -v $IFACE_WAN >> /tmp/traffic_stats.inc
echo "</center><br ><b ><th>Weekly at $IFACE_WAN[WAN]</th></b ><br ><center>" >> /tmp/traffic_stats.inc

vnstat -w -i $IFACE_WAN | grep -v $IFACE_WAN >> /tmp/traffic_stats.inc
echo "</center><br ><b ><th>Monthly at $IFACE_WAN[WAN]</th></b ><br ><center>" >> /tmp/traffic_stats.inc

vnstat -m -i $IFACE_WAN | grep -v $IFACE_WAN >> /tmp/traffic_stats.inc
echo "</center>" >> /tmp/traffic_stats.inc
Last thing we need to do is to add an entry in the crontab (crontab -e). This entry will run the gettraffic.sh every 5 minutes, so that the file /tmp/traffic_stats.inc will be updated.
*/5 * * * * gettraffic.sh
Web interface add-on
Finally, we need to extend the web interface, so we can see the traffic stats in our browser. To do so, we need to place the file traffic.sh in the directory /www/cgi-bin/webif. This file will pick up the file /tmp/traffic_stats.inc.
#!/usr/bin/webif-page
<?
. /usr/lib/webif/webif.sh
header "Status" "Traffic Statistic" "@TR<<Traffic Statistic>>"
?>
<pre><? cat /tmp/traffic_stats.inc ?></pre>
<? footer ?>
<!--
##WEBIF:name:Status:5:Traffic Statistic
-->
Email stats
I wanted to receive the stats of my router hourly by email. So, I looked at a package called mini-sendmail_1.3.5-1_mipsel.ipk which gives the ability to send emails. In the link section at the top I included the manpage for mini-sendmail. So to get the stats by email, I added the following line to the crontab.
0 9-16 * * 1-5 cat /tmp/traffic\_stats.inc | mini\_sendmail -fsend@domain.org -ssmtp.server.org receive@domain.org
This crontab entry will email the contents of /tmp/traffic_stats.inc to the address receive@domain.org. It will be emailed every full hour between 09:00 and 16:00 from Monday to Friday. 📝🖋️
🛜OpenWRT and Dynamic DNS
Having the major dynamic DNS services provide me with a domain name for my internet connection, I configured updatedd on my OpenWrt box. I stopped using ez-ipupdate because this application did not seem to pick up the WAN address of my ADSL router, but picked up the address of my wrt54gs and set that address to be my external address. Which gave problems, of course. Therefore I started to use updatedd which also supports all major dynamic DNS service providers.
Installing the packages
To get updatedd up and running, you need to install the package updatedd_2.5-1_ mipsel.ipk. Since I like to use the provider dyndns.org en no-ip.org I also installed the following packages updatedd-mod-noip_2.5-1_mipsel.ipk and updatedd-mod-dyndns_2.5-1_mipsel.ipk.
Update your IP
Now all the needed packages are installed. Now it’s time to update your IP with the chosen providers, for me, this is no-ip.org and dyndns.org.
updatedd noip username:password nodename.bounceme.net
updatedd dyndns username:password nodename.homeftp.org
Update your IP regularly
Now we want this action to be updated regularly. This means cron will be helpful. To edit cron you can use the command crontab -e. Which uses the VI commands to edit the content. I set up cron in the following way.
0 0 * * * updatedd noip username:password nodename.bounceme.net
0 0 * * * updatedd dyndns username:password nodename.homeftp.org
This will update my dynamic DNS accounts every day at midnight. 📝✏️
🛜OpenWRT, fwbuilder and wallwatcher
Installing the right packages
To get the fwbuilder generated scripts up and running on a OpenWrt powered device, you need to install a few packages. Those packages are found in de standard repository of white russian. The packages you need to install from that repository are ip_2.6.11-050330-1_mipsel.ipk, iptables-mod-extra_1.3.3-2_mipsel.ipk and iptables-utils_1.3.3-2_mipsel.ipk
Editing /etc/firewall.user
I am using a SquashFS version of OpenWrt. This means that the real filesystem is readonly and that all files are available with symbolic links on a writeable JFFS filesystem. What we now need to do is to delete the symbolic link and copy the real file in place of the symbolic link in the /etc directory.
Now we need to add the following code to the firewall.user file.
insmod ipt_LOG
insmod ipt_limit

if [not -f /usr/sbin/firewallscript.fw ] ; then
{orginal script}
else /usr/sbin/firewallscript.fw
fi
Now you have to place your firewall script in the /usr/sbin directory (or place it at a location of your choice, but you will have to edit the code above to match your location).
Instead of adding the two insmod lines in the firewall.user file, you can also edit the file /etc/modules. You can just edit the file like the example below.
ipt_LOG
ipt_limit
Remote syslog with wallwatcher
Now we have to set up remote syslog, so we can log the output of your firewall script with wallwatcher. Remember to put some rules in fwbuilder on logging, otherwise we will never log a thing. You need to set up OpenWrt to use a remote syslog server. You need to replace the xxx.xxx.xxx.xxx with the ip-address of the system that will be running wallwatcher.
nvram set log_ipaddr=xxx.xxx.xxx.xxx
nvram commit
The only thing you have to do next is to set up wallwatcher router tab
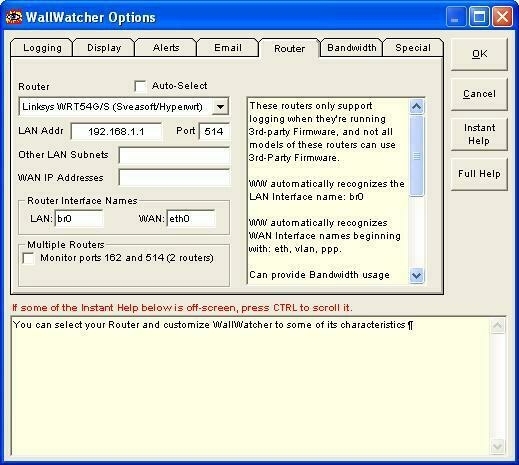
Change Startup order
With the RC5 release of OpenWrt all was working just fine, but when I started to use the RC6 version of OpenWrt I discovered that the firewall script was not executed after a reboot of the router. The problem seemed to be that the /etc/init.d/S35Firewall is executed before /etc/init.d/S40Network. So, When I renamed /etc/init.d/S35Firewall in /etc/init.d/S45Firewall and rebooted the router, the firewall script was executed and all worked just fine. 📝🖋️
📟Fediverse and WordPress
What is it?
ActivityPub is the glue or the oil, if you like, for the Fediverse. It glues all the services together in the Fediverse. It lets mastodon servers communicate with each other, but it also lets Pixelfed talk with mastodon and vice versa. All the social media that is ActivityPub aware can exchange messages with each other.
WordPress
WordPress is by its nature not ActivityPub aware. So, it can’t exchange messages with the Fediverse. But there is a solution. Matthias Pfefferle created a WordPress plugin to connect WordPress to the Fediverse. This enables you to get your WordPress posts across the Fediverse.
What do you need
- Webfinger WordPress Plugin installed on your WordPress instance;
- ActivityPub WordPress Plugin installed on your WordPress instance.
Setup
There is not much needed to get this working. Installed both plugins. The ActivityPub plugin has default settings that could work for you, but fiddle with them if you like. The Webfinger plugin doesn’t need configuration at all. When both plugins are installed, you will see it advises you for 2 more plugins. They are not needed to get ActivityPub working. But will enhance the experience.
Checking the setup
- First check the Site Health under Tools > Site Health. If all is working correctly, you will get no critical errors on this page.
- Go to the Webfinger website and check if you get a JSON response from your ActivityPub plugin by entering the e-mail address at the top. HINT: This is not your regular e-mail address, but the account name and domain name of your WordPress instance. So, if you have an account “Jake” on your WordPress instance at the domain “great.blog.com”, your “e-mail address” will be jake@great.blog.com. You can enter it at the top of the page. As a result, you should get a JSON response.
- Go to your Mastodon account and search for your WordPress account (i.e., jake@great.blog.com) in the search bar of Mastodon.
Dos and Don’ts and Hints
- Don’t install a cache enhancing plugin. It will mess with the ActivityPub or Webfinger Plugin. You will see critical errors after a while in your Site Health menu.
- I found that https://mastodon.social messes with the avatar. It will not come through, even after a few posts on WordPress. I checked a few other mastodon instances (also mastodon.online, which is the other flagship server) they were fine. So, you should be careful with the mastodon server you choose to test this. It could make you think the plugin isn’t working properly.
- Some hosting providers protect the .well-known directory. When this directory is inaccessible for the plugin. It will not work. (This made me host my WordPress instance at home). 📝🖋️